
Task Queue System
The Task Queue System is a modern, flexible automation framework that replaces traditional startup and shutdown scripts with a template-based, configurable task execution system. It provides a visual interface for building sequences of automated operations that can control your observatory equipment through INDI. It is accessible from Ekos Scheduler.
Key Benefits
The Task Queue system offers several advantages over traditional scripting:
Visual Management: Build and monitor task sequences through an intuitive graphical interface
Reusability: Use pre-built templates for common operations without writing code
Error Handling: Built-in retry logic and configurable failure responses
Device Compatibility: Automatic matching of templates to available devices
Progress Monitoring: Real-time status updates and detailed execution logs
Collections: Pre-defined task sets for startup, shutdown, and other common scenarios
Flexibility: Combine templates or create custom variations without programming
When to Use Task Queue
The Task Queue system is ideal for:
Observatory startup and shutdown procedures
Equipment warm-up and cool-down sequences
Between-job operations (e.g., parking mount between scheduler jobs)
Weather response automation
Any repetitive equipment control tasks
You can still use traditional shell scripts when needed through the SCRIPT action type, combining the flexibility of scripting with the structure of the Task Queue.
Key Concepts
Understanding Templates and Tasks
The Task Queue system is built around two fundamental concepts:
- Templates
Templates are reusable blueprints that define what a task should do. They specify:
The sequence of actions to execute
Configurable parameters (with defaults and constraints)
Which INDI device interfaces are supported
Category and description for organization
Templates come in two types:
System Templates: Pre-built templates provided with KStars for common operations (park mount, enable cooling, etc.)
User Templates: Custom templates you create by selecting a device and specifying which property to set or evaluate, along with the target values and conditions
- Tasks
Tasks are specific instances created from templates. When you add a template to the queue, you create a task by:
Selecting which device to use (e.g., which mount or camera)
Setting parameter values (timeouts, target temperatures, etc.)
Optionally scheduling when it should run
Each task in the queue has its own runtime state, tracking its progress and any errors.
Understanding Actions
Each task is composed of one or more actions that execute sequentially. The Task Queue system supports five action types:
- SET Action
Sets an INDI property to a specific value. For example, setting a switch to ON, changing a number property, or updating text. The action can optionally wait for the property state to become OK before completing.
- EVALUATE Action
Waits for a condition to be met by polling an INDI property. Useful for waiting until equipment reaches a target state (e.g., temperature stabilized, mount parked, dome opened). Supports various condition types (equals, greater than, within range, etc.).
- DELAY Action
Pauses execution for a specified duration. Useful for allowing equipment to settle, rate-limiting operations, or adding time-based spacing between actions.
- START Action
Controls when a task begins execution. Can be set to start immediately (ASAP) or at a scheduled date/time. Useful for time-based automation.
- SCRIPT Action
Executes an external script or program. This allows integration of custom logic or operations not directly supported by INDI properties. The action monitors the script’s exit code and captures stdout/stderr for logging.
Action Configuration
All actions support common configuration options:
Timeout: Maximum time to wait for action completion (in seconds)
Retries: Number of retry attempts if the action fails
Failure Action: What to do if the action fails after all retries:
ABORT_QUEUE: Stop the entire queue (default for critical operations)
CONTINUE: Log the error but continue to the next action
SKIP_TO_NEXT_TASK: Skip remaining actions in current task and move to the next task
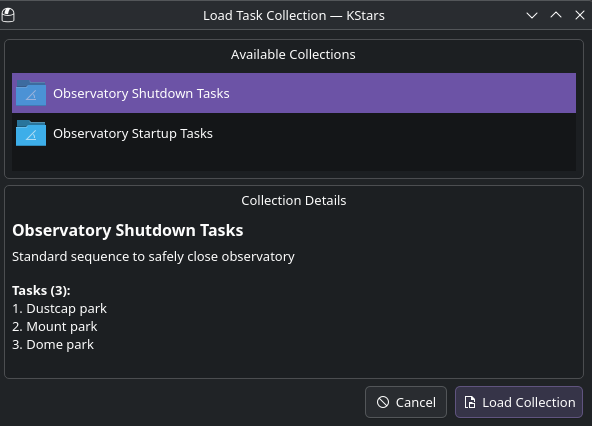
Understanding Collections
Collections are pre-defined sets of tasks designed for common scenarios. They provide quick-start solutions without requiring you to build queues from scratch.
The system provides two collections:
Observatory Startup: Unparks dome, unparks mount, and opens dust cap (if applicable)
Observatory Shutdown: Parks mount, parks dome, and closes dust cap (if applicable)
Collections are loaded as complete queues, ready to execute. You can load a collection and then customize it by adding, removing, or reordering tasks.
Device Interface Matching
Templates specify which INDI device interfaces they support (e.g., Telescope, CCD, Dome, Weather). When you add a template to the queue, the system automatically presents only compatible devices.
For example: - A “Park Mount” template requires the Telescope interface - A “Set Cooling” template requires the CCD interface - A “Set Dome Azimuth” template requires the Dome interface
This ensures you cannot accidentally assign incompatible devices to tasks.
Getting Started
Quick Start: Loading a Collection
The fastest way to start using the Task Queue is to load a pre-built collection:
Open the Ekos Scheduler module
Click the Task Queue or Collections button (location depends on UI integration)
In the Collections dialog, browse available collections:
Observatory Startup: Complete startup sequence for your equipment
Observatory Shutdown: Safe shutdown procedures
Emergency Shutdown: Fast shutdown for weather alerts
Camera Cooling: Controlled camera temperature management
Select a collection and click Load
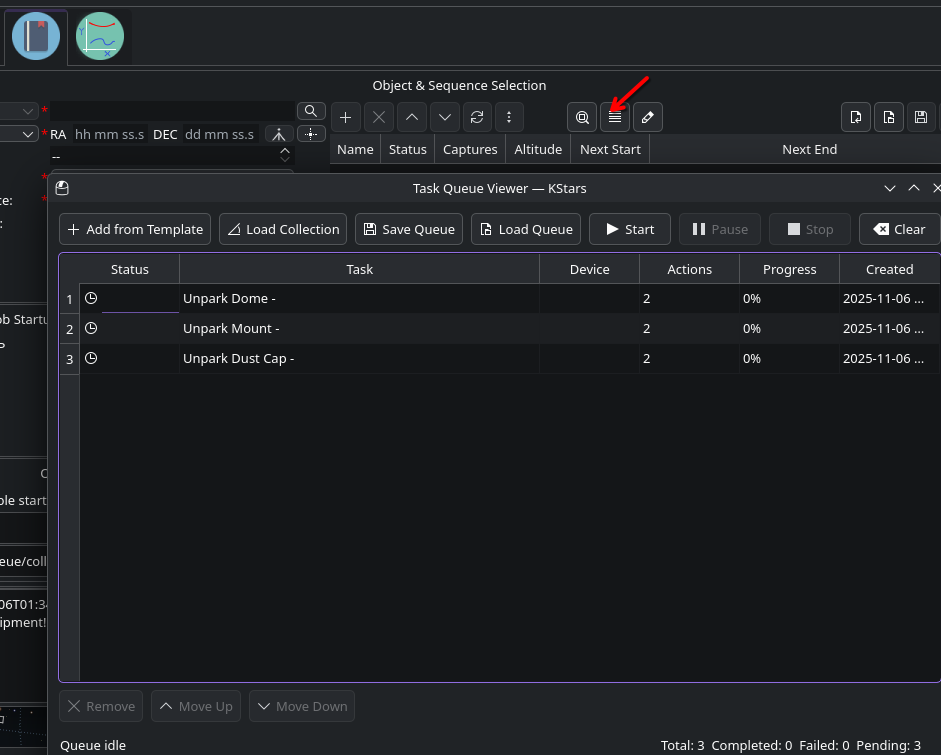
The Queue Viewer will display all tasks in the collection
Review the tasks and customize if needed (see taskqueue-building-queues)
Click Start to execute the queue
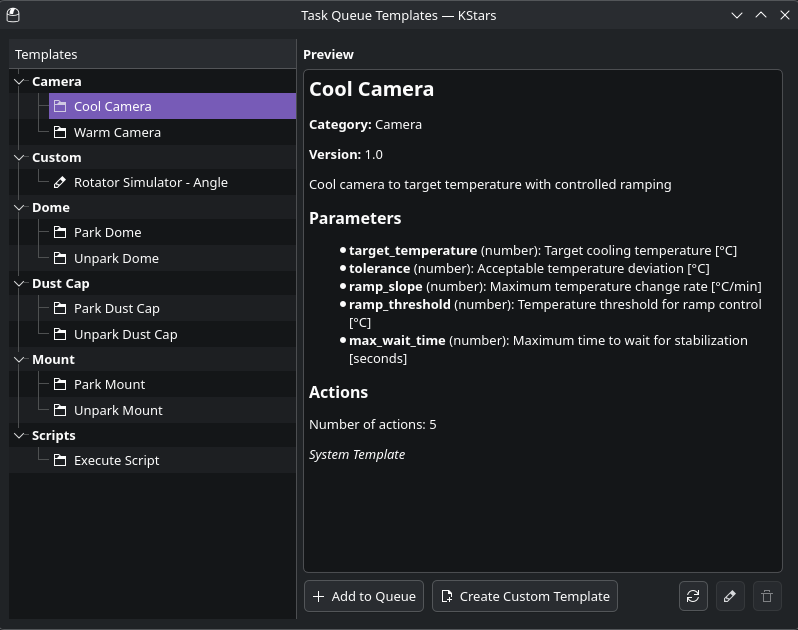
Adding Tasks from Templates
To add a task to your queue:
Click the Add from Template button in the Queue Viewer
The Template Library opens, showing available templates organized by category:
Mount: Park, unpark.
Camera: Cooling, warming.
Dome: Park, unpark
Dust Cap: Park, unpark
Browse or search for the desired template
Select a template to preview its description and parameters
Click Add to Queue or double-click the template
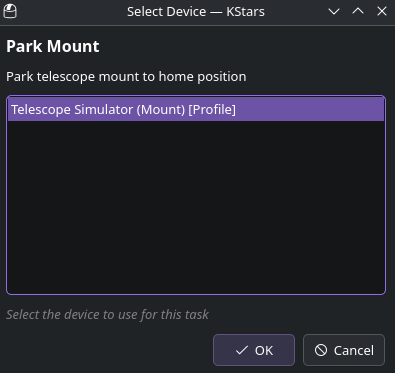
Selecting the Device
After selecting a template, you’ll be prompted to choose which device to use:
The Device Selection dialog appears
Only compatible devices are shown (based on interface matching)
Select the device from the list
Click OK
For example, if you selected a “Park Mount” template, you’ll see only telescope devices. If you have multiple mounts connected, choose which one this task should control.
Customizing Parameters
After device selection, the Parameter Customization dialog opens:
Review the available parameters for this template
Each parameter shows:
Name: Parameter identifier
Description: What this parameter controls
Default Value: Pre-set value from the template
Constraints: Min/max values or allowed options
Unit: Measurement unit (seconds, degrees, °C, etc.)
Modify parameters as needed:
Timeouts: Adjust based on your equipment’s response time
Target values: Set specific temperatures, positions, etc.
Retry counts: Increase for unreliable connections
Click OK to add the configured task to the queue
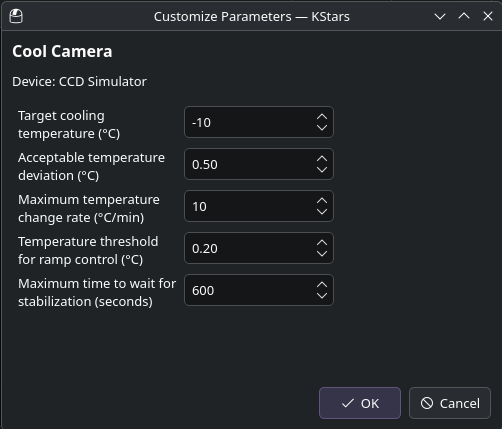
Common parameters you’ll encounter:
timeout: Maximum seconds to wait (default: 30-60s)
retries: Number of retry attempts (default: 2)
target_temp: Target temperature for cameras (°C)
settle_time: Delay to allow equipment stabilization (seconds)
Managing Queue Items
Once tasks are in the queue, you can manage them:
- Reordering Tasks
Select a task in the queue table
Click Move Up or Move Down to change execution order
Tasks execute from top to bottom
- Removing Tasks
Select one or more tasks
Click Remove to delete them from the queue
- Editing Tasks
Double-click a task to view/edit its parameters
Modify device assignment or parameter values
Changes take effect immediately
- Clearing the Queue
Click Clear to remove all tasks
Useful when starting fresh or loading a different collection
Queue Execution
Running the Queue
Once your queue is built, you can execute it:
Review all tasks in the queue to ensure correct order
Click the Start button in the Queue Viewer
The queue begins executing tasks sequentially from top to bottom
Monitor progress in real-time through the status indicators
Queue Controls:
Start: Begin queue execution (only available when queue is idle)
Pause: Temporarily halt execution (current action completes first)
Resume: Continue a paused queue
Stop: Gracefully stop the queue (allows current task to finish)
Abort: Immediately terminate execution (may leave equipment in intermediate state)
Understanding Status Indicators
Each task and action displays a status indicator:
Task Status:
PENDING (Gray): Task waiting to execute
SCHEDULED (Blue): Task scheduled for future time (START action with datetime)
RUNNING (Yellow/Orange): Task currently executing
COMPLETED (Green): Task finished successfully
FAILED (Red): Task failed after all retries
ABORTED (Red): Task manually stopped
SKIPPED (Gray): Task skipped due to conditions
Action Status:
PENDING: Action not yet started
RUNNING: Action currently executing
COMPLETED: Action finished successfully
FAILED: Action failed after retries
ABORTED: Action manually aborted
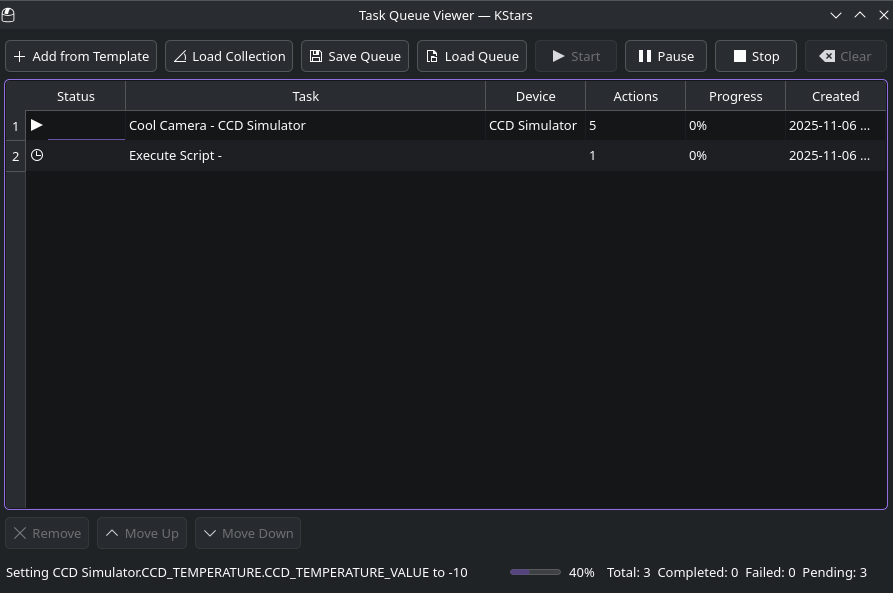
Progress Monitoring
The Queue Viewer provides multiple ways to monitor execution:
- Queue Table
Each task row shows:
Current status icon and text
Device being controlled
Progress percentage
Current action being executed
- Status Bar
Bottom of the window displays:
Overall queue status (IDLE, RUNNING, PAUSED, COMPLETED, ABORTED)
Progress bar showing completion percentage
Statistics: X of Y tasks completed, Z failed
- Log Panel
Detailed execution log shows:
Timestamp for each event
Action start/completion messages
Property changes and INDI communications
Error messages and retry attempts
Script output (for SCRIPT actions)
- Action Details
Expand a task in the table to see:
List of all actions in the task
Status of each action
Current values being set or evaluated
Timeout countdown for long-running actions
Error Handling and Recovery
The Task Queue system includes robust error handling:
- Automatic Retries
When an action fails:
The error is logged with details
The system waits briefly (configurable delay)
The action is retried up to the configured retry count
If all retries fail, the failure action is executed
- Failure Actions
Based on the action’s failure configuration:
- ABORT_QUEUE (Default for critical operations)
Stops the entire queue immediately
Allows safe intervention before continuing
Used for: Mount parking, emergency shutdowns, critical safety checks
- CONTINUE (For non-critical operations)
Logs the error
Proceeds to the next action in the task
Used for: Optional optimizations, best-effort operations
- SKIP_TO_NEXT_TASK
Skips remaining actions in the current task
Continues with the next task in the queue
Used for: When task prerequisites fail but other tasks can still run
- Manual Intervention
During execution, you can:
Pause the queue to investigate issues
Abort a problematic action
Remove or reorder pending tasks
Resume execution after making corrections
- Idempotency
Many actions check if their operation is already complete before executing:
Mount already parked? Skip parking action
Temperature already at target? Skip cooling action
Property already has desired value? Skip set action
This prevents unnecessary operations and supports queue re-runs.
Queue Persistence
Save and Load Queues
You can save queues for later use:
- Saving a Queue:
Build or load a queue
Click Save Queue button
Choose a filename (*.json extension)
The queue file contains all tasks and their configurations
- Loading a Queue:
Click Load Queue button
Select a saved queue file
The queue replaces any existing tasks
Review and start when ready
- Queue File Format
Queue files are JSON-based and include:
Task definitions with device assignments
Parameter values for each task
Task order and scheduling information
Metadata (creation date, description)
Common Use Cases
Observatory Startup Sequence
A typical startup sequence prepares all equipment for imaging:
Example Startup Queue:
Unpark Dome (if applicable)
Template: “Dome - Unpark”
Device: Your dome controller
Timeout: 60 seconds
Failure Action: ABORT_QUEUE (cannot proceed without dome access)
Unpark Mount
Template: “Mount - Unpark”
Device: Your telescope mount
Timeout: 30 seconds
Failure Action: ABORT_QUEUE (critical for all operations)
Enable Mount Tracking
Template: “Mount - Enable Tracking”
Device: Your telescope mount
Timeout: 10 seconds
Failure Action: CONTINUE (can enable later if needed)
Enable Camera Cooling
Template: “Camera - Set Cooling”
Device: Your CCD camera
Parameters: - target_temp: -15°C (adjust for your camera) - ramp_rate: 2°C/minute (prevents thermal shock)
Timeout: 600 seconds (10 minutes for cooling)
Failure Action: CONTINUE (can image without optimal cooling)
Wait for Temperature Stabilization
Template: “Camera - Wait for Temperature”
Device: Your CCD camera
Parameters: - tolerance: ±1°C - settle_time: 60 seconds
Timeout: 300 seconds
Failure Action: CONTINUE
Turn On Flat Panel (if applicable)
Template: “Flat Panel - Enable”
Device: Your flat panel
Failure Action: CONTINUE (optional equipment)
Observatory Shutdown Sequence
A safe shutdown sequence protects equipment and conserves power:
Example Shutdown Queue:
Disable Camera Cooling (Gradual warm-up)
Template: “Camera - Disable Cooling”
Device: Your CCD camera
Parameters: - ramp_rate: 1°C/minute (slow warm-up prevents condensation)
Failure Action: CONTINUE (important but not critical)
Wait for Camera Warm-up
Template: “Camera - Wait for Ambient Temperature”
Parameters: - target: ambient + 2°C - timeout: 900 seconds (15 minutes)
Failure Action: CONTINUE
Park Mount
Template: “Mount - Park”
Device: Your telescope mount
Timeout: 60 seconds
Failure Action: ABORT_QUEUE (critical for safety)
Park Dome (if applicable)
Template: “Dome - Park”
Device: Your dome controller
Timeout: 120 seconds
Failure Action: ABORT_QUEUE (critical for protection)
Turn Off Equipment Power (via script)
Template: “Script - Execute”
Parameters: - script_path: /path/to/power_off.sh
Timeout: 30 seconds
Failure Action: CONTINUE (log error for manual intervention)
Migration from Scripts
Understanding the Transition
The Task Queue system replaces traditional startup/shutdown shell scripts with a more structured approach:
- Traditional Scripts:
Manually written bash/python scripts
Execute commands sequentially
Limited error handling
No visual feedback during execution
Difficult to modify without coding knowledge
- Task Queue System:
Template-based task composition
Visual building and monitoring
Built-in retry and error handling
Progress tracking and status updates
Modifiable through GUI
Converting Script Operations
Common script operations can be converted to Task Queue actions:
INDI Property Changes
- Old Script:
indi_setprop "Telescope.TELESCOPE_PARK.PARK=On"
- New Task Queue:
Template: “Mount - Park”
Action Type: SET
Device: Telescope
Property: TELESCOPE_PARK
Element: PARK
Value: On
Conditional Waits
- Old Script:
while [ $(indi_getprop "CCD.CCD_TEMPERATURE.CCD_TEMPERATURE_VALUE") -gt -10 ]; do
    sleep 5
done
- New Task Queue:
Template: “Camera - Wait for Temperature”
Action Type: EVALUATE
Device: CCD
Property: CCD_TEMPERATURE.CCD_TEMPERATURE_VALUE
Condition: LESS_THAN
Target: -10
Poll Interval: 5 seconds
Time Delays
- Old Script:
sleep 60
- New Task Queue:
Template: “Delay”
Action Type: DELAY
Duration: 60
Unit: SECONDS
External Scripts
- Old Script:
/usr/local/bin/dome_control.sh open- New Task Queue:
Template: “Script - Execute”
Action Type: SCRIPT
Script Path: /usr/local/bin/dome_control.sh
Arguments: open