
FITS Viewer Live Stacker
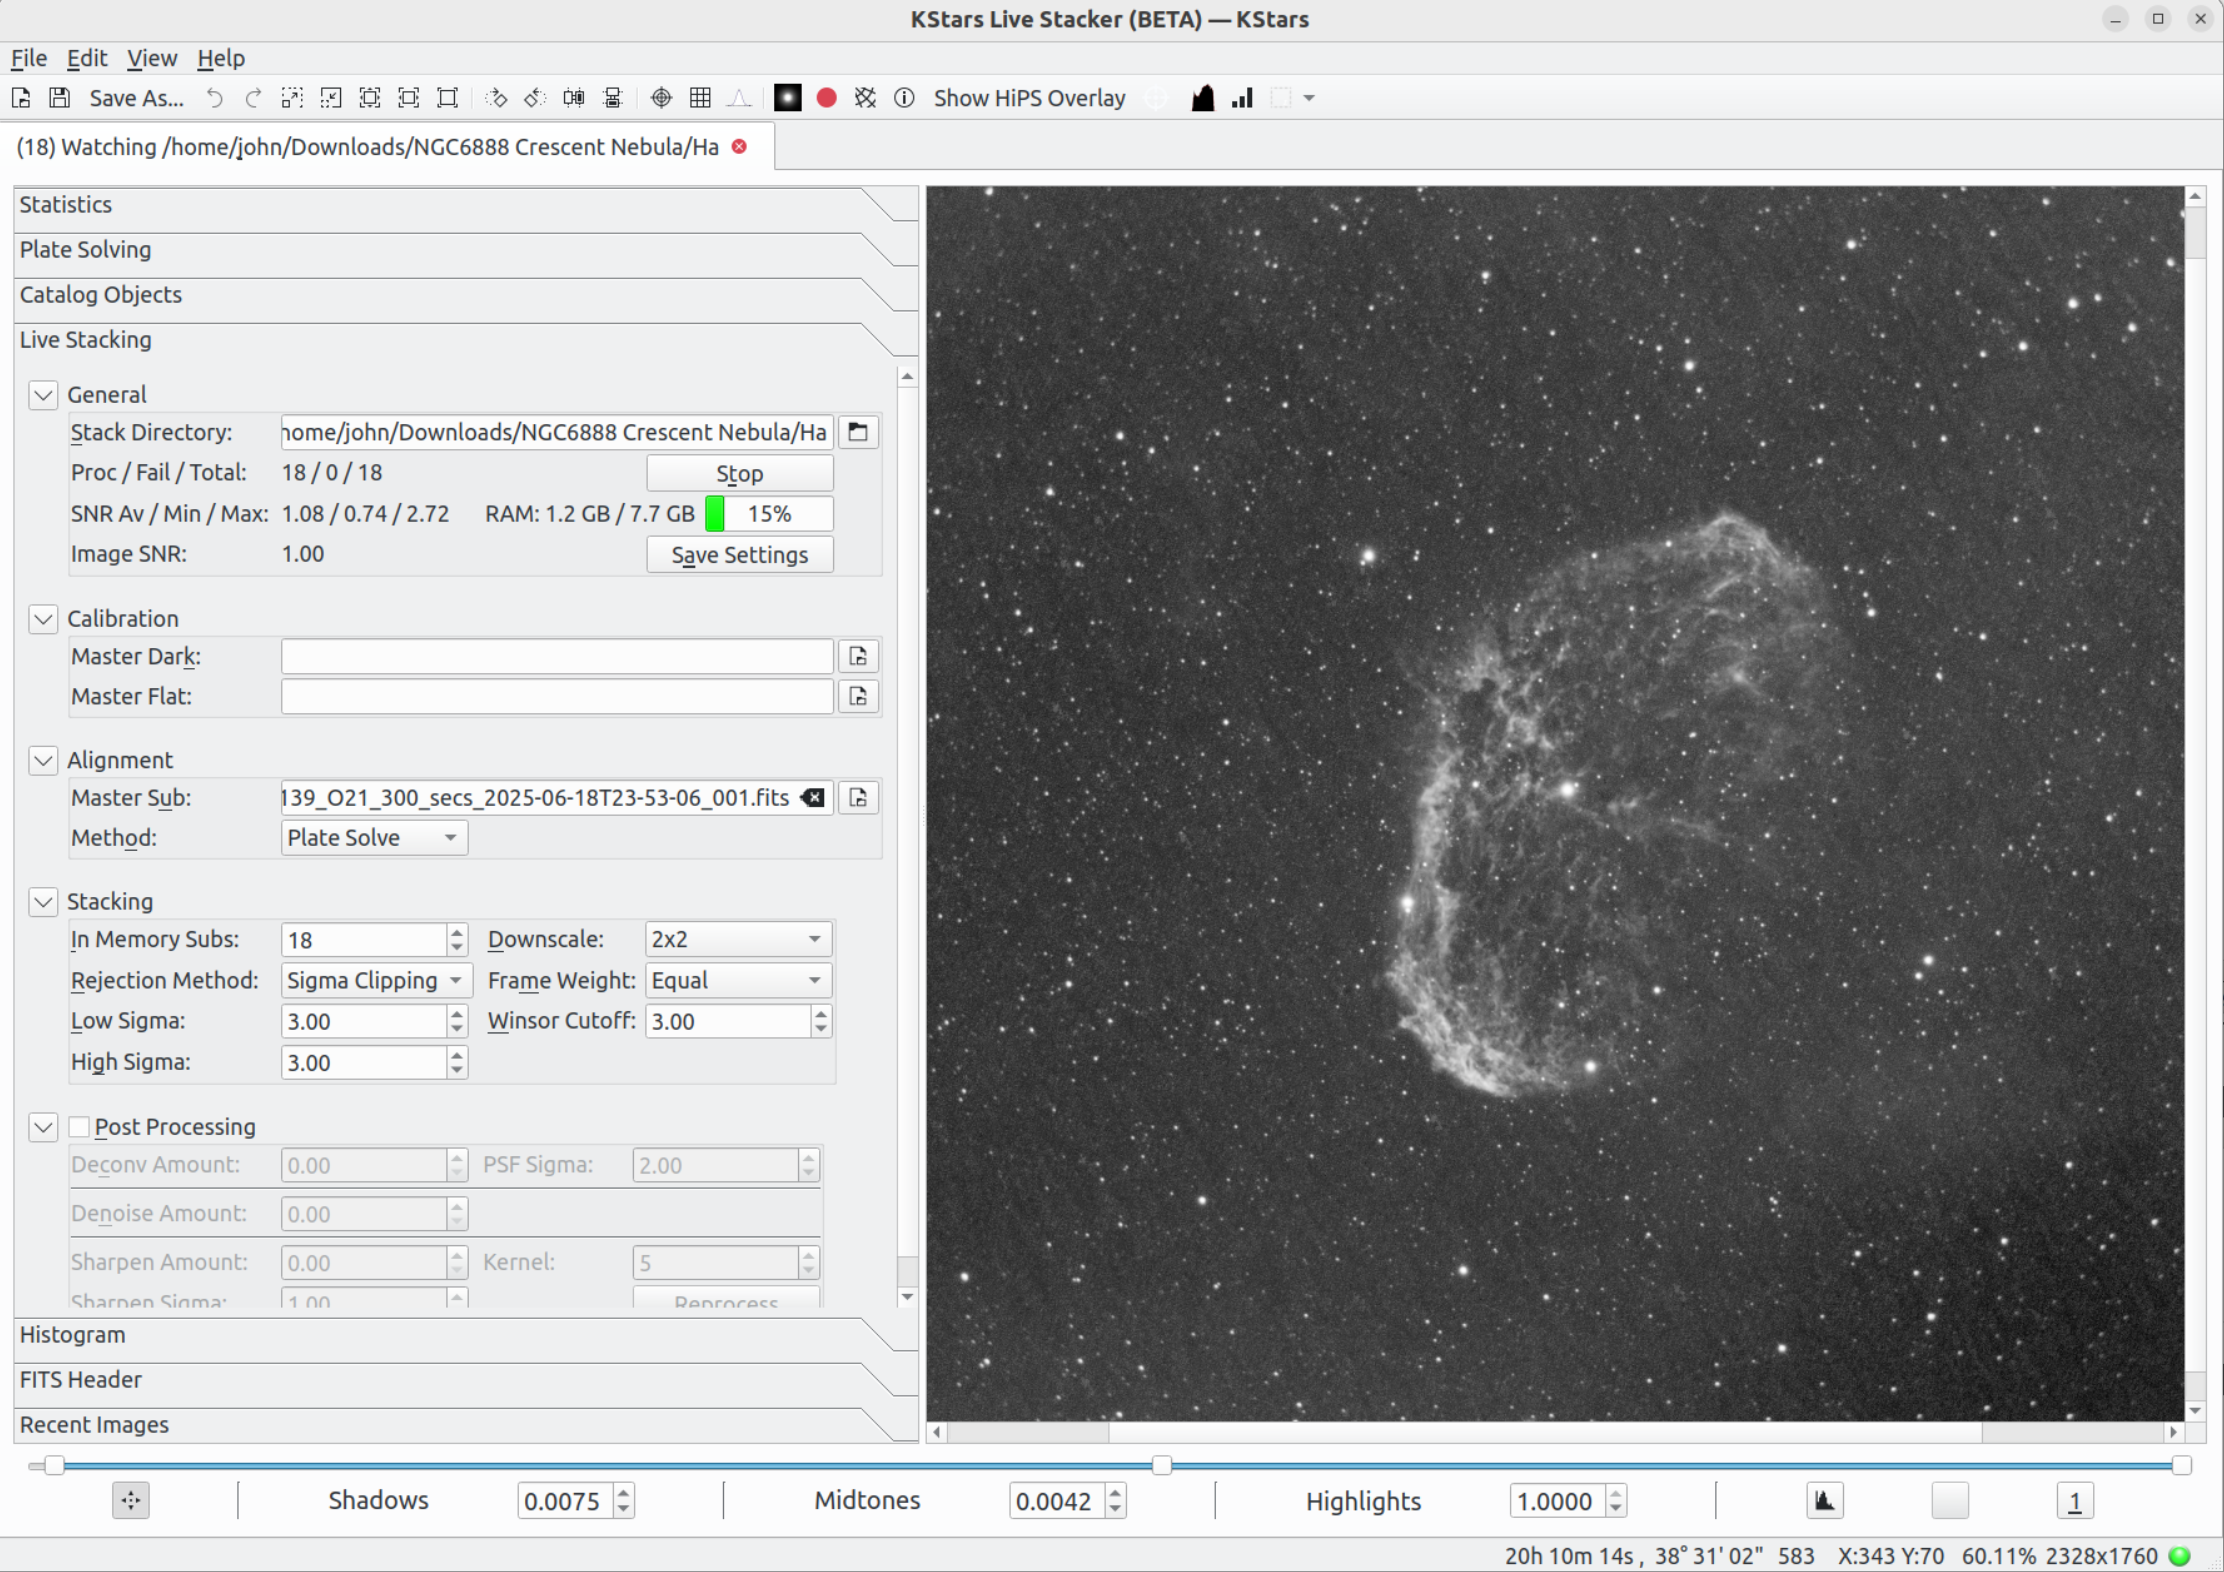
The FITS Viewer Live Stacker (Live Stacker) stacks and displays subframes. It monitors a directory so can be used to stack the existing contents of the directory and / or to add new subframes as they are taken during a live session.
Multiple Live Stackers can be run to monitor different directories. These Live Stackers can be run as separate FitsViewer windows or as multiple tabs within a single FitsViewer tab. In addition, it is possible to run Live Stacker as a standalone process which is still under the control of KStars (so it is stopped when KStars itself is stopped) but has its own process space within the operating system.
Live Stacker follows the FitsViewer architectural approach of displaying the result (in this case the stacked image) and allowing existing functionality such as rotation, object highlighting, histogram manipulation, etc. to be run on the image. The stacked image can be saved by the user using the existing Save functionality.
Live Stacker operates an option webserver to serve up images to devices such as phones and tablets with web-browsers. This allows the stacked image to be viewed on individuals’ devices, for example, at star parties and outreach events.
Live Stacker operates on .fits and .xisf files. They can be either mono or color.
Dark and Flat master files may optionally be specified to improve image quality.
Each section of the Live Stacker input / output widgets are enclosed within a minimize widget that allows the block to be either expanded or minimized.
Following is a description of the UI widgets:
Stack Directory: This is the directory that Live Stacker will watch. Any files in the directory will be stacked when the Live Stacking process is started, and as new files (subs) are added to the directory these will be added to the existing stack.
Stack Directory Button: Launches a directory dialog box to choose a directory.
Multi-Channel (down arrow) button: Toggles between a single channel (either mono or color) subs and multi-channel. Multi-channel allows the user to combine mono subs into a color image. In this mode Red, Green and Blue must be specified and optionally Luminance can be added.
Proc / Fail / Total: Output statistics of the number of subs Processed successfully, Failed and the Total. The Total is the number of subs in the directory.
Webcast Button: Launch the webcast dialog that allows Live Stacker to start or stop webcasting the stacked images in the session.
Start Button: This button has 3 states:
“Start”: Pressing the button runs the stacking process on any subs in Stack Directory and watches the directory for new subs. Button text changes to “Stop”.
“Stop”: Pressing the button stops watching the directory and cancels any in-flight stacking operation. Button text changes to “Cancelling…”.
“Cancelling…”: Button cannot be pressed. When the cancel operation completes, the button text resets to “Start” and the user can start another stacking process.
Live Stacker Monitor button: Launches the Live Stacker Monitor window. See the section on Live Stacker Monitor for more details.
Calc SNR: Switch to turn on or off calculation of SNR for each sub and the stacked image. Usually useful to turn on, but if performance is key this can be toggled off.
SNR Av / Min / Max: Output statistics of the subs processed so far. Average SNR / Minimum SNR / Maximum SNR.
Memory Widget: Displays the amount of memory the current process is using as a percentage of the available memory. Try to keep memory usage in the Green (<50% of available) rather than Amber (<70%) or Red (>=70%). Double click the widget to hide text and just display the progress bar.
Image SNR: This is the SNR of the stacked image at that time.
Save Settings Button. This saves the configuration of the Live Stacker to disk.
Help button: Launches web documentation for Live Stacker.
Calibration Settings:
This section changes depending on whether single channel or multi-channel mode is selected. In single channel mode there is 1 dark and 1 flat associated with the stack dir. In multi-channel mode there is a dark and flat associated with each of the 4 stack dirs: Red, Green, Blue and Luminance.
Master Dark: Blank or pathname to a Master Dark .fits file to be used to calibrate subs.
Master Dark Button: Launches a file picker dialog box to choose a Master Dark.
Master Flat: Blank or pathname to a Master Flat .fits file to be used to calibrate subs.
Master Flat Button: Launches a file picker dialog box to choose a Master Flat.
Remove Hot Pix: Check to have Live Stacker automatically find and remove hot pixels from subframes.
Remove Cold Pix: Check to have Live Stacker automatically find and remove cold pixels from subframes.
Alignment Settings:
Master Sub: Blank or pathname to the sub to be used to align all other subs to. If blank, the first sub is used as alignment master.
Master Sub Button: Launches a file picker dialog box to choose the alignment master sub.
Method: Plate Solve. Use plate solving as the method of aligning subs.
Stacking Settings:
In Memory Subs. This specifies the maximum number of subs that will be held in-memory at any one time and specifies the number of subs that cause a transition from initial stack to running stack.
The stacking process will accumulate this number of subs (if available) before stacking them and will continue in batches of this number before stacking. If the number of subs available is less than this then the stacking process runs in order to display the stacked image to the user.
Once this number of subs is reached, the initial stacking phase completes and intermediate results are then held in order to more rapidly add new, incoming subs to the stack.
Set this number low to be more efficient with memory usage. However, if you use sigma clipping (or winsorized sigma clipping) setting this too low can compromise results.
Downscale: Options of None, 2x2, 3x3 and 4x4 are available. This options downscales the subs by the selected factor. For example, if 2x2 is selected than each group of 2x2 pixels is averaged to a single value per color, reducing both the image width and height by a factor of 2. So the number of pixels in each sub is reduced by a factor of 4 which will significantly speed up processing
Method:
Average: Frames are averaged (mean). No pixels are rejected.
Sigma Clipping: Sigma Clipping is applied to the first “In Memory Subs” to be processed. Once accumulated, a pixel stack is built for each pixel in the subs that contains the value of the pixel across all subs. The median and standard deviation of pixel values is calculated any values lying outside the thresholds of Low Sigma and High Sigma are excluded as outliers. The inliers are then used to calculate the stacked image. As new subs arrive they are checked against the saved pixel statistics to determine whether they are inliers or outliers and are processed accordingly.
Winsorized SC: Similar to Sigma Clipping except where outliers are excluded in Sigma Clipping, they are set to Low Sigma / High Sigma and included in the calculation.
ImageMM: The ImageMM stacking method based on this paper: https://iopscience.iop.org/article/10.3847/1538-3881/adfb72 Basically this can be thought of as a combination of stacking and deconvolution. The method looks to determine the most likely deconvolved stacked image that would have created the set of observed subs. It uses an iterative approach and is extremely resource intensive. This is an experimental approach at this time.
Frame Weighting:
Equal: All subs are given an equal weight (=1.0)
HFR: Subs are weighted by 1 / (Av HFR). So the better the sub, the lower the HFR and the higher the weighting.
Num Stars: Subs are weighted by Num Stars. So the better the sub, the higher than number of stars detected and the higher the weighting.
Normalization:
None: No normalization of subframes is performed.
Linear: Incoming subframes are linear normalized to the existing stack. This is the preferred method as it will stack better with subframes of various background intensity. This option will also deal better with the frame edges to avoid sharp jumps in brightness where subframes have moved slightly during the session.
Low Sigma (Sigma Clipping and Winsor SC Methods). This is the number of Standard Deviations on the low side of the median to clip pixels out.
High Sigma (Sigma Clipping and Winsor SC Methods). This is the number of Standard Deviations on the high side of the median to clip pixels out.
Winsor Cutoff (Winsor SC Method). This is the number of Standard Deviations away from the median to use as cutoff to adjust outlying values before running Sigma Clipping.
Iteration (ImageMM). This specifies the maximum number of iterations the algorithm will attempt. Increase the number for more accurate performance but at the expense of performance.
Kappa (ImageMM). Clamps iterative updates in the range 1/kappa to kappa. So kappa=1 means no update for the iteration. Increase kappa for bigger updates but if you see signs of over “deconvolving” the image then reduce kappa.
Alpha (ImageMM). Damping between iterations by blending alpha * this iteration with (1 - alpha) * last iteration.
Sigma Scale (ImageMM). Reduce calculated image sigma by this scale factor. Reduce if you see ringing artifacts.
PSF Update (ImageMM). Update PSF every nth iteration. Set to zero to disable. Updating too frequently can lead to artifacts. This is quite computationally intensive.
Post Processing Settings:
Post processing options can be turned on / off with the associated minimize widget checkbox. The system temporarily turns off post processing during the initial stacking phase to speed up processing. Thereafter, control is with the user.
These settings are applied to the stacked image to improve its appearance. There are 3 tools: Deconvolution, Denoising and Sharpening. Typically the parameters to use must be found through experimentation by the user. By changing values and hitting the Reprocess Button, the user can adjust values and rerun the Post Processing without re-running the stacking process.
Deconvolution Settings:
Wiener Deconvolution can be applied to the image. The PSF sigma to use must be specified along with an amount.
Deconv Amount: This is the amount of the Deconvolved image to blend with the original stacked image. The range is between 0 (no deconvolution) to 1 (use only the deconvolved image). Set to 0 to disable Deconvolution.
PSF Sigma. The PSF Sigma to use in the deconvolution process.
Denoising Settings:
Denoise Amount: The amount of denoising to apply. Higher values denoise more. Set to 0 to disable denoising.
Sharpening Settings:
A basic Unsharp Mask sharpening algorithm is used.
Sharpen Amount: The amount of sharpening to apply. Higher values sharpen more. Set to 0 to disable sharpening.
Sharpen Kernel. The size of the kernel used for sharpening in pixels (usually 5 or 7 works well). Choose an odd integer.
Sharpen Sigma. The sigma used in the sharpening process.
Reprocess:
Reprocess Button. Pressing this button reruns the Post Processing functionality (Deconvolution, Denoising and Sharpening) on the stacked image using the current values of the Post Processing settings. This means that on a stacked image the user can adjust settings and re-run, adjust again and re-run, etc.
Using Live Stacker for the First Time
Here are some suggestions for using Live Stacker for the first time:
Start in daylight on your imaging computer / setup with some subs you have already taken during a previous imaging session. If you have say 30 subs this will be enough to see how Live Stacker performs.
Select the directory of the subs, and press Start. The default parameters should be relatively memory efficient but may need tweaking.
See how the Memory Widget performs; you want to keep memory usage Green or at worst Amber intermittently. If you are having issues with performance and / or memory usage then here are the things to speed things up (start at the top and work down the list):
Downscale: Usually 2x2 is enough to significantly increase performance with mono subs. Color subs may need more downscaling.
In Memory Subs: Decrease this number. It will then hold less subs in memory at the same time. Note that for Sigma Clipping and Winsorised SC this will potentially compromise image quality.
Calibration Files: Adding a dark and or a flat master will improve image quality, potentially significantly, but at the cost of extra processing.
Frame Weighting: Equal is the most efficient option. Num Stars requires an extra step during Plate Solving so will always be slower. HFR requires the same extra step as Num Stars but also needs more computation so is the slowest option. HFR and Num Stars should, however, yield a better result than Equal weighting.
Rejection Method: None is much more efficient than the other options (at the cost of a potentially better result).
You can rerun the stacking process from scratch by just pressing Start, so its easy to adjust parameters and rerun.
It’s recommended to switch off Post Processing during early stages and come back to it later (see below). To do this make sure the Deconv Amount, Denoise Amount and Sharpen Amount are all set to 0.
When you have a configuration you are happy with press Save Settings and this will be the default configuration for subsequent settings.
Post Processing
When you have the settings for stacking sorted out for your equipment you may wish to try the Post Processing options. Note that the settings you choose will be applied every time Live Stacker displays a stack, e.g. when a new sub is added to the stack. For this reason when you are setting up the stack it is advisable to turn off Post Processing and then when stacking has finished, to experiment with it.
To experiment, set one of the options and press Reprocess. You can then adjust the parameter and press Reprocess again until you have the optimum settings.
Live Stacker Webcast
Pressing the Webcast button launches the Live Stacker Webcast window. This lets you control all aspects of the webcast which allows yourself and others to view stacked images on web-browsers on phones, tablets and computers. This is useful at star parties and outreach events.

The Webcast is initially stopped but is started by pressing Start. This starts the webserver and also displays a QR code in the dialog. This can be scanned to launch a web-browser on a device at the appropriate URL to receive images. Alternatively the displayed URL can be typed in.
Multiple devices can be connected.
As stacking progresses each registered device is automatically updated. The usual features of the device’s browser are available. For example, if supported, the image can be user to the device’s camera roll. The webpage can be converted to an app by the user (if this is supported on the device). This can be useful as sometimes it gives more screen space to the image and minimises decoration.
The following widgets are available: Title. Sets a title for the session - which is displayed on the device. Logo L / R: Allows a logo to be displayed to the left and right of the Title. Port: Defaults to 8080 but can be changed if required. Throttle Updates: If short exposures are causing bandwidth issues, setting this with throttle updates to clients. QR Code: Scan the QR code from a device to launch a browser on the URL URL: The URL the webcast is being broadcast on. Start Webcast: Starts the webcast Stop Webcast: Stops the webcast Reset: removes the images history of the webcast. Effectively a Stop Webcast followed by Start Webcast Subscribers: Toggle to show / hide a grid of subscribing devices to the webcast. Close: Close the Webcast dialog (can be reopened at any time).
Live Stacker Monitor
Pressing the Live Stacker Monitor button launches the Live Stacker Monitor window. The purpose of the Monitor is to display more information at the subframe level about the subs being stacked.
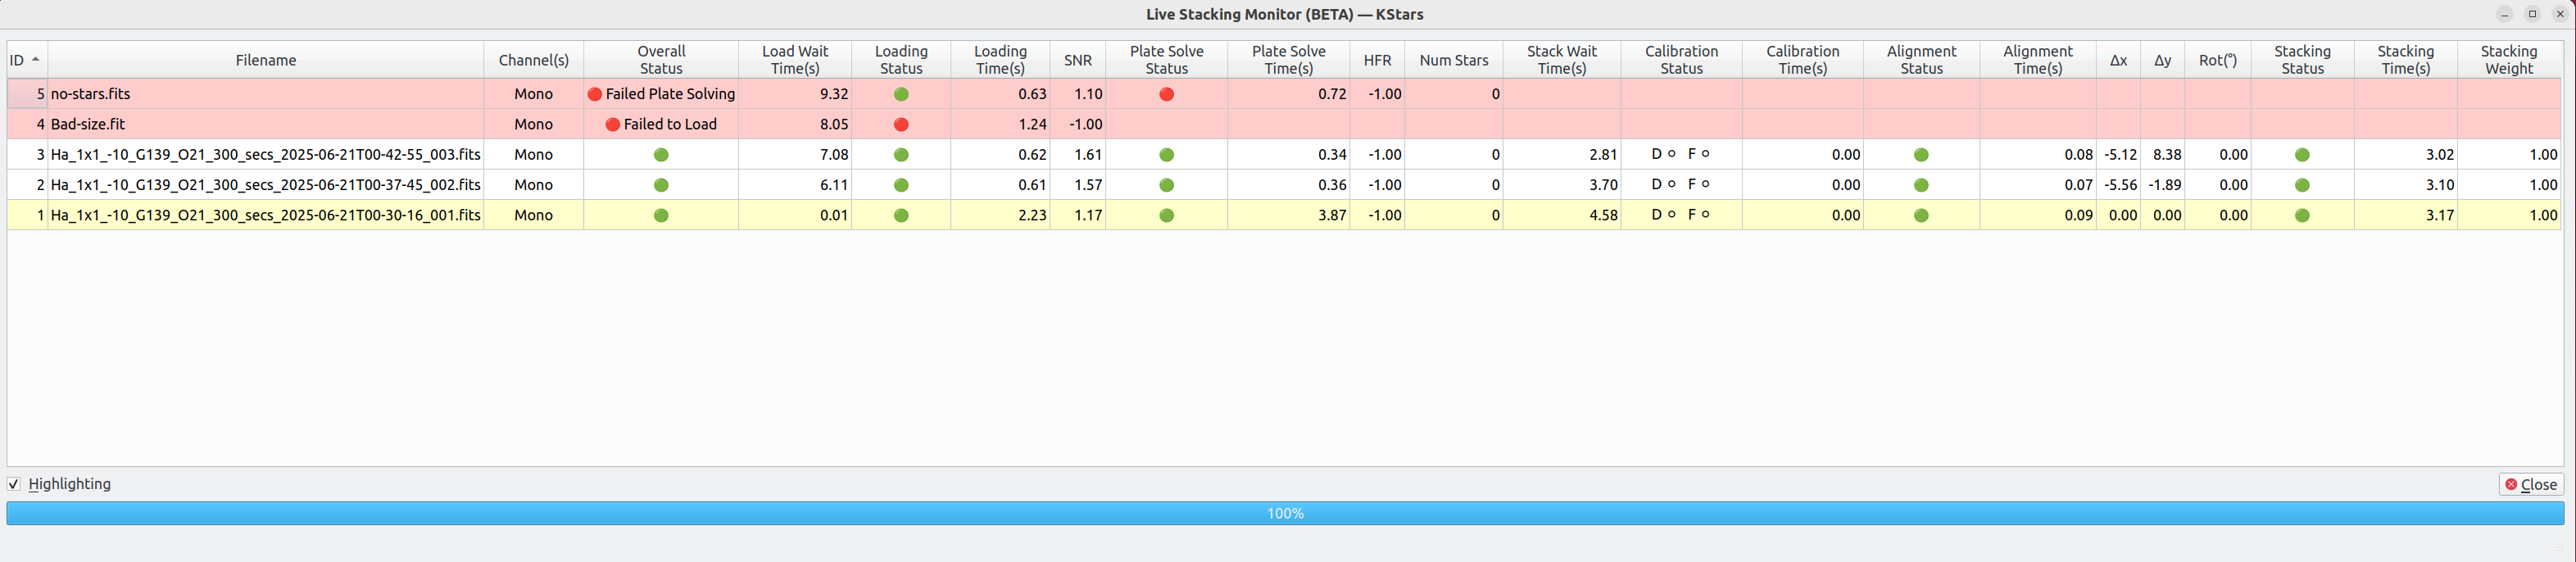
The Monitor displays a grid with 1 row for each sub in the directory / directories selected. The columns are configurable: right click on the column header to display a menu of columns that may be selected or deselected, or double click a column header to remove a column. In addition, the column order may be changed by clicking dragging a column header to a new location.
Single clicking a column sorts the grid on that column and toggles between an ascending sort and a descending sort.
The alignment master sub has a yellow background. If a sub fails to process it has a pink background. The “Highlighting” checkbox will also highlight cell changes as updates are processed.
Tooltips on the column headers explain what each column represents but in summary the columns represent the stacking workflow with relevant information from each step: 1. Miscellaneous columns: ID, pathname, filename, channel(s) and overall status. 2. Loading: displays timings and status of the load step and SNR of the sub. 3. Plate Solving: displays timings, status, average HFR, number of stars. 4. Stack Waiting: displays timings, status of a sub once loaded before the next stacking step. 5. Calibration: displays timings, status, Hot Pix, Cold Pix. Note that calibration is optional. 6. Alignment: displays timings, status and x, y and rotation of the sub to align with the master. 7. Stacking: displays timings, status and stacking weight.
A good way to use the Monitor is to select columns that are relevant to you and order by the ID column so most recent subs are at the top.
Single Channel vs Multi-Channel Mode
Live Stacker starts in single channel mode. This allows a single stack of either mono or color subs.
It is also possible to create color images from individual stacks of mono images. To do this, activate multi-channel mode by expanding the stack directory dropdown toggle (see the red box below) which will then display input directories for Red, Green, Blue and Luminance.
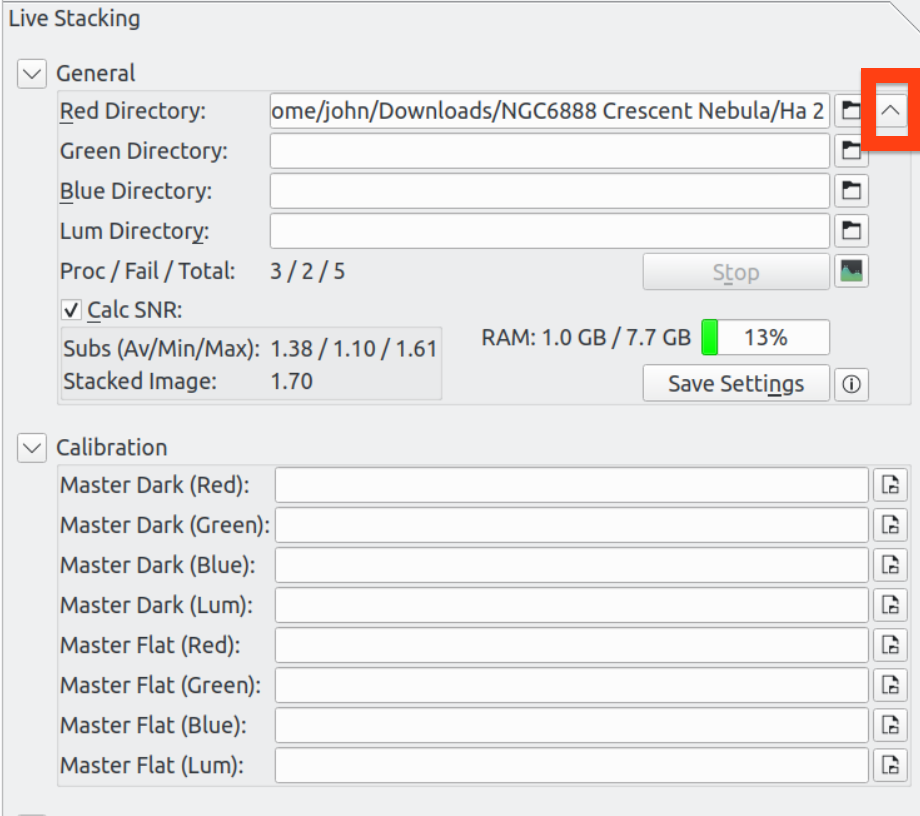
Live Stacker will then stack files in each of the directories and then watch the directories for new files. If an RGB stack is required, fill in Red, Green and Blue (and leave Luminance blank). Live Stacker will then process a stack for each channel, apply a “linear fit” between channels, and combine into a color image for display.
Optionally, a Luminance channel can be added to produce an LRGB image. In this mode, the RGB channels are combined with the Luminance channel to produce a single color image.
Narrowband filter stacks can be combined into color images: SHO, HOO, etc.
If less than 3 stacks are available, for example whilst doing an HOO image, fill in the same directory to the appropriate channels. E.g. for an HOO image set Red to the Hydrogen directory and Green and Blue to the Oxygen directory.
Running Live Stackers
It’s possible to run more than 1 Live Stacker to monitor multiple directories. This would be useful if you are imaging multiple targets or filters and want to keep an eye on everything without having to reset the Live Stacker to a new directory periodically.
Live Stacker is started by selecting “Live Stacker…” from the KStars Skymap. Selecting “Live Stacker…” a second time will launch another Live Stacker. Depending on how FITS Viewer is configured will determine whether multiple Live Stacker windows are started (“Single Window Capture” unchecked) or whether multiple tabs within a single Live Stacker window are started (“Single Window Capture” checked).
By default the tab name for Live Stacker is “(n) DirectoryPath” where n is the number of subs in DirectoryPath. Right click on tabname to change the name to whatever you like. This is particularly useful when runing multiple instances of Live Stacker as separate tabs.
The “Live Stacker own process” option allows Live Stacker to be started as a separate process. When “Live Stacker own process” is unchecked, Live Stacker resides in the KStars / Ekos process space. The advantage of running Live Stacker as its own process is that if it crashes it will not disturb other KStars / Ekos functionality.
Using FITS Viewer functionality with Live Stacker
Live Stacker is integrated into FITSViewer. This means that existing FITSViewer functionality can be applied to stacked images displayed in Live Stacker. For example:
Saving image stacks to disk.
Re-opening a saved stacked image.
Using blink functionality alongside stacking.
Zooming in / out.
Rotating the image
Marking stars / highlighting clipped stars
Plate solving the stacked image, although by default the stacking process will have already plate solved it.
Stretch / Histogram adjustments
Viewing image statistics / FITS Header keywords
Viewing Catalog objects (e.g. Simbad objects)
Trouble Shooting Issues
The pre-requisites for Live Stacker are that KStars is built with WCS, CFITIO and OpenCV. If any of these components is not present, the Live Stacker menu item in the SkyMap will not be visible and Live Stacker will be disabled.
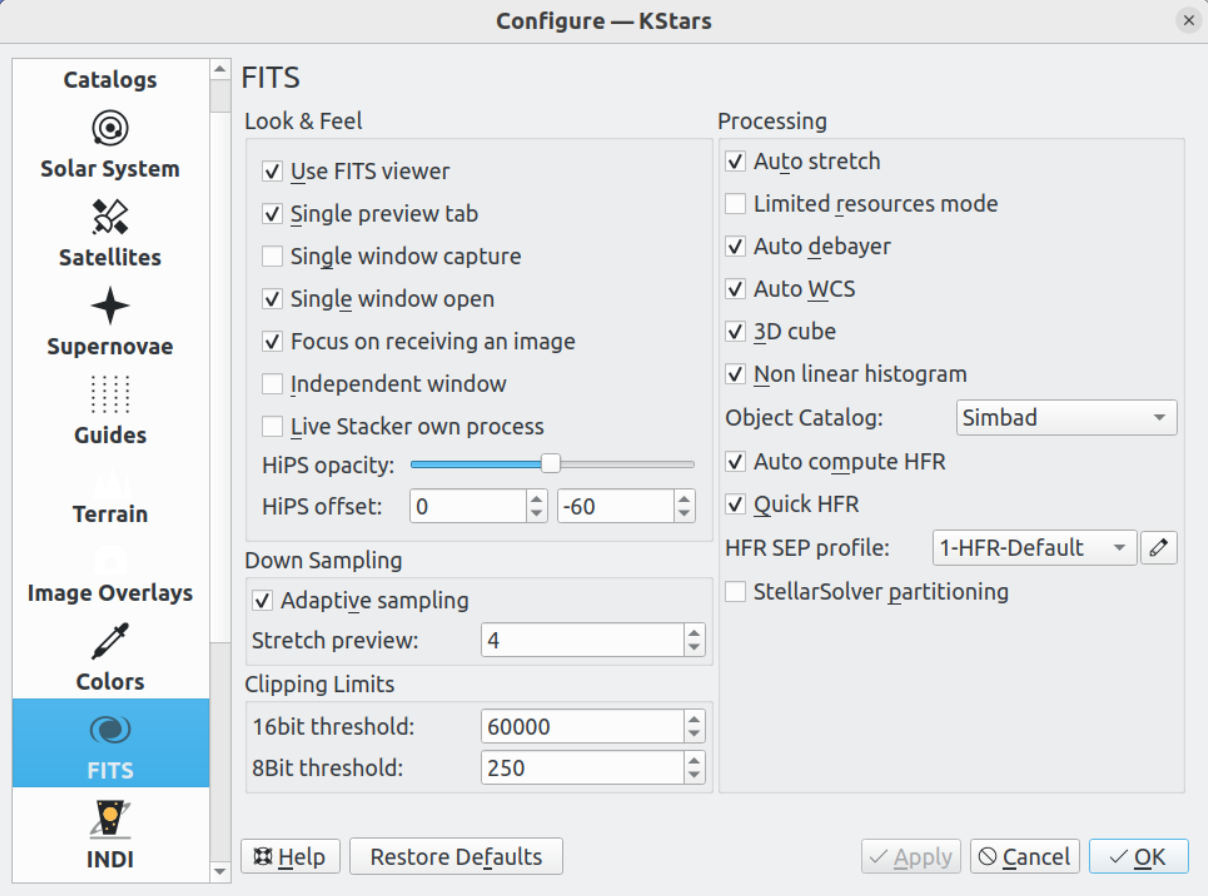
Subframes need to have WCS FITS Keywords. These are added by the Indi driver when WCS is enabled. Also, on the FITS options tab in Ekos, AutoWCS should be enabled.
Live Stacker makes use of KStars internal Plate Solving so it is crucial that this is setup to work correctly. Plate Solving in KStars is flexible and functions like Align and Guide have their own Plate Solving SEP profiles. Live Stacker uses the FITSViewer Plate Solving functionality and default profile, so this is the profile to check if you have issues. Go to the Plate Solve tab in FITSViewer and see which default SEP profile you are using. Choose a different one if that works for you. Make sure you can reliably plate solve subframes with your chosen SEP profile. See the Fits Viewer Solver section of this manual for more information.