
Telescope Setup
Most telescopes are equipped with RS232 interface for remote control. Connect the RS232 jack in your telescope to your computer’s Serial/USB port. Traditionally, the RS232 connects to the serial port of your computer, but since many new laptops abandoned the serial port in favor of USB/FireWire ports, you might need to obtain a Serial to USB adaptor to use with new laptops.
After connecting your telescope to the Serial/USB port, turn your telescope on. It is highly recommended that you download and install the latest firmware for your telescope controller.
The telescope needs to be aligned before it can be used properly. Align your telescope (one or two stars alignment) as illustrated in your telescope manual.
KStars needs to verify time and location settings before connecting to the telescope. This insures proper tracking and synchronization between the telescope and KStars. The following steps will enable you to connect to a device that is connected to your computer. To connect and control remote devices, please refer to remote device control section.
You can use the Telescope Setup Wizard and it will verify all
the required information in the process. It can automatically
scan ports for attached telescopes. You can run the wizard by
selecting the Devices → Telescope Wizard menu item.
Alternatively, you can connect to a local telescope by performing the following steps:
Set your geographical location. Open the
Set Geographic
Location
window by selecting theSettings→Geographic...menu item, or by pressing theGlobeicon in the toolbar, or by pressing Ctrl+G.Set your local time and date. You can change to any time or date by selecting
Time→Set Time...menu item, or by pressing theTimeicon in the toolbar. TheSet Timewindow uses a standard KDE Date Picker widget. If you ever need to reset the clock back to the current time, just select theTime→Set Time to Nowmenu item.Click on the
Tools→Devices→Device Manager...menu item.Under the
Devicecolumn, select your telescope model.Click on the
Run Servicebutton.Click
Closeto leave the Device Manager Dialog.
Note
You do not need to set the geographic location and time every time you connect to a telescope. Only adjust the settings as needed.
You are now ready to use the device features, KStars conveniently provides two interchangeable GUI interfaces for controlling telescopes:
Controlling your telescope
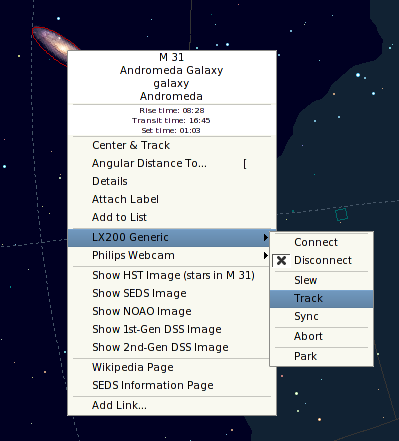
Sky map Control: For each device you run in theDevice Manager, a corresponding entry will show up in popup menu that allows you to control the properties of the device. You can issue commands like Slew, Sync, and Track directly from the sky map.Here is a screenshot of the popup menu with an active LX200 Classic device:
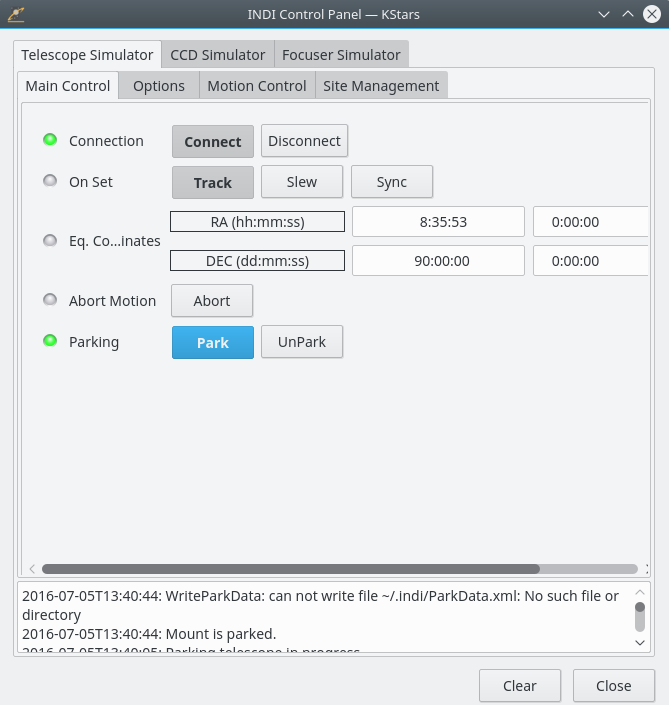
INDI Control Panel: The panel offers the user with all the features supported by a device.The panel is divided into three main sections:
Device tabs: Each additional active device occupies a tab in the INDI panel. Multiple devices can run simultaneously without affecting the operation of other devices.Property views on the
Main ControlandOptionstabs: Properties are the key element in INDI architecture. Each device defines a set of properties to communicate with the client. The current position of the telescope is an example of a property. Semantically similar properties are usually contained in logical blocks or groupings.
Log viewer: Devices report their status and acknowledge commands by sending INDI messages. Each device has its own log view. A device usually sends messages to its device driver only, but a device is permitted to send a generic message when appropriate.
You are not restricted on using one interface over another as
they can be both used simultaneously. Actions from the Sky map
are automatically reflected in the INDI Control Panel and vice
versa.
To connect to your telescope, you can either select Connect
from your device popup menu or alternatively, you can press
Connect under your device tab in the INDI Control Panel.
Important
By default, KStars will try to connect to the /dev/ttyS0
port. To change the connection port, select the Tools →
Devices → INDI Control Panel... menu item and change the
port under your device tab.
KStars automatically updates the telescope’s longitude,
latitude, and time based on current settings in KStars. You can
enable/disable these using the INDI page from the Settings →
Configure
KStars...
menu item. Using the INDI page you can
configure KStars to display or not INDI status messages in the
status bar. By default INDI server port numbers have values
between the range from 7624 to 9000, but you can easily change
the range using the From: and To: text boxes from the Server
Port section.
If KStars communicates successfully with the telescope, it will
retrieve the current RA and DEC from the telescope and will
display a crosshair on the sky map indicating the telescope
position. You can hide the crosshair that marks telescope
position using INDI page from the Settings → Configure
KStars... menu item.
Note
Synchronizing your telescope
If you aligned your telescope and the last alignment star was, for example, Vega, then the crosshair should be centered around Vega. If the crosshair was off target, then you can right-click Vega from the sky map and select Sync from your telescope menu. This action will instruct the telescope to synchronize its internal coordinates to match those of Vega, and the telescope’s crosshair should now be centered around Vega.
This is it: your telescope is ready to explore the heavens!
Warning
Never use the telescope to look at the sun. Looking at the sun might cause irreversible damage to your eyes and your equipment.