Catalogi
In de pagina Catalogi kunt u instellen welke objectcatalogi er in KSstars worden getoond en ook hoeveel informatie er in de hemelkaart moet worden weergegeven. Standaard toont KStars ~300,000 benoemde en onbenoemde sterren tot aan magnitude (helderheid) 8. Voor het tonen van deep-sky objecten is de catalogus: New General Catalog (“NGC”) ingevoegd, die de Index Catalog (“IC”) bevat en de Messier catalogus.
De New General Catalog of Nebulae and Clusters of Stars (afgekort als NGC), is een catalogus van 7840 deep-sky objecten.
De Index catalogus voor nevels en sterrenhopen (afgekort als IC), is een supplement voor de NGC-catalogus, en bevat een verdere 5386 objecten, die collectief bekend staan als de IC-objecten.
U kunt nieuwe catalogi installeren met het “Add-on installatieprogramma” van KStars. U kunt deze openen in menu-item Gegevens → Nieuwe gegevens downloaden.... U kunt uit een lijst van catalogi kiezen, inclusief (maar niet beperkt tot):
Steinicke NGC/IC Catalog: is een meer volledige NGC/IC catalogus.
Abell Planetary Nebulae Catalog: is een catalogus van 86 planetaire nevels. De maximum magnitude (zwakste helderheid) is die van Abell 47: 19,5.
Sharpless HII region Catalog: is de Sharpless (Sh2) catalogus van HII gebieden (diffuse nevels).
Hickson Compact Groups: is een catalogus bestaande uit 99 compact groepen van melkwegstelsels.
Tycho-2 Star Catalog: is een catalogus van meer dan 2,5 miljoen helderste sterren. Hierin zijn sterren met een magnitude van 8,0 tot 12,5.
USNO NOMAD Catalog: is een catalogus met ongeveer 100 miljoen sterren met een magnitude van 12,5 tot 16,5. Let erop dat ook Tycho-2 moet zijn geïnstalleerd..
Hier volgt een opsomming van catalogi in KStars:
Naam |
Afkorting |
Aantal objecten |
Magnitude |
|---|---|---|---|
Standaard catalogus |
Standaard |
~300,000 |
Tot aan magnitude 8 |
Tycho-2 |
Tycho2 |
meer dan 2,5 miljoen |
8.0-12.5 |
Samengevoegde astronomische gegevens van de Naval Observatory |
USNO NOMAD |
100 miljoen |
12.5-16.5 |
Naam |
Afkorting |
Aantal objecten |
Magnitude |
|---|---|---|---|
New General Catalog of Nebulae and Clusters of Stars (OpenNGC) |
NGC |
7840 |
|
Steinicke NGC/IC |
|||
Abell Planetary Nebulae Catalog |
86 |
Tot aan magnitude 19,5 |
|
Sharpless HII region Catalogus |
Sh2 |
||
Hickson Compact Groups |
99 |
Notitie
A potentieel meer up-to-date lijst is te vinden in de catalogusopslagruimtedocumentatie.
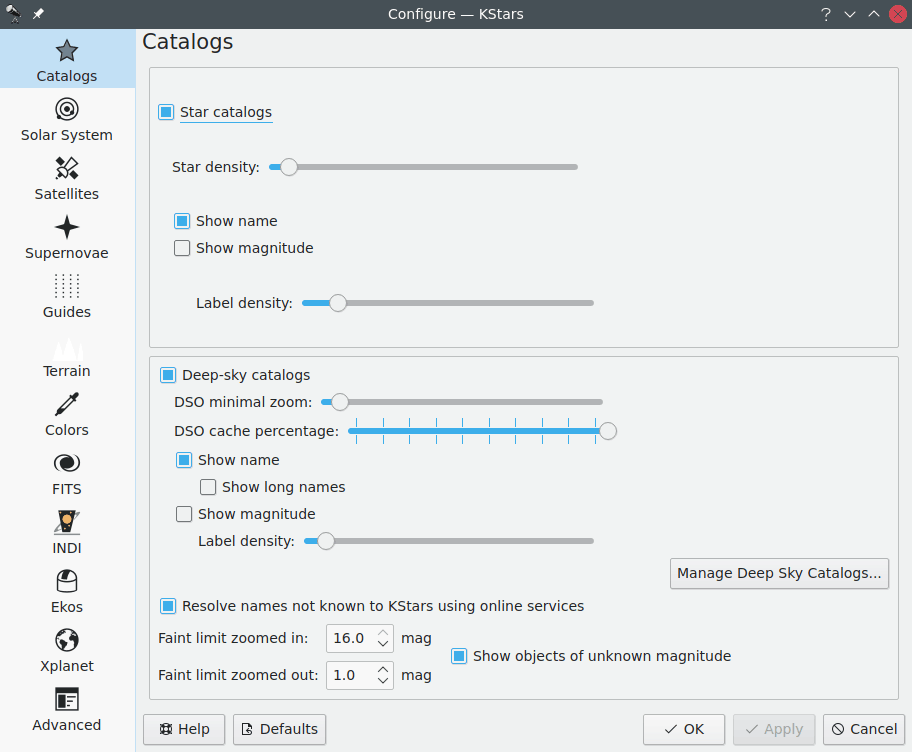
In het gedeelte Sterren kunt u het tonen van sterren instellen. U kunt het wel of niet tonen van sterren instellen met behulp van het keuzevakje voor Stercatalogi. Indien het keuzevakje is geselecteerd ziet u meerdere opties. U kunt instellen hoeveel sterren er worden weergegeven met de schuifbalk voor de Sterdichtheid. U kunt ook het weergeven van namen en >magnitudes aan of uitzetten. Namen van sterren worden naast de heldere sterren geplaatst. Als u ook de namen van zwakkere sterren wilt zien, moet u de schuifbalk voor de Namendichtheid: wat naar rechts schuiven.
Onder de sectie sterren, bestuurt de sectie Deep-Sky objecten het tonen van verschillende niet-stellaire objectcatalogi. U kunt het tonen van Deep-Sky objecten omschakelen en het tonen van hun namen en magnitudes. Standaard omvat de lijst met deep-sky objecten de Messier, NGC en IC catalogi. Extra catalogi zijn beschikbaar via het menu-item Gegevens → Nieuwe gegevens downloaden..., waar u catalogi kunt downloaden die geleverd zijn door het team van KStars en de gemeenschap via de catalogus-inpak-opslagruimte. De schuifregelaar DSO minimale zoom bestuurt het minimale zoomniveau voor welke van de DSO’s worden getoond. Het minimale zoomniveau verhogen kan leiden tot presentatieverbetering bij rondkijken van de uitgezoomde hemelkaart. De schuifregelaar DSO-cachepercentage regelt hoeveel van de DSO mastercatalogus in geheugen wordt gehouden. Als u problemen met het geheugen ervaart met grote catalogi, probeer dan het percentage te verlagen. De schuifregelaar Labeldichtheid bestuurt de waargenomen dichtheid van labels voor de DSO’s. Als labels beginnen met elkaar te overlappen en de hemelkaart begint overbevolkt te geraken, probeer dan deze optie af te regelen. De Helderheidslimiet in-/uitzoomen reguleert tot op welke magnitude objecten getoond worden op de hemelkaart (hogere magnitude is zwakker). Als Objecten met onbekende magnitude tonen is geactiveerd, worden objecten met onbekende magnitude altijd getoond.
De volgende secties detailleren hoe DSO catalogi in KStars werken en hoe ze worden beheerd.
De DSO catalogi-database
Notitie
Deze sectie heeft als doel een de catalogi-database van KStars te introduceren in eenvoudige maar technische termen. Het kan overgeslagen worden zonder dat iets essentieels ontbreekt maar helpt bij het begrijpen van hoe om te gaan met catalogi en aangepaste aan te maken.
DSO catalogi in KStars zijn gewoon SQL (sqlite3) databasetabellen. Elke catalog wordt gerepresenteerd door zijn eigen tabel die al zijn objecten bevat en een item in een metagegevenstabel in de catalogus. Bovendien, catalogi kunnen geïmporteerd of geëxporteerd worden uit en in alleenstaande databasebestanden.
Elk object heeft de gebruikelijke eigenschappen zoals naam en coördinaten maar heeft ook twee ID’s. De eerste ID is de unieke identifier voor het specifieke object en wordt berekend uit een hash van alle objectvelden samen met de catalogus-id. Omdat objecten in verschillende catalogi zich kunnen bevinden heeft elk object een additioneel object-id (OID) dat het fysieke object identificeert en gedeeld kan worden door verschillende objecten uit verschillende catalogi.
Om zoeken van een object te versnellen zijn alle ingeschakelde catalogi samengevoegd in een mastertabel. Elke catalogus heeft een prioriteitsnummer en als verschillende objecten met dezelfde OID verschijnen wordt diegene uit de catalogus met de hoogste prioriteit geladen. De objecten uit de mastercatalogus worden op de hemel getekend en zijn algemeen beschikbaar in KStars.
Op dit moment wordt duplicaten verwijderen (de toekenning van OID’s) alleen ondersteund door de hulpmiddelen van de catalogus-inpak-opslagruimte. Het doel van deze hulpmiddelenketting is om reproduceerbaar catalogi te bouwen in een homogene omgeving. Iedere catalogus is geïmplementeerd als een python-module en levert standaard methoden om gegevens te verwerven, ze te ontleden en duplicaten te vinden in andere catalogi. Alle te downloaden catalogi zijn op deze manier geïmplementeerd. Als u zelf een catalogus voor uzelf beschikbaar wilt maken voor KStars, wordt het aangeraden dat u het implementeert als een pakket in de opslagruimte. De geleverde hulplijnen daar zijn zo flexibel, dat het voor u zou moeten werken. Voor meer informatie over hoe dat te doen zie de catalogus-inpak-opslagruimte. Als u niet vertrouwd bent met programmeren in python dan kunt u het toevoegen van een catalogus verzoeken door het openen van een ticket in de opslagruimte of contact op te nemen met de onderhouders. KStars levert ook middelen om aangepaste catalogi te maken door handmatig gegevens in te voeren of CSV-tabellen te importeren, maar die zijn minder flexibel en bieden geen ontdoen van duplicaten.
De GUI van catalogusbeheer
De GUI van catalogusbeheer wordt bereikt via menu-item Gegevens → DSO-catalogi beheren... en wordt onderstaand getoond.
Het interface van DSO-catalogusbeheer.
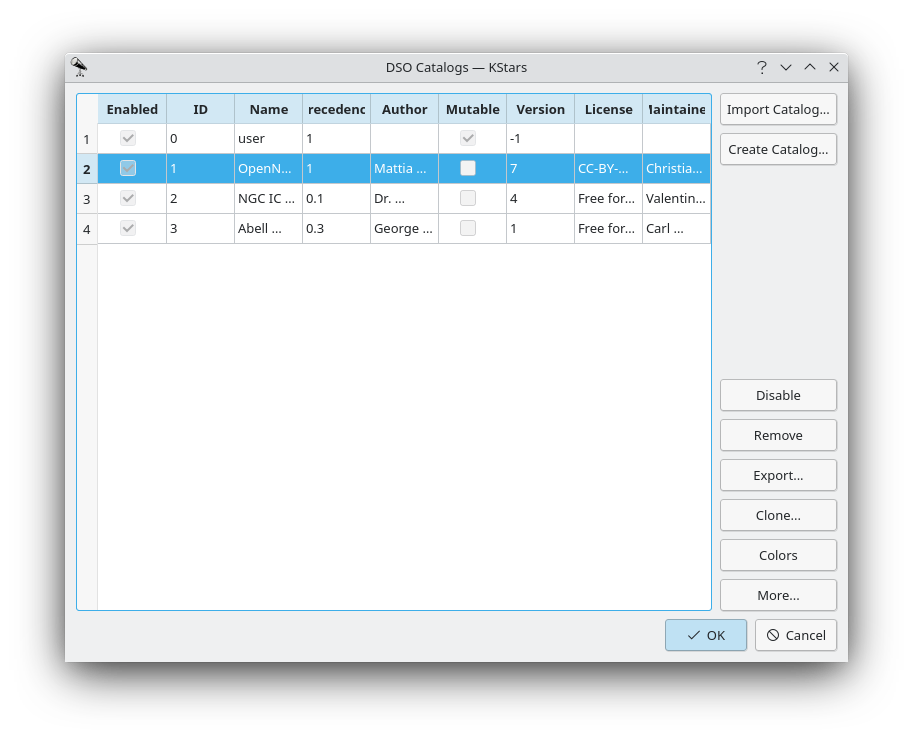
Links is een lijst met catalogi getoond. In deze lijst kunt hoofdeigenschappen van catalogi lezen, inclusief of een catalogus is ingeschakeld, wat zijn ID is en wat zijn naam is. De kolom Te wijzigen geeft aan of de catalogus bewerkt kan worden of niet. Catalogi die gedownload zijn uit de catalogusopslagruimte via menu-item Gegevens → Nieuwe gegevens downloaden... zijn gewoonlijk niet te wijzigen terwijl door de gebruiker aangemaakte catalogi dat wel zijn. U kunt altijd een catalogus Klonen om deze te kunnen wijzigen.
De knoppen in de rechtsboven hoek bieden u het toevoegen van catalogi aan de database.
Catalogus importeren...Een catalogus in het formaat
.kscatimporteren uit een bestand.Dit wordt gewoonlijk gedaan om nieuwe versies van catalogi uit te proberen die nog niet opgepakt zijn door de gebruikelijke downloadserver.
Met de knoppen in de rechtsonder hoek kunt u catalogi toevoegen, verwijderen, modificeren en bekijken. Hun acties verwijzen altijd naar de nu geselecteerde catalogus (de geaccentueerde rij links).
Catalogus aanmaken...Maak een nieuwe catalogus. Zie de sectie genaamd “Een nieuwe catalogus aanmaken”.
In-/uitschakelenEen catalogus in-/uitschakelen.
Dit wordt gereflecteerd in de hemelkaart bij sluiten van de GUI voor catalogusbeheer.
VerwijderenEen catalogus verwijderen uit de catalogusdatabase.
Dit wordt gereflecteerd in de hemelkaart bij sluiten van de GUI voor catalogusbeheer.
Exporteren...Een catalogus exporteren in een
.kscatbestand.Het resulterende bestand kan geïmporteerd worden met de knop
Catalogus importeren....Klonen...Maak een exacte kopie van de catalogus en voeg deze in in de database.
Dit is nuttig als u wijzigingen wilt maken in een niet te wijzigen catalogus.
Notitie
Merk echter op dat dit niet de aanbevolen manier is om catalogi te wijzigen die geleverd worden door de
catalogus opslagruimte voor pakket maken <https://invent.kde.org/vboettcher/kstars-catalogs>`__ d.w.z. de catalogi gedownload via menu-item ``Gegevens→Nieuwe gegevens downloaden....KleurenOpen de kleurbewerker van de catalogus (Zie de sectie genaamd “Kleurbewerker van catalogus”.).
Dit zal een dialoog openen die het instellen van de kleuren biedt waarin objecten uit de geselecteerde catalogus getoond zullen worden voor elk kleurenschema.
Meer...Open de dialoog voor catalogusdetails. (Zie de sectie genaamd “Dialoog van Catalogusgdetails”.)
Daarin kunt u de inhoud van de catalogus zien, evenals enige verdere metagegevensinformatie. Onder anderen kunt u ook zijn inhoud bewerken (als het te wijzigen is).
Een nieuwe catalogus aanmaken
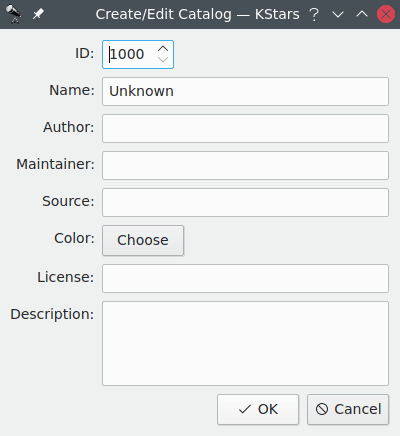
Deze dialoog wordt bereikt via de GUI voor catalogusbeheer (zie de sectie genaamd “De GUI van catalogusbeheer”). Het veld >ID zal automatisch gekozen worden maar kan gewijzigd worden. Het veld Kleur configureert in welke kleur de objecten van de catalogus getoond zullen worden. Alle andere waarden zijn optioneel of hebben zinvolle standaarden. U kunt natuurlijk deze waarden op een later moment wijzigen.
Bij klikken op Ok zal een lege catalogus met de metagegevens ingevoerd in de dialoog toegevoegd worden aan de database en kan daarna gevuld worden met objecten. (Zie de sectie genaamd “Dialoog van Catalogusbeheer” en de sectie genaamd “CSV importeren (en gelijke formaten)”.)
Kleurbewerker van catalogus
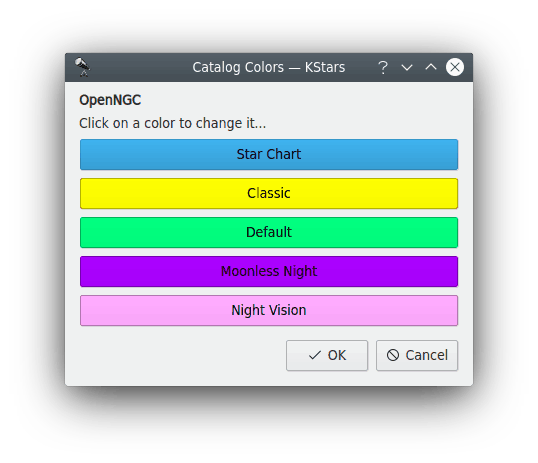
Deze dialoog bereikt via de GUI voor catalogusbeheer (zie de sectie genaamd “De GUI van catalogusbeheer”). Elke knop representeert de kleur waarin objecten getekend zullen worden voor een specifiek kleurenschema. Op een knop klikken biedt u om een kleur te kiezen met een kleurenkiezer. De knop kleuren is geïnitialiseerd met de standaardkleuren uit de catalogusspecificatie. De kleur “standaard” is de kleur die voor de catalogus gekozen zal worden als er geen kleur is ingesteld voor een kleurenschema.
Dialoog voor catalogusdetails
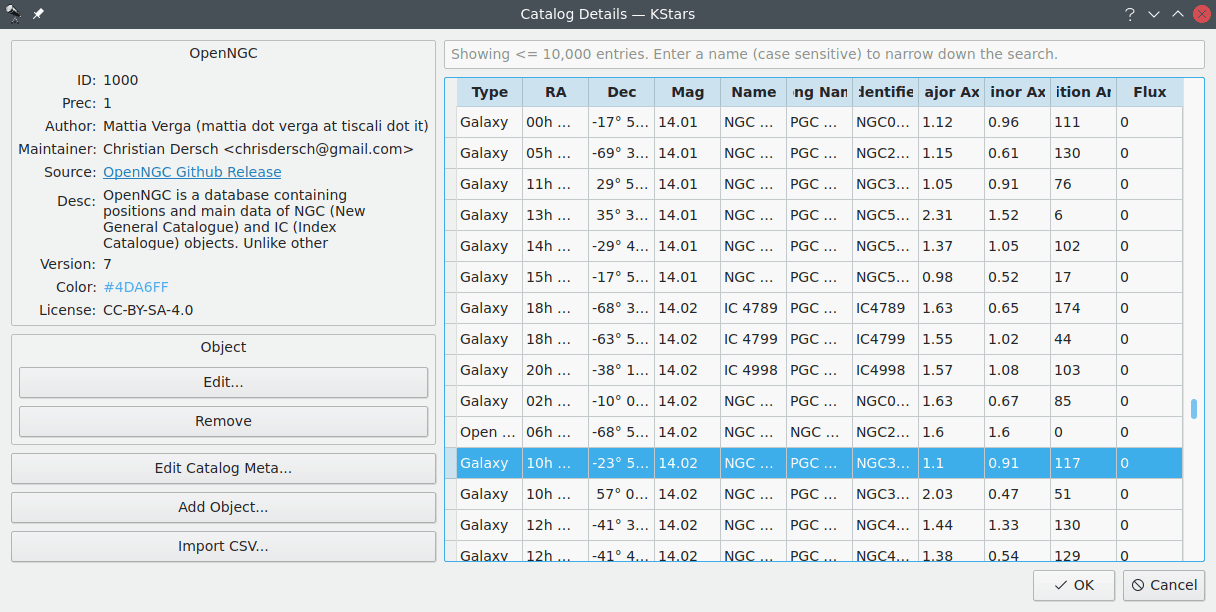
Deze dialoog wordt bereikt via de GUI voor catalogusbeheer (zie de sectie genaamd “De GUI van catalogusbeheer”). In de linksboven hoek worden de metagegevens van de catalogus getoond. Rechts wordt een tabel van alle objecten in de catalogus getoond. De zoekregel boven de tabel filtert objecten op naam. Dubbelklikken op een rij opent de dialoog van de objectdetails (zie de sectie genaamd “Venster met objectdetails”).
Een rij selecteren schakelt het menu Object links in. Meerdere rijen selecteren voert de enkel-object-actie uit voor elk geselecteerd object.
Bewerken...Het catalogusobject bewerken. (Zie de sectie genaamd “Objecten toevoegen/bewerken”).
VerwijderenVerwijdert het object uit de catalogus.
Onder het sectie Object zijn de algemene catalogusopties gesitueerd.
Meta in catalogus bewerken...Bewerkt de metagegevens van de catalogus getoond linksboven. Dit opent de dialoog beschreven in de sectie genaamd “Een nieuwe catalogus aanmaken”.
Object toevoegen...Een object aan de catalogus toevoegen. (Zie de sectie genaamd “Objecten toevoegen/bewerken”.)
CSV importeren...Objecten uit een tabulair tekstformaat (csv, tsv, etc.) importeren in de catalogus. (Zie de sectie genaamd “CSV importeren (en soortgelijke formaten)”.)
Objecten toevoegen/bewerken
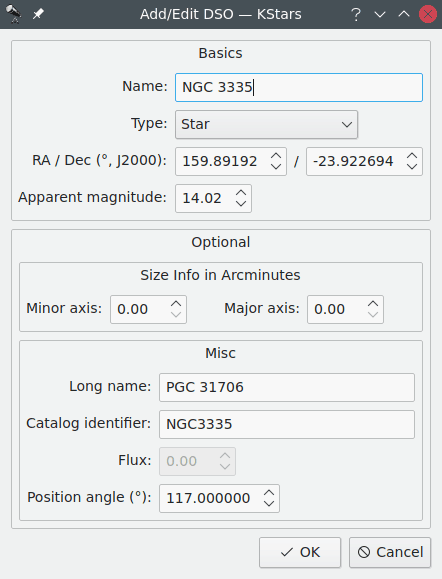
Deze dialoog biedt het aanmaken of bewerken van een deep-sky-object (DSO). De basis sectie bevat velden die ingevuld moeten worden.
Naam:De naam van het object dat getoond zal worden aan de hemel.
Type:Het type object.
RA / Dec (°, J2000):De coördinaten van het object in graden en met betrekking tot de J2000 epoch.
Schijnbare magnitude:De schijnbare magnitude van het object.
De sectie Optioneel bevat gegevensvelden die optioneel zijn en is opgedeeld in twee subsecties. Ze zijn ingevuld en kunnen in hun standaard waarden blijven.
De subsectie Grootte-informatie in boogminuten. Het object is gemodelleerd als een ellips die beschreven wordt door zijn majeure en mineure as.
De subsectie Diversen.
Lange naam:Een langere, meer beschrijvende naam.
Gewoonlijk is de lange naam iets als “Andromeda Galaxy” voor het object M31. Het kan alternatieve aanduidingen en namen in andere catalogi ook bevatten.
Catalogus-identifier:Een interne identifier in de catalogus.
Bijvoorbeeld de schermafdruk hierboven, het object komt uit de OpenNGC catalogus waar elke rij geïdentificeerd is door “NGCXXXX”.
Flux:De flux van het object. Is alleen van toepassing op radiobronnen.
Positiehoek (°):Als het object uitgebreid is, moet het een oriëntatie aan de hemel hebben. De positiehoek is de hoek tussen zijn majeure as en een rechte lijn naar de noordpool.
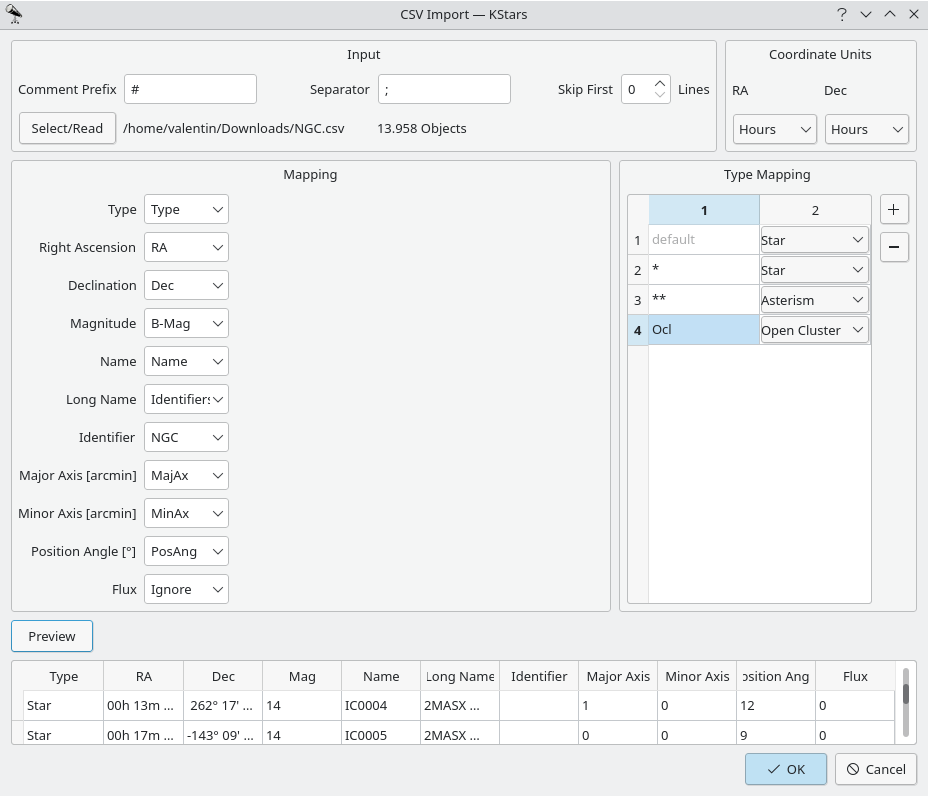
CSV importeren (en gelijksoortige formaten)
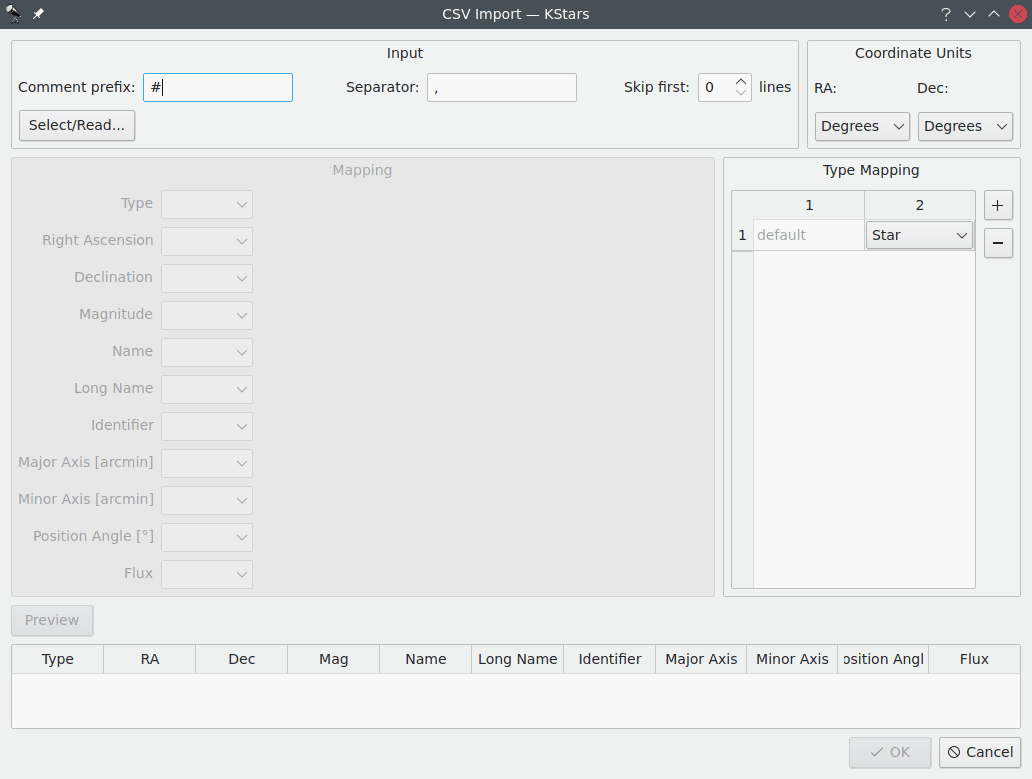
De schermafdruk boven toont de CSV importdialoog in zijn standaard status. In de sectie Invoer kunt u de csv-parser configureren. De Commentaarprefix is het teken dat regels in de invoer aangeeft die commentaar zijn. Het Scheidingsteken: zou aangepast moeten worden om te passen bij uw invoer. Gewoonlijk is het “,” of “;” maar andere scheidingstekens kunnen voorkomen. Tenslotte kunt u er voor kiezen om een aantal lijnen aan het begin van het bestand over te slaan. Knop Selecteer/lees laat u een te lezen csv-bestand kiezen met de bovenstaande configuratie. Daarna zal de dialoog er uitzien als in de onderstaande schermafdruk.

Bovenrechts kunt u kiezen of coördinaten uitgedrukt worden in graden of uren/minuten/seconden. De sectie Mapping laat u kolommen in het CSV-bestand overeenkomen met gegevensvelden in KStars. Selecteren van Negeren kent de standaard waarde voor dit veld toe. Uw eigen tekst zal dit als de waarde voor elk gelezen object gebruiken. De sectie Type mapping koppelt tekenreeksen aan objecttypen. U kunt mappings toevoegen en verwijderen door te klikken op + of -. Wanneer u met mapping klaar bent kunt u uw instellingen testen door te klikken op Voorbeeld om de eerste paar objecten uit de csv te lezen. Als u tevreden bent kunt u klikken op OK om de gehele catalogus te importeren of uw instellingen aanpassen en opnieuw een voorbeeld te bekijken. Als referentie is een mapping voor de OpenNGC catalogus getoond in de onderstaande schermafdruk.