
Hulpmiddel Plannen van opnamen
Het hulpmiddel Planner van opnamen assisteert gebruikers bij het selecteren van welke objecten opnamen te maken. Gebruikers kunnen catalogi van aanbevolen objecten downloaden of kunnen hun eigen catalogi aanmaken en delen. Het hulpmiddel berekent wanneer van objecten in een catalogus opnamen gemaakt kunnen worden in de geselecteerde nacht gegeven de beperkingen zoals minimale hoogte, terrein en hoogte en afstand tot de maan. Het kan de objecten langs verscheidene dimensies sorteren inclusief het aantal uren dat een van een object vannacht een opname wordt gemaakt (gegeven de geografie van de gebruiker, beperkingen en mogelijke kunstmatige horizon), zijn piekhoogte, afstand tot de maan, constellatie, naam en type. Objecten kunnen ook uitgefilterd worden om verschillende redenen (bijv. type van het object, of er eerder een opname is gemaakt, trefwoorden die de gebruiker heeft toegevoegd, of het object geselecteerd is, gebruiker niet geïnteresseerd, etc). Dit hulpmiddel helpt gebruikers de objecten te onderzoeken door kleinen afbeeldingen van de objecten te tonen, de hemellocaties van de objecten op de hemelkaart te tonen en door koppelingen te leveren om internetsites te volgen met meer informatie en afbeeldingen. Het helpt bij objecten te selecteren door hoge kwaliteitsafbeeldingen te tonen, hemellocaties op de hemelkaart en en koppelingen te leveren naar internetsites met meer informatie en afbeeldingen. Dit hulpmiddel kan gebruikt worden samen met Ekos-imager of andere hulpmiddelen voor opnamen maken, maar er is op dit moment is er geen directe interactie met de echte maker van de opname; het helpt de gebruiker alleen te bepalen waarvan opnamen te maken.

Opzetten de Planner van opnamen
Het hulpmiddel Planner van opnamen kan gebruikt worden met KStars/Ekos of andere astrofotografie software. Deze sectie levert instructies voor opzetten, als u nieuw bent bij KStars. Bestaande gebruikers van KStars kunnen de initiële stappen onnodig vinden.
- KStars downloaden
Volg de instructies op https://kstars.kde.org/download/.
- KStars voor de eerste keer uitvoeren
De
Opstartassistentverschijnt wanneer u KStars voor de eerste keer uitvoert. U krijgt ook toegang vanuitInstellingen→Opstartassistent.Zet uw geografie op in de Opstartassistent.
Klik op
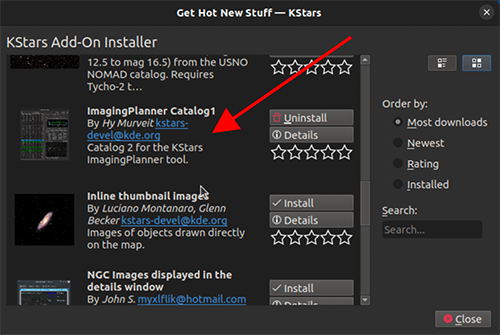
Extra gegevens downloaden.Als u KStars 3.7.6 of later uitvoert is de enige vereiste download van de Planner van opnamen de catalogus van de Planner van opnamen (zie afbeelding). Het zou
Catalog 2...of later moeten zeggen.Als u eerdere versies gebruikt is het aanbevolen ook de catalogi
NGC/IC,Open NGC,Abell,Sharpless,HicksonenLyndste downloaden om de tijd die het neemt om de Planner van opnamen voor de eerste keer op te starten aanzienlijk te versnellen.In elk geval kunt u ook elke andere catalog, die u zou willen, downloaden.
- Stel uw kunstmatige horizonbestand in (optioneel, maar leuk)
Uw horizonbestand zou als volgt geformatteerd moeten zijn, waar de regels beginnend met
#gewoon commentaar zijn en optioneel zijn,SideNearFencekan vervangen worden door wat u uw horizon wilt noemen en de andere regels hebben twee drijvende-komma getallen voor azimuth en hoogte. Dit formaat is waarschijnlijk soortgelijk of identiek aan het horizonbestandsformaat gebruikt door andere software voor afbeeldingen:# KStars kunstmatige horizon exporteren # Horizon SideNearFence 67.6236 22.7211 71.4942 21.7769 73.8178 20.6722 ...Ga naar
Instellingen→Kunstmatige horizon. Klik op het pictogram dat de 5de van links is (als u met uw muis er over zweeft en het zou moeten zeggen “Importeer een eerder geëxporteerd horizonbestand”).Navigeer naar uw horizonbestand en selecteer het.
Klik op Toepassen en klik daarna op Sluiten.
- Wijzig uw thema (Optioneel)
Als u aan een donkerder thema de voorkeur geeft, ga naar
Instellingen→Thema'sen selecteerZwart lichaam.
- De planner voor de eerste keer uitvoeren
Ga naar
Hulpmiddelen→Planner van opnamenDe planner zal starten, maar kan u vragen een catalogus te laden
Als u een catalogus nodig hebt of u gebruikt niet de meest recente catalogus (bijv. de 770-object Catalog2) die geüpload is in de bovenstaande sectie
Download extra gegevens, zoek dan en klik opCatalogus ladenrechts van de Planner van opnamen.
Het zou een menu
Open bestandmoeten laten zien beginnend met een map waar u catalogi van Planner van opnamen zou moeten vinden. Op dit moment is de laatste catalogus in een map genaamd ImagingPlanner-catalog2.Dubbelklik op die map en het zou u moeten brengen naar een map waar u in staat zou moeten zijn
all.csvte vinden.Selecteer (enkele klik)
all.csven klik opOpen. Het zou de Planner van opnamen grijs moeten maken en starten met het laden van de gegevens van de catalogus. Dit laden kan een aantal minuten duren bij voor het eerst toevoegen van een catalogus aan versies van KStars voor 3.7.6. De vertraging zou veel korter moeten zijn bij en na 3.7.6.Deze lange vertragingen zouden alleen moeten gebeuren bij de eerste keer dat u het hulpmiddel Planner van opnamen uitvoert. U zult een notitie nabij de de top zien die wordt bijgewerkt, en iets zegt als
13/66 Arp 240 wordt toegevoegd.Als u een catalogus hebt of u hebt er een volledig geladen, dan sis de Planner van opnamen gereed voor gebruik.
Volgende keren opstarten zou veel sneller moten zijn, met uw keuzes onthouden.
- Planner van opnamen gebruiken
Deze video (aangemaakt in november 2024) demonstreert het gebruik van het hulpmiddel Planner van opnamen: https://youtu.be/hrjqglLCW2s
De objectentabel
De Objecttabel, die het meeste van de linkerkant van het hulpmiddel Planner van opnamen, toont een lijst met objecten uit de geladen catalogus, met uitzondering van alles wat uitgefilterd is (zie de onderstaande sectie Filters). De table’s kolommen van de tabel tonen verschillende attributen. Selecteer een rij om details te zien, een hoogtegrafiek en een afbeelding rechts.
De tabel sorteert standaard op uren van bekijken. Klik op een kolomkop om die kolom te sorteren. Klik opnieuw om de sorteervolgorde om te keren.
Rechts klikken op een rij opent een menu met bewerkingen. Selecteer meerdere rijen met gebruik van “klik daarna shift-klik”. Het menu na rechts klikken kan op alle geselecteerde rijen werken, attributen toevoegen aan de objecten. Keuzes zijn:
Kies het geselecteerde object (of kiezen ongedaan maken van een al gekozen object). Merk op dat u meer dan één object tegelijk kunt selecteren met klik daarna Shift-klik. Een object markeren als gekozen biedt u het later eenvoudig tonen van een paar gekozen objecten in plaats van de gehele tabel. Bijvoorbeeld, u zou tijd kunnen spenderen aan het onderzoeken van vele objecten en wanneer een interessante kandidaat is gevonden, dan kan het gemarkeerd worden als gekozen voor latere bestudering. Als, na een poosje, een verzameling van gekozen objecten has been samengesteld is, kunt u alleen de gekozen objecten zien door de filterbeperking (zie onderstaand Filters).
Markeer een object als opname al gemaakt (of maak dat ongedaan). Nog eens, dit objectattribuut instellen en later filteren op deze niet tonen (of alleen deze tonen).
Markeer een object om genegeerd te worden (of dat ongedaan te maken). Gelijk aan het markeren als opname al gemaakt.
Het object centreren op de hemelkaart van KStars. Dit is meestal zinvol als automatisch centreren is uitgeschakeld in het menu Opties.
Schermafdruk. Dit is een complexere bewerking beschreven in de onderstaande sub-sectie schermafdruk.
Objecten die gemarkeerd zijn als opname al gemaakt worden getoond met een andere achtergrondkleur dan de andere afbeeldingen om ze te onderscheiden. Dit hulpmiddel weet niet automatisch dat u van een object al een opname hebt gemaakt, bijv. omdat u er een opname van hebt gemaakt met KStars/Ekos. In plaats daarvan moet u een object expliciet markeren als opname al gemaakt met het menu of de knop
Opname geladenin de sectie Filters gebruiken.Objecten die zijn gekozen worden ook anders getoond. Ze worden getoond in vet-cursief en onderstreept om ze te onderscheiden.
De regel boven de tabel toont het aantal rijen in de tabel en het totaal aantal objecten in de geladen catalogus. Hun aantallen kunnen verschillen als sommige objecten uitgefilterd zijn. Er is ook een zoekvak die een bepaald object zal vinden als het in de tabel is.
Schermafdrukken
U zou een mooi beëindigd voorbeeld van een doel dat u overweegt willen plaatsen op de Hemelkaart. Dit zou, bijvoorbeeld, een afbeelding die u bewondert op Astrobin kunnen zijn. Dit zou nuttig kunnen zijn om u later te helpen uw geplande opname in te lijsten. Iets wat u kunt doen is de mogelijkheid afbeeldingsoverlays. U kunt echter deze procedure afsnijden als al wat u wilt te doen is een tijdelijke overlay maken (alleen deze sessie). Een demonstratievideo van dit proces is hier te vinden en is onderstaand samengevat:
Zoek een mooi groot voorbeeld van de afbeelding die u als overlay wilt en open die webpagina zodat het zichtbaar is op uw scherm.
Ga terug naar het hulpmiddel Planner van opnamen en klik rechts op het object in de objecttabel. Selecteer daar de onderste optie
Schermafdruk.Uw muisaanwijzer zal naar de schermafdrukcursor wijzigen. (U kunt de toets
Escapegebruiken als u deze bewerking wilt annuleren.)Toetsenbordcommando’s gebruiken (niet de muis) navigeert terug naar de mooie afbeelding, zet uw muis in de linker bovenhoek van de afbeelding waarvan u een schermafdruk wilt, Druk in en sleep de muis naar de hoek rechtsonder van die afbeelding en laat dan de muisknop los. Als u niet weet hoe naar het tonen van de afbeelding te navigeren met toetsenbordcommando’s, moet u de groottes van het tonen van de mooie afbeelding en het hulpmiddel voor de planner van opnamen aanpassen zodat beiden zonder overlap op uw scherm passen.
Als alles goed is gegaan, zal er een venster verschijnen met een knop
Oplossen. Klik op Oplossen. Deze stap kan geautomatiseerd worden door het keuzevakBegin direct met oplossente activeren in het hamburgermenu in de hoek rechtsboven van het hoofdvenster van de Planner van opnamen.Als de afbeelding was opgelost, zou de Hemelkaart nu getoond moeten worden met uw voorbeeldafbeelding op de juiste plaats. U zou in moeten zoomen om het te zien als uw weergave te ver is uitgezoomd.
Datum, tijd en geografie
De datum waarvoor de analyse wordt gedaan kan gewijzigd worden door de datuminvoervakken rechtsboven van het hulpmiddel. Met een dag terug door te klikken op de knop links van de datum en een verder een dag met de knop rechts. Wijzigen naar een willekeurige datum door de menuknop bij de datum te selecteren of door eenvoudig de datumtekst te bewerken. De maanverlichting voor die dag wordt getoond links van de datum.
De tijd gebruikt (bijv. voor de positie van het object in de hemelkaart) en de geografie/locatie gebruikt om de hemelpositie van een object te bepalen worden genomen uit de waarden die door KStars worden gebruikt. Om uw locatie te wijzigen, ga naar het menu
Instellingen→Geografie. Om de huidige tijd te wijzigen, ga naar het menuTijd→Tijd instellen....
Opties en Help
Er zijn twee knoppen rechts van de datumbesturing.
De optieknop “hamburger” brengt een klein opties-menu. Op dit moment bevat het menu twee keuzevakken. Een bestuurt of het systeem de hemelkaart van KStars naar de coördinaten van een object verschuift wanneer het object wordt geselecteerd in de tabel. De tweede bepaalt of het hulpmiddel een onafhankelijk venster is (d.w.z. achter of voor een ander venster van KStars kan gaan), of dat het altijd voor het hoofdvenster van KStars gaat.
De tweede knop, indien er op wordt geklikt, brengt dit handboek van KStars op in een webbrowser.
ObjectInformatie
De sectie objectinformatie bij de bovenkant van de linkerkat van het hulpmiddel toont informatie over het geselecteerde object. Klik op een object en u zou deze sectie ingevuld moeten zien.
De bovenste regel zou de primaire naam, type object en objectgrootte moeten tonen.
De 2de regel zou elke alternatieve naam die het object heeft moeten tonen.
De 3de regel geeft informatie over verloop en afstand tot de maan.
De laatste regel biedt u het toevoegen van notities over het object. Deze informatie zou opgeslagen moetne worden van sessie-naar-sessie door KStars in zijn MySQL database en is gekoppeld door de naam van het object. U bewerkt deze notities door op het potloodpictogram te klikken aan de linkerkant van de notitieregel. Als u tot drie URL’s toevoegt in de notitie (bedenk http of https aan het begin van de URL te gebruiken) dan zouden ze automatisch gedetecteerd moeten worden en zal een pictogram voor het browsen van die URL’s toegevoegd moeten worden aan de notitieregel. Als de notitie, die u toevoegt, te lang is voor de regel toegekend in de sectie Objectinformatie, dan kunt u de volledige notitie zien door te klikken op de potloodknop voor bewerken.
De hoogtegrafiek
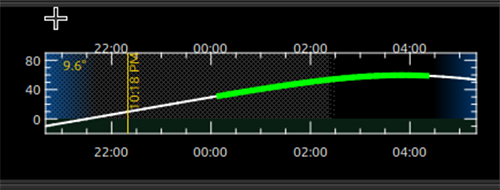
De nu geselecteerde hoogte van het object heeft een grafiek in de hoogte vs tijd. De grafiek loopt van net voor zonsondergang tot net na zonsopgang. U zult een donkere achtergrond opmerken gedurende de nacht. U kunt ook een gestreept patroon in de achtergrond opmerken die verlichting met de maan aangeeft. De hoogte in de grafiek is wit, maar er op gesuperponeerd is een dikkere groene lijn die aangeeft wanneer er van het object een opname kan worden gemaakt gegeven uw beperkingen (zie onderstaande sectie Opnamebeperkingen). Dus als u alleen een witte hoogtelijn ziet, dan kan er geen opname gemaakt worden van het object. Als u een groene lijn ziet, dan zijn dat de tijden en hoogten wanneer er van het object opnamen gemaakt kunnen worden. Als u in de grafiek klikt, dan zult u de hoogte van het geselecteerde object getoond zien linksboven in de grafiek.
In De bovenstaande schermafdruk van de grafiek correspondeert de X-as met the nachttijd tussen ongeveer 20:30 in de avond en 05:30 in de morgen. De witte lijn is een plot van de hoogte van het geselecteerde object (die toevallig NGC 6384 is, niet getoond). De er overheen gelegde heldere groene lijn toont het is op te nemen iets na middernacht tot ongeveer 4:20. De blauwe achtergrond aan beide kanten van de grafiek corresponderen met net voor en na de astronomische schemering. De schuine strepen tonen enig maanlicht tussen zonsondergang en bijna 2:30. De gebruiker klikte op de grafiek waar (op de X-as) het 22:18 was en op die tijd was de hoogte van het object 9,6º.
Beperkingen bij opnamen maken
Het hulpmiddel Planner van opnamen berekent wanneer gedurende de nacht opnamen gemaakt kunnen worden van objecten. Er zijn verschillende beperkingen die deze berekeningen beïnvloeden. Sommigen zijn in dit hulpmiddel ingesteld en een paar zijn KStars/Ekos parameters die misschien gewijzigd moeten worden.
De minimale hoogte in graden waarop van een object een opname gemaakt kan worden is gegeven in het vak Min hgt. Als u deze waarde wijzigt, zou u de kolom Uren in de objectentabel opnieuw berekend moeten zien en de grafiek opnieuw berekend in de sectie Objectinformatie.
Vergelijkbaar met hoogte kunt u de minimale scheiding van de maan in een hoek in graden wijzigen.
Als het keuzevak kunstmatige horizon is geactiveerd, dan worden de beperkingen van de kunstmatige horizon gebruikt om de mogelijke tijden voor opnamen te berekenen. De kunstmatige horizon zijn de delen van de hemel die geblokkeerd zijn voor het maken van opnamen door gebouwen of bomen of zoiets op de locatie van uw telescoop. De kunstmatige horizon is elders ingesteld in KStars (zie Menu Instellingen en ga omlaag naar
Instellingen→Kunstmatige horizonen op zijn eenvoudigst is het een lijst met azimuth en hoogte waarden. Als u gebruik maakt van dit hulpmiddel en opneemt van een gebied waar significante delen van de hemel zijn geblokkeerd, is het aanbevolen om de functie kunstmatige horizon in te stellen. Verbonden met de kunstmatige horizon is de terrein functie van de hemelkaart. Als u uw terreinafbeelding instelt, dan zult u, wanneer het hulpmiddel Planner van opnamen het object toont op de hemelkaart, zien hoe het relatief is ten opzichte van uw lokale omgeving. U moet natuurlijk een realistische opnametijd instellen–dat wil zeggen, als u plant tijdens de dagtijd en het hulpmiddel lokaliseert objecten op de huidige tijd, dan kan het object onder zijn of achter gebouwen of bomen.KStars/Ekos gebruikt astronomische schemertijden om tijden voor opnamen te beperken. De standaarden gebruiken zal resulteren in geen opnamen buiten astronomische schemertijden. Als u deze wilt aanpassen zie dan de beperkingen in het menu
Offset in Ekos-planner–wijzig deDusk Offsetpositief om opnemen later te beginnen en negatief om eerder met opnemen te beginnen. Wijzig evenzoDawn Offsetpositief om langer door te gaan met opnemen en negatief om eerder te stoppen met opnemen. Deze parameters zijn te vinden door het selecteren vanHulpmiddelen→Ekosen dan klikken op het tabbladPlanner(2de van links), klikken op de knopOptiesrechtsonder en het tabbladoffsetlinksboven.
Zoeken naar afbeelding/object
De sectie
Zoekenlevert enige sneltoetsen voor het onderzoeken van het nu geselecteerde object. De knopWikipediabrengt een browservenster voor Wikipedia met het ID van het object. Evenzo voor voorSimbad. De knopNGC/ICbrengt een browservenster voor de website Professor Seligman NGC/IC.De knop
Astrobingebruikt de zoekfaciliteit Astrobin.com om een iets gedetailleerdere afbeelding te zoeken. U kunt het laten zoeken naar afbeeldingen in Astrobin met een bepaalde afbeeldingsstraal en vereisen dat de resulterende afbeeldingen “Astrobin awards” hebben gewonnen zoals top-gekozen nominatie, top-gekozen of afbeelding-van-de-dag. Nadat u bent op de Astrobin website, kunt u, natuurlijk, de zoekbeperkingen van Astrobin wijzigen zoals u wilt, gegeven de beperkingen en mogelijkheden van de Astrobin website. De Astrobin zoekbeperkingen kunnen verborgen zijn en blootgelegd met de knop links van de zoekregel.
Filters
Er zijn een aantal manieren waarmee de getoonde objecten gefilterd kunnen worden in de objecttabel van de Planner van opnamen. Objecten filteren verwijdert ze uit de tabel, maar er is weer toegang door het filter te wijzigen. Merk op dat de filtersectie verborgen en gezien kan worden door te klikken op de kleine knop links van de filtersectie.
Items kunnen gefilterd worden op hoeveel uren er vannacht opnamen van gemaakt kunnen worden. Wijzig de waarde in het vak
Min urenen objecten met minder uren dan die waarde zullen niet getoond worden.Activeren of deactiveren van een van de objecttypen zal veroorzaken dat objecten met die typen getoond zullen worden of niet.
Gekozen: activeren van Gekozen zal veroorzaken dat alleen “gekozen” objecten getoond zullen worden. Evenzo activeren van “Niet gekozen” zal veroorzaken dat alleen objecten die niet gekozen zijn getoond zullen worden. Activeren vanNiet ter zakein de regel gekozen zal veroorzaken dat de gekozen-status irrelevant is in of een object uitgefilterd is uit de tabel.Net als gekozen, veroorzaakt
Opgenomendat objecten met label eerder opgenomen om al dan niet getoond te worden.
Genegeerdveroorzaakt dat objecten met label “Genegeerd” al dan niet getoond zullen worden.
Zoekennaar trefwoorden in de Notities die de gebruiker heeft toegevoegd aan het object en “true” is als het een woord in de notitie ziet dat overeenkomt met het trefwoord (zie de sectie Objectinformatie bovenstaand).De knop
Opgenomen ladenin de rij Opgenomen van de sectieFiltersbiedt u het laden van een al opgenomen bestand. Dit bestand is een eenvoudige lijst met objectnamen, één per rij, die u kunt construeren en laden. Dit laden zal zorgen dat het hulpmiddel die objectnamen onthoudt en markeert ze als al opgenomen wanneer deze ze tegen komt. Als u deze actie ongedaan wilt maken, de manier om dat te doen is het zetten van de filters om alleen opgenomen objecten te tonen en daarna in het menu na rechts klikken/Ctrl-klik de gewenste objecten als niet opgenomen te zetten. U kunt dat versnellen door vele objecten tegelijk te selecteren met de klik daarna de techniek Shift-klik.
Opname van object
Als het beschikbaar is zal een kleine afbeelding van het nu geselecteerde getoond worden. Op de afbeelding klikken, zal bladeren naar de informatie van de astrofotograaf of de URL-regel zal een browser openen via de gegeven koppeling een volledige afbeelding geven, als een koppeling is geleverd.
Merk op dat de knop
Catalogus ladenook in deze sectie aanwezig is.
Opzet van KStars voor de Planner van opnamen
Er zijn een aantal manieren waarop KStars opgezet kan worden om uw ervaring met dit hulpmiddel te verbeteren.
Het belangrijkste ding te doen is naar
Gegevens→Nieuwe gegevens downloaden...te gaan en een catalogus te downloaden geassocieerd met dit hulpmiddel. De eerste keer dat u dit hulpmiddel gebruikt zult u moeten klikken op de knop Catalogus laden en de gedownloade catalogus laden. Het hulpmiddel zou de catalogus in volgende runs automatisch moeten laden.Een ander belangrijk iets om te doen, ook in het bovenstaande menu
Gegevens→Nieuwe gegevens downloaden..., is het downloaden van sommige deep-sky objectcatalogi. Specifiek de NGC IC, OpenNGC, Sharpless, Abell, Lynds en Hickson catalogi zouden handig zijn. U kunt de Planner van opnamen uitvoeren zonder deze (kleine) downloads, maar de opstarttijd bij de eerste keer dat u dit hulpmiddel gebruikt zal veel langer zijn als u ze niet download.Lees de bovenstaande sectie Opnamebeperkingen en volg de suggesties daar, zodat dit hulpmiddel beter kan voorspellen hoe lang een object opgenomen kan worden gedurende de geselecteerde datum.
Geselecteerde objecten kunnen automatisch in de getoonde hemelkaart gecentreerd worden. Als die weergave nuttig is, dan wilt u misschien de zoom aanpassen zodat het dicht bij het weergaveveld van uw opnemer is. De onderstaande items zijn ook van toepassing op die weergave van de hemelkaart.
U zou ook de tijd in KStars willen instellen om weer te geven wanneer u de opname gaat maken. Zie het menu Tijd.
Als u de tijd niet instelt, dan wilt u misschien de terreinweergave verbergen (als u dat hebt ingesteld) en ook de grond niet renderen, omdat die het object zou kunnen verbergen. U toont en verbergt de terreinweergave in het menu Beeld en de grond kan uitgeschakeld worden in
Instellingen→Hulplijnenmet het keuzevakDekking voorgrond.Als u een op HiPS gebaseerde hemelkaart gebruikt, dan wilt u waarschijnlijk locale kopieën van de DSS-gegevens om het renderen van de hemelkaart te versnellen. Zie
Beeld→HiPS volledig hemeloverzichten daaronderHiPS instellingen...→Cacheen de cache inschakelen en de locatie van uw lokale kopie van de gegevens. De gegevens zijn beschikbaar op https://irsa.ipac.caltech.edu/data/hips/CDS/DSS2/color/Norder1 … /Norder7 en een andere hulpbron is https://coochey.net/?p=699Het zou nuttig zijn om een aangepast “FOV-symbool” in de hemelkaart te maken die hetzelfde is als het weergaveveld van uw opnemer is. Zie
Instellingen→FOV-symbolenen daarin selecterenNieuw→Cameraen de brandpuntsafstand van uw optiek en de specificaties van de camera.U wilt misschien het kleurenthema aanpassen, bijv. in
Instellingen→Thema'snaar Black Body als u van donkere thema’s houdt.
Catalogi
KStars levert nu een enkele catalogus van de planner voor opnamen via het menu-item
Gegevens→Nieuwe gegevens downloaden.... De hoop is dat er toekomstige gespecialiseerde catalogi zullen zijn en mogelijk ook gebruiker-gegenereerde catalogi. Daarom is de catalogus geformatteerd in een human-leesbare manier.
Catalogusformaat
Het formaat is nu een komma-gescheiden bestand met één object op een rij.
De eerste kolom is een object-ID–wat het soort ID is dat zou moeten werken met het hulpmiddel Object zoeken van KStars.
De 2de kolom is een bestandsnaam (relatief ten opzichte van de locatie van de catalogus) waar een ongeveer 300x300 jpeg afbeelding van het object gevonden kan worden.
De 3de kolom is de naam van de fotograaf van de opname.
De 4de is een koppeling naar een grotere versie van de afbeelding,
De 5de kolom is Creative Commons licentie toestemming voor het gebruik van de afbeelding (bijv. ACC is Attribution Creative Commons, ANCSACC is Attribution Non-Commercial ShareAlike Creative Commons, waarbij dezelfde conventies worden gebruikt als de website Astrobin.com).
Om een object zonder een afbeelding toe te voegen, voeg eenvoudig het object-ID toe zonder volgende komma’s of een object-ID met 4 volgende komma’s, zoals een van deze lijnen (zonder aanhalingstekens): “M 42” of “M 42,,,,”. Een voorbeeld met een volledige regel zou kunnen zijn: “M 42,M_42.jpg,Hy Murveit,https://www.astrobin.com/x4dpey/,ACC”.
Er zijn een paar andere mogelijke gespecialiseerde rijen:
Rijen die beginnen met # is commentaar.
Rijen die LoadCatalog RELATIEVE_CATALOGUS_BESTANDSNAAM bevatten betekent dat de inhoud van RELATIEVE_CATALOGUS_BESTANDSNAAM ingelezen zou moeten worden alsof ze in dit catalogsbestand zijn.
Om eigen objecten toe te voegen, maar een .csv bestand (bijv., op uw bureaublad). De eerste regel zou moeten wijzen naar de bestaande catalogus met LoadCatalog. Volgende regels zijn een lijst met uw objecten. Gebruik daarna
Catalogus ladenop uw nieuwe .csv bestand.
Catalogi laden
Catalogi ingelezen met
Gegevens→Nieuwe gegevens downloaden...worden opgeslagen in de standaard gegevensmap van KStars, maar catalogi kunnen vanaf overal ingelezen worden.Gebruik de knop
Catalogus ladenvan de Planner van opnamen om een nieuwe catalogus in te lezen.Wanneer een catalogus is ingelezen, wordt de vorige catalogus verworpen.
Wanneer het hulpmiddel start leest het de catalogus in die het laatst is geladen in de vorige sessie.