
Objects in the Sky
KStars displays thousands of celestial objects: stars, planets, comets, asteroids, clusters, nebulae and galaxies. You can interact with displayed objects to perform actions on them or obtain more information about them. Clicking on an object will identify it in the status bar, and simply hovering the mouse cursor on an object will label it temporarily in the map. Double-clicking will recenter the display on the object and begin tracking it (so that it will remain centered as time passes). Right clicking an object opens the object’s popup menu, which provides more options.
The Popup Menu
Here is an example of the right click popup menu, for the Uranus:
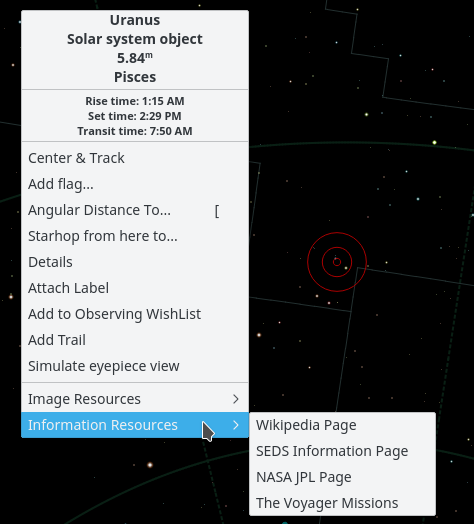
The appearance of the popup menu depends somewhat on the kind of object you right-click on, but the basic structure is listed below. You can get more detailed information about the popup menu.
The top section contains some lines of information which are not selectable: the object’s names (“Uranus”), object type (“Solar system object”), and the constellation which contains the object (“Pisces”). The next three lines show the object’s rise, set, and transit times. If the rise and set times say “circumpolar”, it means that the object is always above the horizon for the present location.
The middle section contains actions which can be performed
on the selected object, such as Center & Track, Details, and
Attach Label. See the popup menu
description for a full list
and description of each action.
The bottom section contains links to images and/or
informative webpages about the selected object. If you know
of an additional URL with information or an image of the
object, you can add a custom link to the object’s popup
menu. Use the Details item in the popup menu to open the
Object Details dialog. On the Links tab use the Add Link...
button.
Finding Objects
You can search for named objects using the Find Object tool,
which can be opened by clicking on the search icon in the
toolbar, by selecting Pointing → Find Object... menu item,
or by pressing Ctrl+F. The Find Object window is
shown below:
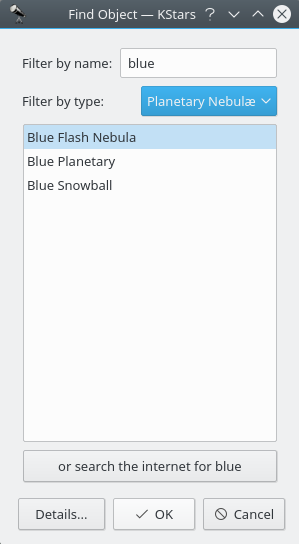
The window contains a list of (almost, see the section called “Catalogs”) all the named objects that KStars is aware of. Many of the objects only have a numeric catalog name (for example, NGC 3077), but some objects have a common name as well (for example, Whirlpool Galaxy). You can filter the list by name and by object type. To filter by name, enter a string in the edit box at the top of the window; the list will then only contain names which start with that string. To filter by type, select a type from the combo box at the bottom of the window.
KStars provides another method for resolving the objects
that are missing from any of its predefined catalogues, by
using an internet connection. Thus, if you want to find an
object that KStars is not aware of, you can easily do this
by querying several professional astronomical databases as:
SIMBAD, NED or VizieR. This can be done by entering the
object’s name and then press the or search the internet for
ObjectName button. After your object is found, you can
use it exactly as any object that is already loaded into
KStars (i.e. adding it to the Observing WishList). If the
object was not found in the online databases, then a warning
dialogue will pop-up. Once you resolve an object by using
this method, it is stored in KStars database, so if you
close KStars and open it again, your object will still be
there.
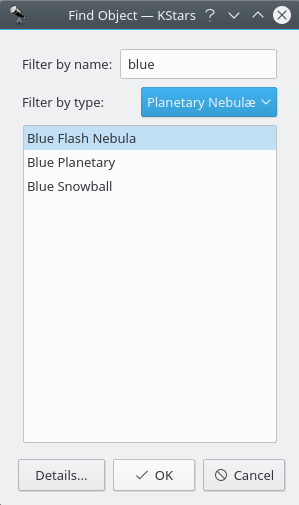
You can choose to enable or disable this feature by checking
or unchecking the Resolve names not known to KStars using
online services check box from Catalogs page, inside of
Configure - KStars dialog (select the Settings → Configure
KStars... menu item). If this checkbox is checked, when an
object name unknown to KStars is entered in the Find Dialog,
KStars will contact online services to learn about the
desired object and then add it directly to KStars database.
The objects acquired in this manner are stored in a fake
catalog, called “_Internet_Resolved”. Thus, you can enable
or disable the display of these objects by checking or
unchecking the “_Internet_Resolved” catalog from the
catalogues list. Note that you can not delete this fake
catalogue, as you can do with a custom catalogue. If this
checkbox is unchecked, then the Find Object window will be
exactly the same, excepting a minor change: the online
searching button will no longer be visible.
To center the display on an object, highlight the desired
object in the list, and press Ok. Note that if the object is
below the horizon, the program will warn you that you may
not see anything except the ground (you can make the ground
invisible in the Guides settings page, or by pressing the
Ground button in the View toolbar).
Centering and Tracking
KStars will automatically begin tracking on an object
whenever one is centered in the display, either by using the
Find Object window, by double-clicking on it, or by
selecting Center & Track from its right-click popup menu.
You can disengage tracking by panning the display, pressing
the Stop Tracking icon in the Main toolbar, or selecting
Pointing → Stop Tracking menu item.
Note
When tracking on a Solar System body, KStars will automatically attach an “orbit trail”, showing the path of the body across the sky. You will likely need to change the clock’s timestep to a large value (such as “1 day”) to see the trail.
Keyboard Actions
When you click on an object in the map, it becomes the selected object, and its name is identified in the statusbar. There are a number of quick key commands available which act on the selected object:
- C
Center and Track on the selected object.
- D
Show the Details window for the selected object.
- L
Toggle a visible name label on the selected object.
- O
Add the selected object to the Observing wish-list.
- T
Toggle a visible curve on the sky, showing the path of the object across the sky (only applicable to Solar System bodies).
Note
By holding down the Shift key, you can perform these actions on the centered object, rather than the selected object.