Catalogs
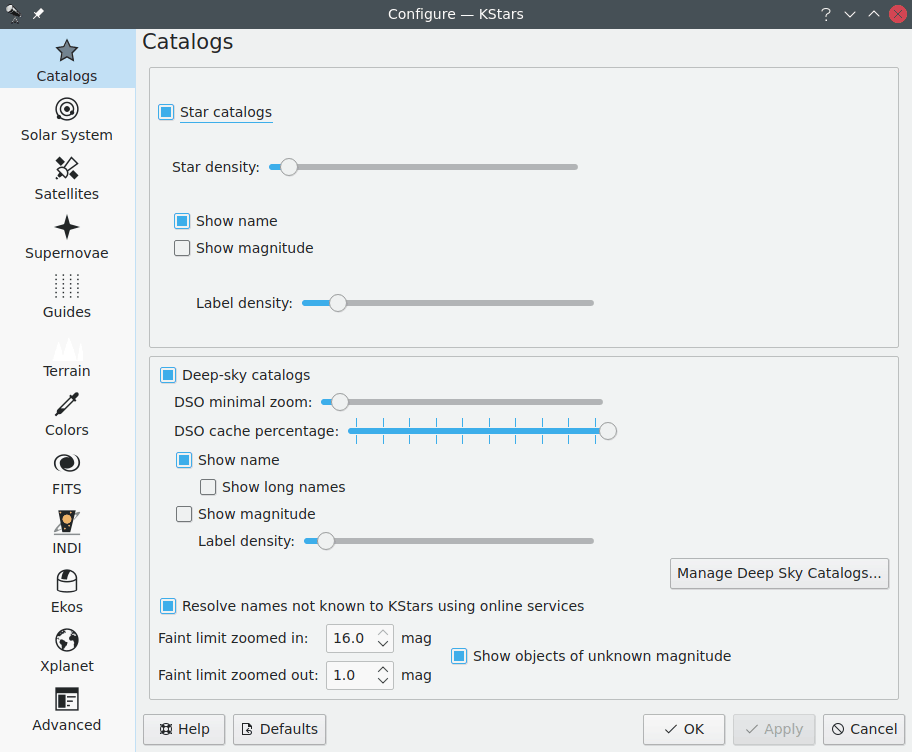
In the Catalogs page, you can configure which object catalogs are displayed by KStars, as well as how much information you would like to be included on the Sky Map. By default, KStars includes ~300,000 named and unnamed stars up to magnitude 8. For Deep Sky Objects, the included catalog is the New General Catalog (“NGC”) including the Index Catalog (“IC”) and the Messier Catalog.
The New General Catalog of Nebulae and Clusters of Stars (abbreviated as NGC) is a catalog of ca 7,840 deep-sky objects.
The Index Catalog of Nebulae and Clusters of Stars (abbreviated as IC) serves as a supplement to the NGC, and contains an additional 5,386 objects, collectively known as the IC objects.
You can install new catalogs using KStars “Add-On Installer”.
You can open it via the Data → Download New Data... menu item.
You can choose from a list of catalogs, including (but not
limited to):
Steinicke NGC/IC Catalog: is a more complete NGC/IC catalog.
Abell Planetary Nebulae Catalog: is a catalog of 86 planetary nebulae. The maximum magnitude is represented by Abell 47’s value of 19.5.
Sharpless HII region Catalog: is the Sharpless (Sh2) catalog of HII regions (diffuse nebulae).
Hickson Compact Groups: is a catalog consisting of 99 compact groups of galaxies.
Tycho-2 Star Catalog: is a catalog of more than 2.5 million of the brightest stars. It contains stars with a magnitude value from 8.0 to 12.5.
USNO NOMAD Catalog: is a catalog of about 100 million stars with magnitude from 12.5 to 16.5. Note that is requires Tycho-2 to be installed.
The following is a summary of catalogs in KStars:
Name |
Abbreviation |
Number of objects |
Magnitude |
|---|---|---|---|
Default Catalog |
Default |
~300,000 |
Up to 8 magnitude |
Tycho-2 |
Tycho2 |
more than 2.5 million |
8.0-12.5 |
Naval Observatory Merged Astronomic Dataset |
USNO NOMAD |
100 million |
12.5-16.5 |
Name |
Abbreviation |
Number of objects |
Magnitude |
|---|---|---|---|
New General Catalog of Nebulae and Clusters of Stars (OpenNGC) |
NGC |
7,840 |
|
Steinicke NGC/IC |
|||
Abell Planetary Nebulae Catalog |
86 |
Up to 19.5 magnitude |
|
Sharpless HII region Catalog |
Sh2 |
||
Hickson Compact Groups |
99 |
Note
A potentially more up-to-date listing can be found in the catalog repository documentation.
The Stars section allows you to manage how stars are displayed
in KStars. You can choose to see the stars or not by checking
the Star catalogs checkbox. If you check it, then multiple
options will be enabled. Thus, you can set how many stars are
drawn on the map using the Star density: slider. You can also
customize KStars to toggle star name and
magnitudes. Star names are drawn next
to bright stars. To display labels of fainter stars, increase
the Label density: slider.
Below the stars section, the Deep-Sky Objects section controls
the display of several non-stellar object catalogs. You can
toggle the display of Deep Sky Objects and control the display
of their names and magnitudes. By default, the list of deep-sky
objects includes the Messier, NGC and IC catalogs. Addons
catalogs are available via the Data → Download New Data... menu
item where you can download catalogs provided by KStars team
and the community through the catalog packaging
repository.
The DSO minimal zoom: slider controls the minimal zoom level
for which the DSOs are shown. Increasing the minimal zoom level
can lead to performance improvements when panning the skymap
zoomed-out. The DSO cache percentage: slider regulates how much
of the DSO master catalog is being kept in memory. If you
experience memory issues with large catalogs, try lowering the
percentage. The Label density: slider controls the perceived
density of labels for the DSOs. If labels start to overlap and
the skymap begins to look too crowded, try tuning this option.
The Faint limit zoomed in/out: regulates up to which magnitude
objects are shown on the skymap (higher magnitude is fainter).
If Show objects of unknown magnitude is ticked, objects of
unknown magnitude are always shown.
The following sections will detail how DSO catalogs work in KStars and how they’re managed.
The DSO Catalog Database
Note
This section aims at introducing the catalog database of KStars in simple but technical terms. It can be skipped without missing anything essential but helps understanding how to deal with and create (custom) catalogs.
DSO catalogs in KStars are just SQL (sqlite3) database tables. Each catalog is represented by its own table which contains all its objects and an entry in a catalog metadata table. Additionally, catalogs may be imported or exported from and into stand-alone database files.
Each object has the usual properties like name and coordinates but additionally features two IDs. The first ID is the unique identifier for the specific object and is calculated by hashing all the object fields along with the catalog id. Because objects can be contained in several catalogs each object has an additional object id (OID) that identifies the physical object and may be shared by several objects of different catalogs.
To speed up object lookup all enabled catalogs are merged into a master table. Each catalog has a priority number and if several objects with the same OID occur the one from the catalog with the highest priority is loaded. The objects from the master catalog are then drawn on the sky and generally available in KStars.
Currently, deduplication (the assignment of OIDs) is only supported by the tooling of the catalog packaging repository. The aim of this tool-chain is to reproducibly build catalogs in a homogeneous environment. Every catalog is implemented as a python module and provides standard methods to acquire data, parse it and find duplicates in other catalogs. All downloadable catalogs are implemented this way. If you’d like to make a catalog of your own available for KStars, it is recommended that you implement it as a package in the repository. The tooling provided there is so flexible, that it should work for you. For more information on how to do that see the catalog repository documentation. If you are not familiar with python programming you can request the addition of a catalog by opening a ticket in the repository or contacting the maintainers. KStars provides also provides means to create custom catalogs by manually entering data or importing CSV tables, but those are less flexible and offer no deduplication.
The Catalog Management GUI
The catalog management GUI is reached via the Data → Manage
DSO Catalogs... menu item and is displayed below.
The DSO catalog management interface.
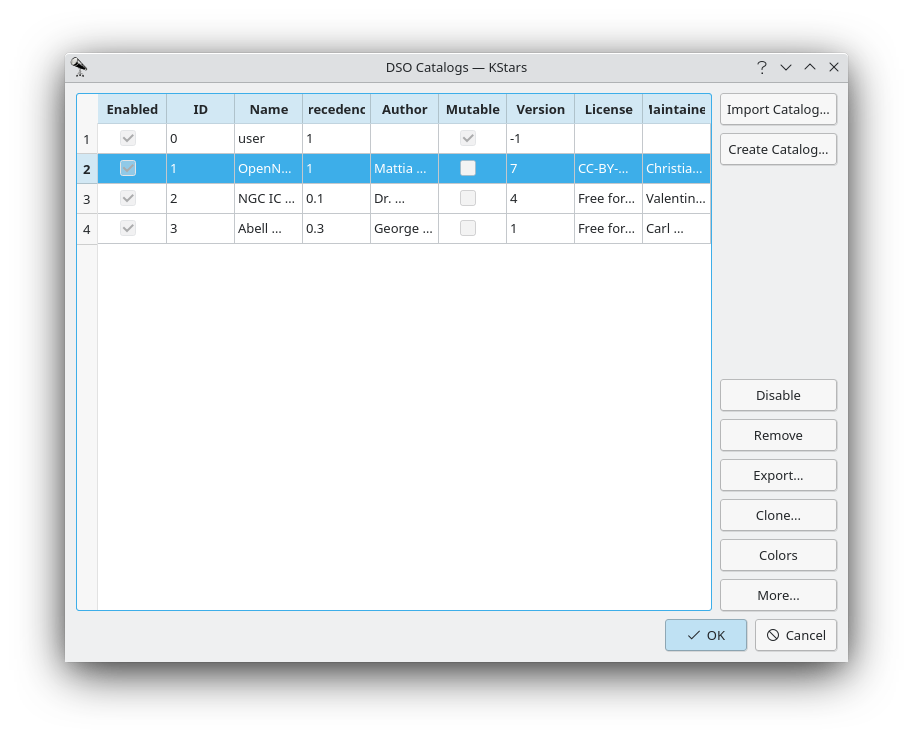
On the left, a list of catalogs is displayed. In this list,
you can read off key catalog properties, including whether a
catalog is enabled, what its ID is and what its name is. The
Mutable column signifies whether the catalog can be edited
or not. Catalogs which have been downloaded from the catalog
repository via the Data → Download New Data... menu item are
usually immutable whereas user-created catalogs aren’t. You
can always Clone a catalog to make it mutable.
The buttons in the upper right corner allow you to add catalogs to the database.
Import Catalog...Import a catalog in the
.kscatformat from a file.This is usually done to try out new versions of catalogs that haven’t yet been picked up by the usual download server.
With the buttons in the lower right corner, you can add, remove, modify and explore catalogs. Their actions always refer to the currently selected catalog (the highlighted row on the left).
Create Catalog...Create a new catalog. See the section called “Creating a new Catalog”.
Enable / DisableEnable or disable a catalog.
This is reflected in the skymap upon closing the catalog management GUI.
RemoveRemove a catalog from the catalog database.
This is reflected in the skymap upon closing the catalog management GUI.
Export...Export a catalog into a
.kscatfile.The resulting file can be imported with
Import Catalog...button.Clone...Make an exact copy of the catalog and insert it into the database.
This is useful if you wish to make modifications to an immutable catalog.
Note
Note however that this is not the recommended way to alter catalogs that are provided by the catalog packaging repository i.e. the catalogs downloaded via the
Data→Download New Data...menu item.ColorsOpen the catalog color editor (See the section called “Catalog Color Editor”.).
This will open a dialog which allows you to set the colors in which objects from the selected catalog will be displayed for each color scheme.
More...Open the catalog details dialog. (See the section called “Catalog Details Dialog”.)
In there, you can see the contents of the catalog, as well as some more meta information. Amongst other things, you can also edit its contents (if it is mutable).
Creating a new Catalog
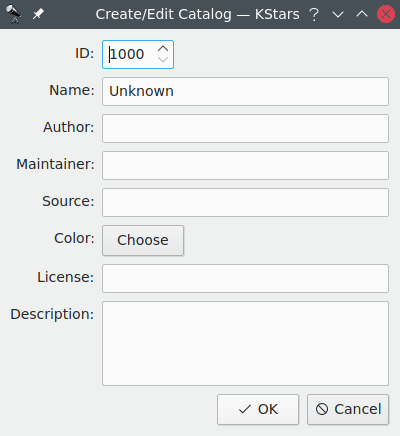
This dialog reached through the catalog management GUI (see
the section called “The Catalog Management
GUI”). The ID: field will be
automatically chosen but can be changed. The Color: field
configures in which color the objects of the catalog will be
displayed. All the other values are optional or have
sensible defaults. You can, of course, change these values
at a later point.
Upon clicking Ok an empty catalog with the meta data entered
into the dialog will be added to the database and can then
be filled with objects. (See the section called “Catalog
Details Dialog” and the
section called “Importing CSV (and similar
formats)”.)
Catalog Color Editor
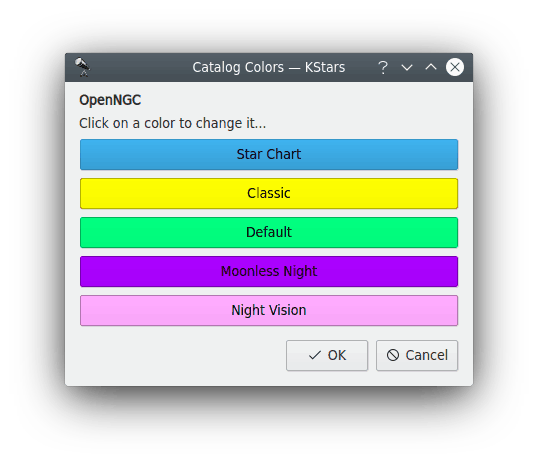
This dialog reached through the catalog management GUI (see the section called “The Catalog Management GUI”). Each button represents the color that objects will be drawn in for a specific color scheme. Clicking on a button will allow you to choose a color with a color picker. The button colors are initialized with the default colors from the catalog specification. The color “default” is the color which will be chosen for the catalog if there is no color set for a color scheme.
Catalog Details Dialog
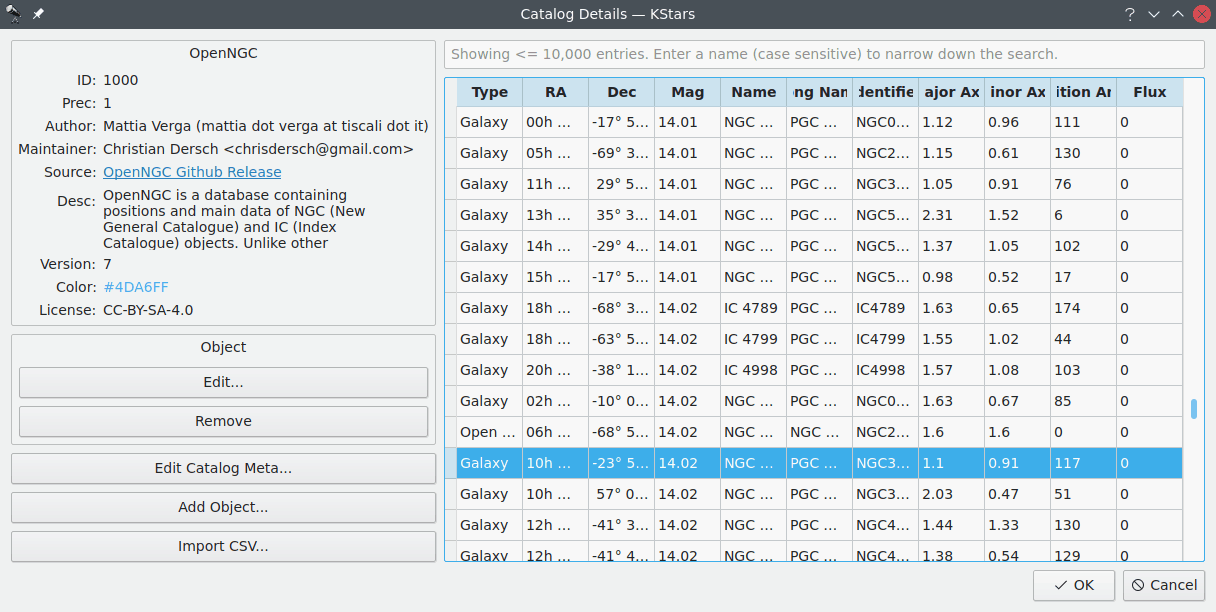
This dialog reached through the catalog management GUI (see the section called “The Catalog Management GUI”). In the top left corner, the catalog metadata is being displayed. On the right, a table of all objects in the catalog is being shown. The search line above the table filters objects by name. Double-clicking a row opens the object details dialog (see the section called “Object Details Window”).
Selecting a row enables the Object menu on the left.
Selecting multiple rows performs the single-object action
for each selected object.
Edit...Edit the catalog object. (See the section called “Adding/Editing Objects”).
RemoveRemoves the object from the catalog.
Below the Object section, the general catalog options are
situated.
Edit Catalog Meta...Edit the catalog metadata displayed in the top left. This opens the dialog described in the section called “Creating a new Catalog”.
Add Object...Add an object to the catalog. (See the section called “Adding/Editing Objects”.)
Import CSV...Import objects from a tabular text format (csv, tsv, etc.) into the catalog. (See the section called “Importing CSV (and similar formats)”.)
Adding/Editing Objects
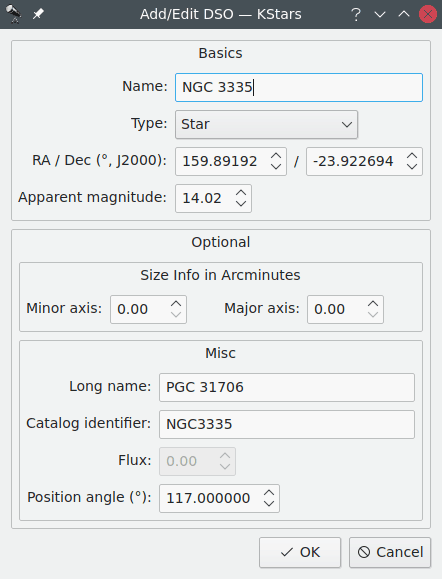
This dialog allows to create or edit a deep sky object (DSO). The Basics section contains fields that have to be filled in.
Name:The name of the object which will be displayed in the sky.
Type:The type of the object.
RA / Dec (°, J2000):The coordinates of the object in degrees and with respect to the J2000 epoch.
Apparent magnitude:The apparent magnitude of the object.
The Optional section contains data fields that are
optional, is divided into two subsections. They are set
to and can be left at their defaults.
The Size Info in Arcminutes subsection. The object is
modeled as an ellipse which is described by its major and
minor axis.
The Misc subsection.
Long name:A longer, more descriptive name.
Usually, the long name is something like “Andromeda Galaxy” for the object M31. It can contain alternative designations and names in other catalogs as well.
Catalog identifier:A catalog internal identifier.
For example the screenshot above, the object originates from the OpenNGC catalog where each row is identified by “NGCXXXX”.
Flux:The flux of the object. Only applies for radio sources.
Position angle (°):If the object is extended, it must have some orientation in the sky. The position angle is the angle between its major axis and a straight line to the north pole.
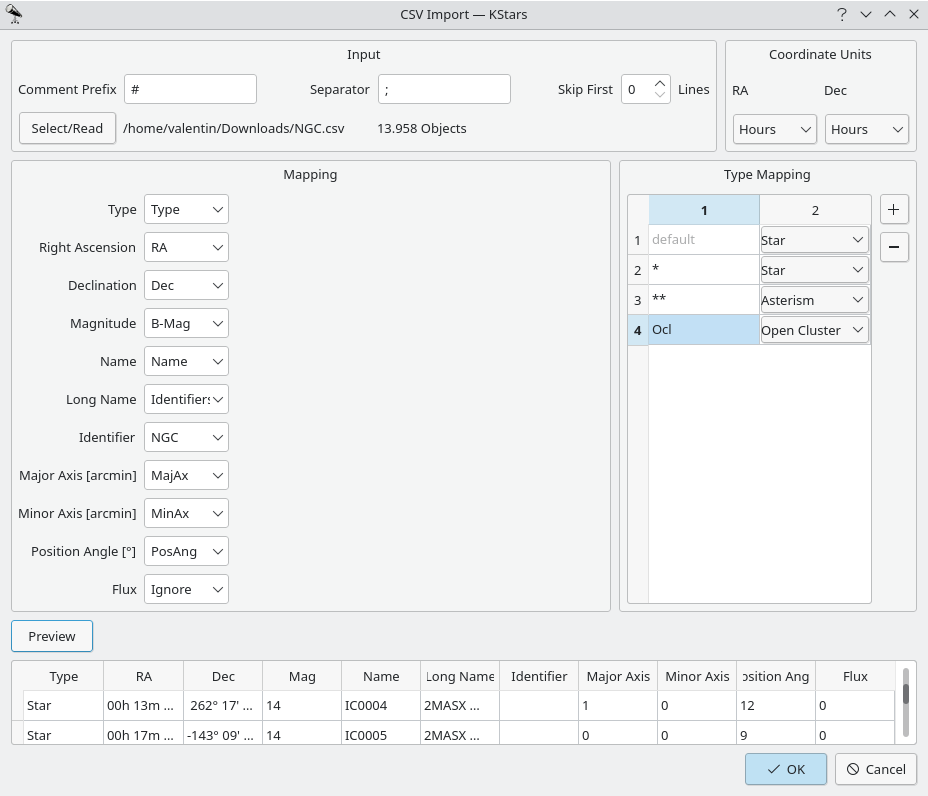
Importing CSV (and similar formats)
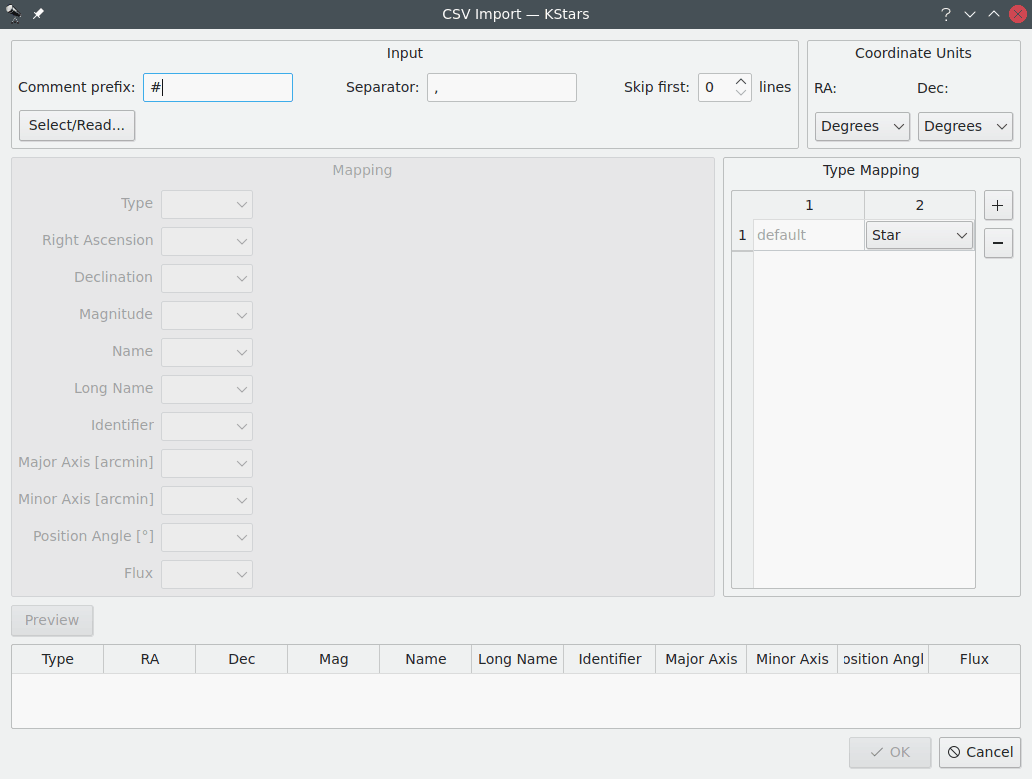
The screenshot above shows the CSV import dialog in its
default state. In the Input section, you can configure
the csv parser. The Comment prefix: is the character that
signals commented-out lines in the input. The Separator:
should be adjusted to fit your input. Usually, it is “,”
or “;” but other separators can occur. Finally, you can
choose to skip a number of lines at the beginning of the
file. Select/Read button lets you choose a csv file to
read with the above configuration. After that, the dialog
will look as in the screenshot below.
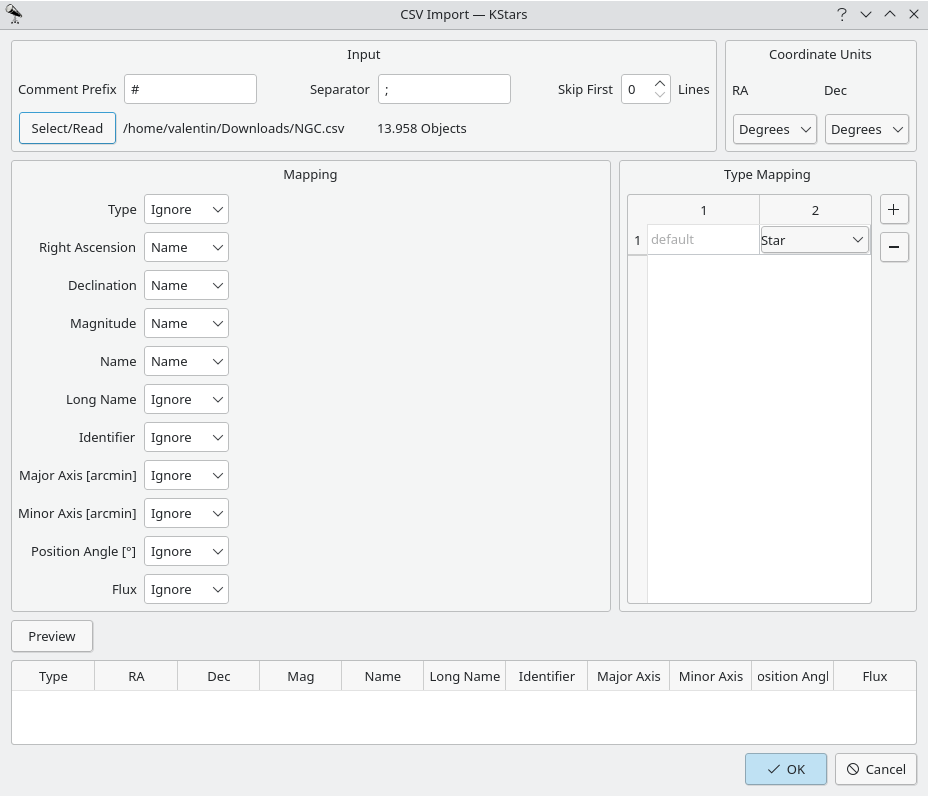
In the top right you can choose whether coordinates are
being expressed in degrees or hours/minutes/seconds. The
Mapping section lets you map columns in the CSV file to
data fields in KStars. Selecting Ignore assigns the
default value for this field. Entering your own text will
use this as the value for every object being read. The
Type Mapping section maps strings to object types. You
can add and remove mappings by clicking + or -. When
you’re done mapping, you can test your settings by
clicking Preview to read the first few objects from the
csv. If you are satisfied you can click OK to import the
whole catalog or adjust your settings and preview again.
As a reference, a mapping for the OpenNGC catalog is
shown in the below screenshot.