
Adjusting orientation of the sky map
You can tweak various settings to make the orientation of the sky map match the view through your optical instrument.
First, pick the coordinate system that matches your mount. For
an equatorially mounted instrument, switch to the Equatorial
Coordinate mode in the View menu or by pressing the Space
key. The option to toggle the coordinate system should read
Switch to Horizontal View (Horizontal Coordinates) when the
current mode is Equatorial Coordinates. For an
altazimuth-mounted instrument or naked-eye viewing, switch to
Horizontal Coordinates, so that the option in the View menu
reads Switch to Star Globe View (Equatorial Coordinates). This
sets the base coordinate system used to render the sky map, and
also sets the reference for the orientation of the skymap:
zenith or north.
If your instrument is using an erecting prism, typically used
on Schmidt-Cassegrain and refracting type telescopes, the view
through the eyepiece will be mirrored horizontally. You can
have the sky map match this by checking the Mirrored View
option under the View menu, or using the key combination
Ctrl+Shift+M.
Next, to rotate the sky map freely, you can hold down the
Shift key and drag the mouse on the sky map. A temporary
overlay will appear showing the direction of north and zenith
at the point, and displaying the angle they make with the
vertical in a counterclockwise sense. The orientations of
zenith and north will update as you rotate the sky map. Letting
go of Shift or the mouse button will stop the rotation
operation. As you pan the sky map or focus it on different
objects, the rotation you set is retained as an offset from the
reference direction. The reference direction is north when
using Equatorial Coordinates and zenith when using Horizontal
Coordinates. As a reminder, the reference direction is solid
and brighter in the temporary overlay. The temporary overlay
also marks the East direction, which will be clockwise from
north when mirrored and counter-clockwise when not mirrored.
For the two common orientations of erect and inverted, the
rotation can be set / reset using the View → Skymap Orientation
submenu. Select North Down or Zenith Down as is applicable to
set an orientation of 180 degrees.
If you are visually observing through an eyepiece of an
instrument, you may need to do some more correction. For the
common case of a large Dobsonian telescope (or more generally a
Newtonian design mounted on an altazimuth mount), an additional
systematic correction is of help. This correction applies
because we stand erect while using the telescope irrespective
of the angle the telescope tube is making with the ground. So
as we move the telescope in altitude, an additional correction
depending on the altitude of the object needs to be applied to
make the sky map match the view through the eyepiece where the
observer is standing erect. This correction is enabled by
choosing the appropriate “Erect observer correction” option in
the View → Skymap Orientation submenu. The correction depends
on which side the telescope’s focuser is placed by the
manufacturer. If when observing just above the horizon through
the eyepiece, the sky is on the observer’s right side (and the
mirror to the left), pick the Erect observer correction,
right-handed option. Similarly, if the sky is to the left of
the observer, choose the Erect observer correct, left-handed
option. This correction only makes sense in Horizontal
Coordinate mode and is disabled when using equatorial
coordinates.
We now provide some examples of how to use these settings for various instruments:
Naked-eye observing: Choose Horizontal Coordinates and a
Zenith Uporientation underView→Skymap Orientation.Camera on an equatorially mounted telescope: Choose Equatorial Coordinates and adjust the orientation of the sky map so that it matches your camera. As your mount points to different regions of the sky, the orientation should be rendered correctly.
Using binoculars: Same settings as Naked-eye observing
Eyepiece of an altazimuth Schmidt-Cassegrain telescope with an erecting prism: Under the
Viewmenu, chooseMirrored View, and under theSkymap Orientationsub-menu, chooseZenith Up. Finally, tweak the rotation manually to match the eyepiece view according to the angle you are using for your erecting prism.Using a RACI finder scope on an altazimuth mounted telescope, looking straight down into it: Same settings as Naked-eye observing, except you may need to tweak the orientation manually once if you have it mounted at an angle
Using a RACI finder scope on an altazimuth mounted telescope, looking through it from the side: In addition to the aforementioned, enable Erect observer correction for the appropriate side.
Using a straight-through (inverted view) finder scope on an altazimuth mounted telescope: Choose
Horizontal Coordinatesand a sky-map orientation ofZenithDown inView→Skymap OrientationsubmenuEyepiece of a Dobsonian telescope: Choose Horizontal Coordinates, and in the
View→Skymap Orientationsubmenu, selectZenith Downand enable the erect observer correction, picking the left/right handed option as is appropriate for your telescope. Then adjust the orientation manually once to match your telescope eyepiece view, and it should henceforth track it correctly.
It is typical in visual astronomy to use at least three
different instruments: the unaided eye, a finder scope, and the
main telescope. The orientations of these three will have
different settings and will need frequent modification of all
the aforementioned options. To make it easy to adjust these
settings together, KStars provides the Views feature. This
feature is accessible through the View → Views menu and the
options contained therein. The Arbitrary view is not a real
view, but the option that gets selected when the sky-map
orientation is modified manually through the previously
described options. The rest of the views are bona fide views.
New views may be added, or the existing views may be edited,
removed, or re-ordered using the View → Views → Edit Views...
option. Choosing this brings up a window to manage the views:
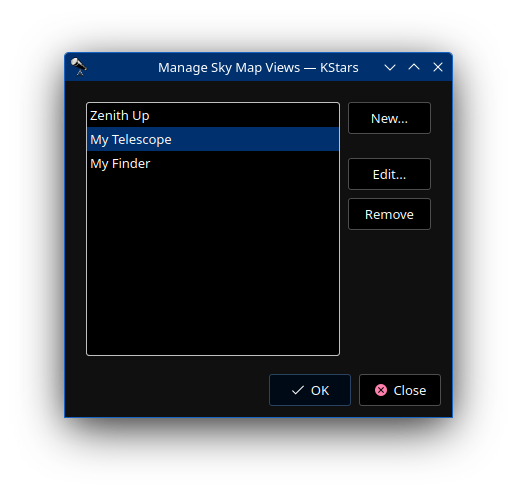
To remove a view, simply select the view from the list and
delete it using the Remove button. To re-order the views, use
the mouse to drag the view you wish to move and drop it at its
destination in-between two other entries. To edit a view,
select the view from the list and click Edit.... To create a
new view, click the New... button. The Edit... and New...
options bring up a view editor interface:
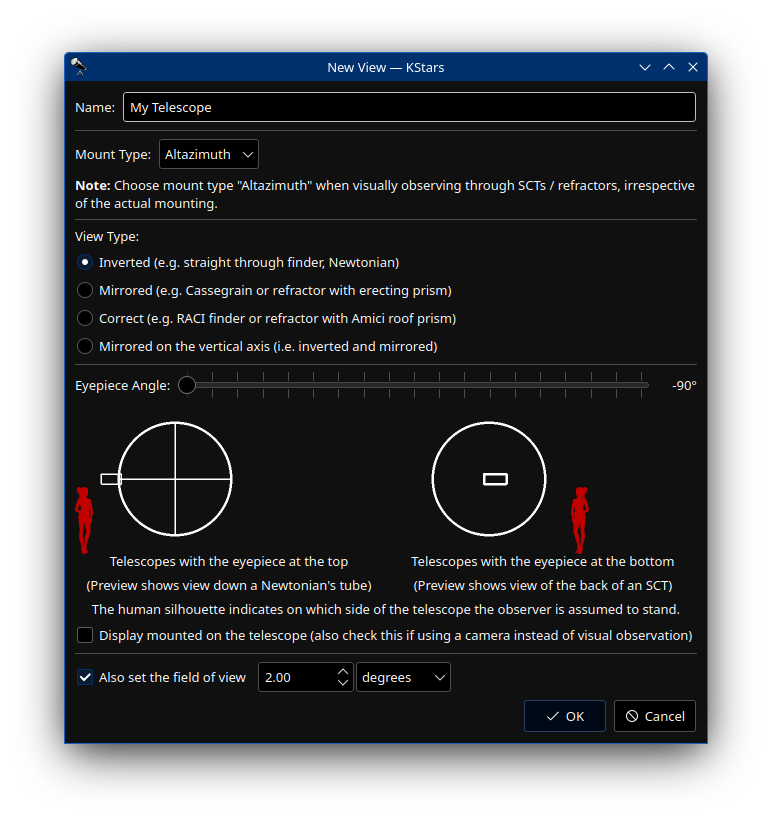
The Name field carries a unique name for the View. The Mount
Type determines whether the reference direction used for
orientation will be north or zenith. Typically, one would set
this to the type of mount used for the telescope. However, when
using refractors and Schmidt-Cassegrain Telescopes (SCTs) with
a rotatable diagonal, the observer will have a tendency to
re-orient the eyepiece for comfort so that the eyepiece remains
at a fixed angle with respect to the zenith. For this reason,
it makes sense to choose Altazimuth mounting even when the
telescope is actually on an equatorial mount. Choose Equatorial
mounting when the focuser will not be re-oriented, such as when
using a camera on an equatorially mounted telescope. For
Newtonian telescopes that invert (i.e. rotate by 180 degrees
but do not change the handedness) of the view, pick the
Inverted option. This is also the correct option for
straight-through refractors and finder scopes. When using a
erecting prism diagonal, the prism erects the inverted image by
flipping it up-down. This results overall in a left-right
mirrored image. Thus for telescopes that use an erecting prism,
pick Mirrored. A special kind of prism called an Amici roof
prism not only erects the image vertically, but it also
prevents left-right mirroring of the image. Finder scopes
incorporating such a diagonal are normally called “Right-Angle
Correct Image” or RACI finder scopes. Such diagonals may also
be used on refractors and SCTs. When using such a prism that
produces a correct image, choose the Correct option. The
Mirrored on the vertical axis option is not encountered in
typical astronomical instruments, but is provided for
completeness. Two more factors need to be considered: one is
the angle of the eyepiece with respect to the reference
direction (north / zenith), and the other is the orientation of
the observer’s head (and notion of the vertical) which we
explained when describing the erect observer correction
feature. These two aspects are configured using the single
slider titled Eyepiece Angle. Two illustrations below the
slider show the interpretation of this setting; on the left, as
seen from the front as is more convenient for Newtonian
telescopes, and on the right as is seen from the back, more
convenient for refractors and Cassegrains. The observer
naturally stands on the side that makes it more convenient to
look through the eyepiece, so the erect observer correction is
automatically adjusted accordingly. For eyepiece angles that
are less than -1 degree on the slider, the Erect observer
correction, right-handed option is applied. Similarly, for
eyepiece angles that are greater than +1 degree, the Erect
observer correction, left-handed is applied. At 0 degrees, no
erect observer correction is applied. This correction is
indicated by a silhouette of a person standing on the
appropriate side of the telescope. In our convention, most
mass-manufactured Dobsonians seem to have a correction around
+45 degrees. Incidentally, this correction is also useful for
finder scopes with diagonals. One may want to explicitly
disable the erect observer correction even when the eyepiece
angle is not zero. This is useful in case the view comes from a
CCD camera that does not change angle with respect to the
telescope body (unlike an observer’s head), or if the display
showing KStars’ sky map is mounted on the telescope body
itself. In this case the Display mounted on the telescope
option can be checked. For the opposite effect, i.e. where the
eyepiece angle is zero, but the observer is leaning to look
through the eyepiece from one of the two sides, set the
eyepiece angle to plus or minus 2 degrees to enable the erect
observer correction; the minor difference will not be
noticeable. Finally, one may want triggering of the view to
also set the field-of-view of the sky map to some value, for
example to set the FOV of a finder scope. In this case, the
Also set the field of view check-box may be checked, and an
approximate field-of-view to adjust may be specified. If this
is not enabled, the zoom level of the sky map is not altered
when this view is applied.