
Imaging Planner Tool
The Imaging Planner tool assists users in selecting objects to image. Users can download catalogs of recommended objects, and may create and share their own catalogs. The tool calculates when objects in a catalog may be imaged on the selected night, given constraints such as minimum altitude, terrain, and moon elevation and separation. It can sort the objects along several dimensions including the number of hours an object may be imaged tonight (given the user’s geography, constraints and possibly artificial horizon), the object’s peak altitude, distance from the moon, constellation, name, and type. Objects can also be filtered out for several reasons (e.g., object type, whether it was previously imaged, keywords, whether the object has been selected, or if the user is uninterested). This tool aids object selection by displaying high-quality images, showing sky locations on the skymap, and providing links to follow to internet sites with more information and images. It allows attaching notes and links to objects, and selecting them for future consideration. This tool can be used with Ekos or other imaging tools, but does not directly interact with the imager; it helps the user decide what to image.

Setting up the Imaging Planner
The Imaging Planner tool can be used with KStars/Ekos or other astrophotography software. This section provides setup instructions, if you are new to KStars. Existing KStars users may find the initial steps unnecessary.
- Download KStars
Follow the instructions at https://kstars.kde.org/download/.
- Run KStars for the first time
The
Startup Wizardappears when you run KStars for the first time. You can also access it fromSettings→Startup Wizard.Setup your geography in the Startup Wizard.
Click
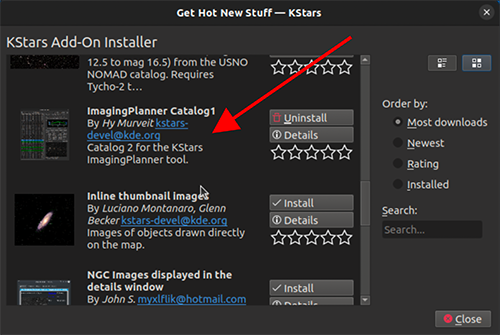
Download Extra Data.If you are running KStars 3.7.6 or later, the only required Imaging Planner download is the Imaging Planner catalog (see image). It should say
Catalog 2...or later.If you are running earlier versions, it’s recommended to also download the
NGC/IC,Open NGC,Abell,Sharpless,Hickson, andLyndscatalogs to greatly speed up the time it takes the Imaging Planner to start up for the first time.In either case, you can also download any other catalogs you may want.
- Setup your Artificial Horizon file (optional, but nice)
Your horizon file should be formatted as follows, where the lines starting with
#are just comments and are optional,SideNearFencecan be replaced by whatever you want to call your horizon, and the other lines have two floating point numbers for azimuth and altitude. This format is likely similar or identical to the horizon file format used by other imaging software:# KStars Artificial Horizon export # Horizon SideNearFence 67.6236 22.7211 71.4942 21.7769 73.8178 20.6722 ...Go to
Settings→Artificial Horizon. Click the icon that’s the 5th from the left (if you hover your mouse over it, and it should say “Import a previously exported horizon file”).Navigate to your horizon file and select it.
Click Apply and then click Close.
- Change your theme (Optional)
If you prefer a darker theme, go to
Settings→Themesand selectBlack Body.
- Running the planner for the first time
Go to
Tools→Imaging PlannerThe planner will start, but may prompt you to load a catalog
If you need a catalog or aren’t using the most recent catalog (e.g. the 770-object Catalog2) that was uploaded in the
Download Extra Datasection above, then find and clickLoad Catalogon the right side of the Imaging Planner.
It should bring up an
Open filemenu starting with a folder where you should be able to find Imaging Planner catalogs. Currently the latest catalog is in a folder called ImagingPlanner-catalog2.Double click that folder, and it should bring you to a folder where you should be able to find
all.csv.Select (single click)
all.csvand clickOpen. It should grey out the Imaging Planner, and start loading the catalog’s data. This load can take several minutes when first adding a catalog on KStars versions before 3.7.6. The delay should be much shorter on and after 3.7.6.These long delays should only happen the first time you run the Imaging Planner tool. You will see a note near the top that keeps updating, saying things like
13/66 adding Arp 240.If you have a catalog, or you’ve completed loading one, the Imaging Planner is ready for use.
Subsequent startups should be much faster, with your choices remembered.
- Using the Imaging Planner
This video (created November 2024) demonstrates using the Imaging Planner tool: https://youtu.be/hrjqglLCW2s
The Object Table
The Object Table, which occupies most of the left side of the Imaging Planner tool, displays a list of objects from the loaded catalog, excluding any that have been filtered out (see the Filters section below). The table’s columns display various attributes. Select a row to see details, an altitude graph, and an image on the right.
The table sorts by imaging hours by default. Click a column header to sort by that column. Click again to reverse the sort order.
Right-clicking a row opens a menu of operations. Select multiple rows using “click then shift-click”. The right-click menu can operate on all selected rows, adding attributes to the objects. Choices are:
Pick the selected object (or un-pick an already picked object). Note you can select more than one object at a time with click then shift click. Marking an object as picked will allow you to later just display a few picked objects instead of the whole table. For example, one may spend time researching many objects, and when an interesting candidate is seen, it may be marked picked for later examination. After a while, when a collection of picked objects has been put together, one can only show the picked objects by using the picked filtering constraint (see Filters below).
Mark an object as already imaged (or undo that). Again, one can set this object attribute and later filter for not displaying these (or only displaying those).
Mark an object to be ignored (or undo that). Similar to marking as already imaged.
Center the object on the KStars SkyMap. This mostly makes sense if auto-centering is disable in the Options menu.
Screenshot. This is a more complex operation described in the screenshot sub-section below.
Objects that are marked as imaged are displayed with a different background color as the other images in order to distinguish them. This tool doesn’t automatically know that you’ve imaged an object, e.g. because you may have imaged it with KStars/Ekos. Rather you must explicitly mark an object as imaged using the menu, or use the Load Imaged button in the Filters section.
Objects that are picked are also displayed differently. They are shown in bold-italic and underlined in order to distinguish them.
The line above the table displays the number of rows in the table and total number of objects in the loaded catalog. They numbers may be different if some objects are filtered out. There is also a search box which will find a certain object if it is in the table.
Screenshots
You may want to place a nice finished example of a target you are considering on the SkyMap. This could be, for example, an image you admire on Astrobin. This could be useful to later help you frame your planned capture. One can do this using the image overlays capability. However, you can shortcut this procedure if all you want to do is create a temporary overlay (this session only). A demonstration video of this process can be found here and is summarized below:
Find a nice large example of the image you want to overlay and open up that web page so it’s visible on your screen.
Go back to the Imaging Planner tool and right click on the object in the object table. There select the bottom option
Screenshot.Your mouse cursor will change to the screenshot cursor. (You can use the
Escapekeyboard character if you want to cancel this operation.)Using keyboard commands (not the mouse) navigate back to the nice image, move your mouse in the upper left corner of the image you wish to screenshot, press down and drag the mouse to the bottom right corner of that image, and then release the mouse. If you don’t know how to navigate to the image display with keyboard commands, you’d need to adjust the sizes of the nice image display and the imaging planner tool such that both fit on your screen unobstructed.
If all has gone well, a window will pop up with a
Solvebutton. Click on Solve. This step can be automated by checking theStart Solving Immediatelycheckbox in the hamburger menu in the upper right corner of the main Imaging Planner window.If the image was solved, the SkyMap should now be displayed with your example image placed correctly. You may need to zoom-in to see it if your view is zoomed out too far.
Date, Time and Geography
The date for which the analysis is done can be changed by the date input boxes at the top-right of the tool. One can be move back a day by clicking the button on the left of the date, and one can more ahead one day with the button to the right. One can change to an arbitrary date by selected the menu button by the date, or by simply editing the date text. The moon illumination for that day is displayed to the left of the date.
The time used (e.g. for the object’s position in the skymap) and the geography/location used to determine an object’s sky position are taken from the values being used in by KStars. To change your location, go to the
Settings→Geographicmenu. To change the current time, go to theTime→Set Time...menu.
Options and Help
There are two buttons to the right of the date control.
The options “hamburger” button brings up a small options menu. Currently the menu contains two checkboxes. One controls whether the system slews the KStars SkyMap to an object’s coordinates when the object is selected in the table. The second decides if the tool is an independent window (i.e. can go behind or in front of other KStars windows), or if it always goes in front of the main KStars window.
The 2nd button, when clicked, brings up this KStars Handbook in a web browser.
Object Information
The object information section near the top of the left-side of the tool displays information about the selected object. Click on an object and you should see this section filled in.
The top line should display the primary name, object type, and object size on the top line.
The 2nd line should display any alternate names the object has.
The 3rd line give transit and moon-separation information.
The last line allows you to add notes about the object. This information should be stored from session-to-session by KStars in its MySQL database, and is keyed by the object name. You edit these notes by clicking on the pencil icon at the left of the Note line. If you add a upto three URLs in the note (remember to use http or https at the start of the URL) then they should be automatically detected and an icon for browsing those URLs will be added to the Notes line. If the note you add is too long for the line allocated in the Object Information section, you can always see the full note by clicking the editing pencil button.
The Altitude Graph
The currently selected object’s altitude is graphed in the Altitude vs Time graph. The graph runs from just before sunset to just after sunrise. You’ll notice a dark background during the night. You may also notice a hash-pattern indicating moon illumination in the background. The altitude is graphed in white, but superimposed on top of it is a thicker green line indicating when the object can be imaged given your constraints (see Imaging Constraints section below). Thus if you just see a white altitude line, then the object cannot be imaged. If you see a green line, then those are the times and altitudes when the object can be imaged. If you click in the graph, you will see the altitude of the selected object displayed in the upper left of the graph.
In the above graph screenshot, the X axis corresponds to the nighttime between about 20:30 in the evening and 05:30 in the morning. The white line is a plot of the altitude of the selected object (which happened to be NGC 6384, not displayed). The superimposed bright green line shows it is imageable between a little after midnight until about 4:20am. The blue background on both sides of the graph correspond to just before and after astronomical twilight. The hashing shows some moonlight between sunset and almost 2:30am. The user clicked on the graph where (on the X axis) it was 10:18pm, and at that time the object’s altitude was 9.6º.

Imaging Constraints
The Imaging Planner tool calculates when during the night objects can be imaged. There are several constraints that affect this calculation. Some are set in this tool and a few are KStars/Ekos parameters that may need to be modified.
The minimum altitude in degrees that an object can be imaged is given in the Min alt box. If you change this value, you should see the Hours column recalculated in the object table and the graph recalculated in the Object Info section.
Similar to altitude, you can change the minimum Moon-separation angle in degrees.
If the artificial horizon checkbox is checked, then artificial horizon constraints are used to calculate the possible imaging times. The artificial horizon are the parts of the sky that are blocked from imaging by buildings or trees or the like at your telescope’s location. The artificial horizon is set up elsewhere in KStars (see Setting Menu and go down to
Settings→Artificial Horizon) and at its simplest is a list of azimuth and altitude values. If you make use of this tool and image from an area where significant parts of the sky is blocked, it is recommended you set up and use the artificial horizon feature. Associated with the artificial horizon is the SkyMap’s terrain feature. If you set up your terrain image, then when the Imaging Planner tool displays the object on the SkyMap, you will see when it is relative to your local environment. Of course, you’d need to set a realistic imaging time–that is, if you plan during the daytime and the tool is locating objects at the current time, then the object may be set or behind buildings or trees.KStars/Ekos uses astronomical twilight times to constrain imaging times. Using the defaults will result in no imaging outside of astronomical twilight times. If you wish to adjust this please see the constraint in the
Ekos Scheduler's Offsetmenu–change theDusk Offsetpositive to start imaging later, and negative to start imaging earlier. Similarly changeDawn Offsetpositive to continue imaging longer, and negative to stop imaging sooner. These controls can be found by selectingTools→Ekosand then clicking on theSchedulertab (2nd from the left), clicking theOptionsbutton on the bottom right, and theoffsettab on the top-left.
Image/Object Search
The
Searchsection provides some shortcuts for researching the currently selected object. TheWikipediabutton brings up a browser window for Wikipedia using the object’s ID. Similar forSimbad. TheNGC/ICbutton brings up a browser window for the Professor Seligman NGC/IC website.The
Astrobinbutton uses the Astrobin.com search facility to perform a slightly more detailed image search. You can cause it search for images in Astrobin with a certain image radius, and require that the result images have won “Astrobin awards” such as top-pick nomination, top-pick or image-of-the-day. Once you browse to the Astrobin website, you can, of course, modify the Astrobin search constraints as you like given the constraints and capabilities of the Astrobin website. The Astrobin search constraints can be hidden and exposed using the button on the left of the Search line.
Filters
There are a number of ways one can filter the objects displayed in the Imaging Planner’s object table. Filtering objects removes them from the table, but they can be accessed again by changing the filter. Note that the filter section can be hidden and exposed by clicking the small button at the left of the filter section.
Items can be filtered by how many hours they are image-able this night. Change the value in the
Min
Hours
box, and objects with fewer hours than that value will not be displayed.Checking or unchecking one of the object types will cause objects with those types to be displayed or not.
Picked: Checking Picked will cause only “picked” objects to be displayed. Similarly checking “Not Picked” will cause only objects not picked to be displayed. CheckingDon't Carein the picked line will cause the picked-status to be irrelevant in whether an object is filtered from the table.Similar to picked,
Imagedcauses objects labeled as previously imaged to be displayed or not.
Ignoredcauses objects labeled as “Ignored” to be displayed or not.
Keywordsearches inside the Notes the user has added to the object, and is “true” if it sees a word in the note that matches the keyword (see the Object Information section above).The
Load Imagedbutton in the Imaged row of theFilterssection allows you to load an already-imaged file. This file is a simple list of object names, one per row, that you can construct and load. Loading this will cause the tool to remember those object names and mark them as already imaged when it encounters them. If you wish to undo this action, the way to do that is to set the filters to just show imaged objects and then use the right-click/control-click menu to set the desired objects as not imaged. You can speed that up by selecting many objects at a time with the click then shift-click technique.
Object Image
If it is available, a small image of the currently selected object is displayed. Clicking on the image, astrophotographer credit line, or URL line will open a browser with given link to a full image, if a link was provided.
Note that the
Load Catalogbutton is also in this section.
KStars setup for the Imaging Planner
There are a number of ways KStars could be setup to improve your experience with this tool.
The most important thing to do is go to
Data→Download New Data...and download a catalog associated with this tool. The first time you use this tool you’ll need to click on theLoad Catalogbutton and load the downloaded catalog. The tool should automatically download the catalog in subsequent runs.Another important thing to do if you are running earlier versions of KStars (pre 3.7.6), also in the above
Data→Download New Data...menu, is to download some deep-sky object catalogs. In particular the NGC IC, OpenNGC, Sharpless, Abell, Lynds and Hickson catalogs would be handy. You can run the Imaging Planner without these (small) downloads, but the start-up time on the first time you use this tool will be much longer if you don’t download them.Read the Imaging Constraints section above and follow suggestions there, so that this tool can better predict how long an object can be imaged during the date selected.
Selected objects can be automatically centered in the SkyMap display. If that display is useful, you may want to adjust the zoom so that it is close to your imager’s field of view. The items below also apply to that SkyMap display.
You may also want to set the time in KStars to reflect when you’ll be imaging. See the Time menu.
If you don’t set the time, you may want to hide the terrain display (if you’ve set that up) and also not render the ground, as those may obscure the object. You show and hide the terrain display in the view menu, and the ground can be disabled in
Settings→Guideswith theOpaque Groundcheckbox.If you’re using a HiPS-based skymap, you would likely want local copies of the DSS data to speed-up the rendering of the SkyMap. See
View→HiPS All Sky Surveyand under thereHiPS Settings...→Cacheand enable the cache and enter the location of your local copy of the data. The data is available on https://irsa.ipac.caltech.edu/data/hips/CDS/DSS2/color/Norder1 … /Norder7 and another resource is https://coochey.net/?p=699It would be useful to create a custom SkyMap “FOV Symbol” which is the same as the field-of-view of your imager. See
Settings→FOV Symbols, and inside there selectNew→Camera, and enter the focal length of your optics and the camera’s specifications.You may want to adjust the color theme, e.g. in
Settings→Themesto Black Body if you like dark themes.
Catalogs
KStars currently provides a single imaging-planner catalog via the
Data→Download New Data...menu item. The hope is that there will be future specialized catalogs, and possibly user-generated catalogs too. Therefore the catalog is formatted in a human-readable way.
Catalog Format
The format is currently a comma-separated file with one object on a row.
The first column is an object ID–which is the kind of ID that would work with the KStars Find Object tool.
The 2nd column is a filename (relative to the catalog’s location) where an approximate 300x300 jpeg image of the object can be found.
The 3rd column is the name of the image’s photographer.
The 4th is a link to a larger version of the image,
The 5th column is Creative Commons license permission for using the image (e.g. ACC is Attribution Creative Commons, ANCSACC is Attribution Non-Commercial ShareAlike Creative Commons, using the same conventions as the Astrobin.com website).
To add an object without an image, simply add the object ID with no following commas, or an object ID with 4 following commas, such as one of these lines (without quotes): “M 42”, or “M 42,,,,”. An example full line might be: “M 42,M_42.jpg,Hy Murveit,https://www.astrobin.com/x4dpey/,ACC”.
There are a few other possible specialized rows:
Rows that start with # are comments.
Rows that contain LoadCatalog RELATIVE_CATALOG_FILENAME mean that the contents of RELATIVE_CATALOG_FILENAME should be read in as if they were in this catalog file.
To add custom objects, create a .csv file (e.g., on your desktop). The first line should reference the existing catalog with LoadCatalog. Subsequent lines list your objects. Then, use
Load Catalogon your new .csv file.
Loading Catalogs
Catalogs read in from
Data→Download New Data...are stored in the standard KStars data directory, but catalogs can be read in from anywhere.Use the Imaging Planner’s
Load Catalogbutton to read in a new catalog.When a catalog is read in, the previous catalog is discarded.
When the tool starts, it reads in the catalog last loaded in the previous session.