Ordonnanceur
Introduction
L'ordonnanceur d'Ekos est un composant important dans le flux de travail de l'imagerie. Il se connecte à INDI, démarre et arrête tous les autres modules d'Ekos, organise les tâches en tenant compte des contraintes et priorités, les surveille lorsqu'elles sont exécutées et arrête le système de manière sécurisée quand elles sont terminées ou avant l'aube. Que vous imagiez plusieurs cibles sur plusieurs nuits ou simplement une seule cible pendant quelques heures, il est conseillé d'utiliser l'ordonnanceur pour contrôler les sessions d'imagerie.
Table de l'ordonnanceur
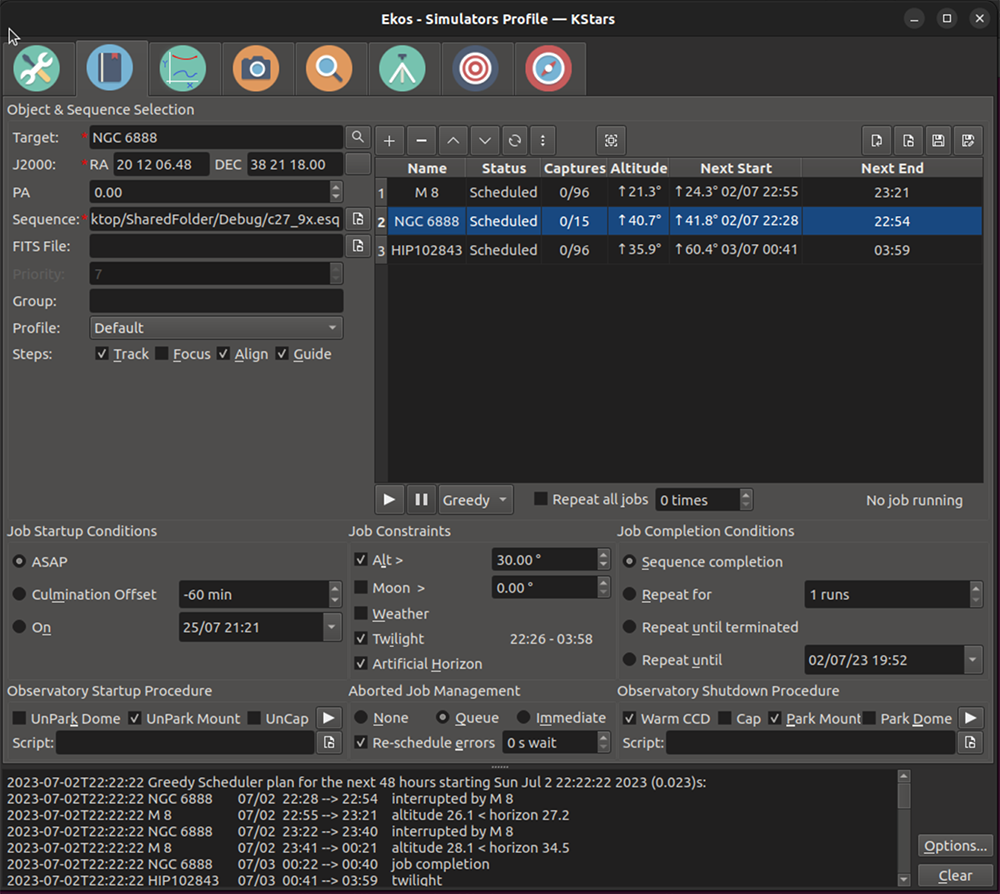
Le cœur de l'ordonnanceur est une table affichant la liste des tâches prévues par l'opérateur. À chaque tâche est associée des attributs (décrits dans la section de configuration ci-dessous). Les attributs sont le nom de la tâche, la position vers laquelle le télescope doit pointer pour cette tâche, une description des types d'images à acquérir, les contraintes de la tâche (p. ex. l'altitude, le crépuscule, la lune, les obstructions du paysage, etc.), ainsi que toutes les choses qui doivent être accomplies avant et après la tâche, ainsi que les stratégies à adopter en cas d'erreurs.
Vous pouvez ajouter, supprimer, modifier ou changer l'ordre des tâches dans la table de l'ordonnanceur.
Vous pouvez ajouter une ligne de tâche dans l'ordonnanceur en cliquant sur le bouton
+au-dessus de la table, si tous les attributs requis sont renseignés (nom, position et fichier de séquence).Si une ligne est sélectionnée, vous pouvez la supprimer en cliquant sur le bouton
-au-dessus de la table.En cliquant sur une ligne, vous pouvez la monter avec le bouton
^ou la descendre avec le boutonvdans la liste de tâches.En double-cliquant sur une ligne, les attributs de cette tâche seront renseignés avec les différents réglages de la page de l'ordonnanceur. Vous pouvez ensuite modifier un ou plusieurs attributs et ensuite cliquer sur la coche au-dessus de la table (après avoir double-cliqué, le bouton
+devient unecoche), et les nouveaux attributs seront assignés à cette tâche.
Graphique de l'ordonnanceur
Le tableau du planificateur est associé à un graphique représentant l'exécution planifiée des tâches. Chaque ligne du graphique correspond à une ligne du tableau, affichant l'altitude de la tâche au fil du temps.
Si une tâche est planifiée pour cette nuit, sa ligne est mise en évidence en vert pendant ses plages d'exécution prévues.
Des flèches à droite (et éventuellement à gauche) du graphique permettent de passer à « demain soir » et « la nuit suivante », ou de revenir à la nuit en cours.
Un clic sur une ligne du tableau met en évidence la ligne correspondante dans le graphique. Il est également possible d'identifier les lignes en passant la souris dessus.
Un clic dans le graphique affiche l'heure et l'altitude pour la tâche sélectionnée.
Le graphique peut être agrandi ou réduit en faisant glisser le séparateur pointillé entre le graphique et le tableau.
Algorithme de l'ordonnanceur
La table ci-dessus dresse la liste des tâches par ordre de priorité, avec les tâches plus hautes (de numéro de ligne plus basse) ayant une priorité plus haute que celles plus bas dans la liste (de numéro de ligne plus haut).
L'ordonnanceur revoit régulièrement l'ordre des tâches et le moment où elles doivent être lancées. Il peut lancer une tâche puis plus tard, temporairement la mettre en pause en faveur d'une autre. Il peut devenir inactif si aucune tâche ne peut être lancée (p. ex. durant le jour) et rester dans cet état jusqu'à ce qu'une tâche peut être lancée. Le but est de conserver l'équipement le plus occupé possible tout en respectant les priorités de la table. Voici comment il fonctionne.
Quand l'ordonnanceur démarre (ou quand il revoit ses plans, ce qu'il fait toutes les secondes quand il est actif), il passe à travers toute la liste de tâches, en commençant par celle de plus haute priorité, jusqu'à celle de plus basse priorité. Quand il trouve une tâche qui peut être lancée, il le fait, même s'il doit mettre en pause une tâche en cours. Une tâche ne peut être lancée que si elle remplit toutes les contraintes, p. ex., la cible n'est pas bloquée par l'environnement (un arbre par exemple) et qu'elle satisfait la contrainte d'altitude minimale ou encore qu'elle n'a pas terminé toutes les acquisitions souhaitées.
L'algorithme montre l'heure projetée de départ et d'arrêt pour toutes les tâches de la table de l'ordonnanceur. Il affiche également une estimation de la durée d'exécution pour les 48 prochaines heures dans le panneau de journalisation situé au bas de la fenêtre. Veuillez voir la capture d'écran au début de cette section.
L'algorithme décrit ci-dessus est connu comme l'algorithme glouton. C'est celui qui est recommandé. Dans des versions précédentes d'Ekos, il y avait un autre algorithme, nommé Classique, qui n'est plus disponible dans Ekos. Il ne pouvait pas mettre en pause une tâche en faveur d'une autre et donc n'optimisait pas l'équipement autant que l'algorithme glouton.
Il y a une option à cocher dans le menu des options de l'ordonnanceur nommée
Utiliser l'ordonnanceur gloutonqui est cochée par défaut. Le système fonctionne comme décrit ci-dessus quand elle est cochée. Lorsqu'elle est décochée, le système est empêché de traiter les tâches de plus basse priorité si les tâches de plus haute priorité ne peuvent être exécutées. L'efficacité de l'utilisation du système est moindre mais donne davantage de contrôle sur l'ordonnanceur.
Fichiers de l'ordonnanceur (.esl)
La table de l'ordonnanceur avec sa liste de tâches peut être enregistrée sur le disque dur pour pouvoir être réimportée plus tard. Ces données sont enregistrées dans un fichier « .esl ». Les boutons pour cela ainsi que pour importer d'autres fichiers « .esl » de séquence se trouvent au-dessus de la table sur la droite.
Réglages
L'ordonnanceur d'Ekos propose une interface simple pour aider l'utilisateur à configurer les conditions et les contraintes requises pour une tâche d'observation. Pour ajouter une tâche, il faut d'abord choisir une cible et ses coordonnées ainsi que le fichier de séquence.
Chaque tâche de l'ordonnanceur est composée de :
Nom de la cible et ses coordonnées: sélectionnez la cible depuis la Boîte de recherche ouAjouterla cible depuis le Planificateur d'observation. Vous pouvez également indiquer un nom personnalisé. Les coordonnées peuvent également être copiées à partir de la carte du ciel en utilisant le bouton situé à la droite des coordonnées.Le
APfacultatif : l'angle de position (ou rotation de l'image) peut être indiqué pour les appareils possédant la capacité physique de tourner l'appareil.Un
fichier FITSfacultatif : si vous spécifiez un fichier « FITS », le résolveur astrométrique résoudra le fichier et utilisera la position centrale en AD et DEC comme coordonnées cibles.Un fichier
Séquence: le fichier est (préalablement) construit dans le module d'acquisition. Il contient une liste de spécifications pour l'acquisition où chacune détaille le nombre d'images à acquérir, les filtres à utiliser, la durée d'exposition, le gain, les détails de nommage du fichier, les réglages de température, les préfixes, le dossier d'enregistrement, etc.
Profil: spécifie le profil d'équipement à utiliser au démarrage d'Ekos. Si Ekos & INDI sont déjà démarrés, cette option est ignorée.
Pas: l'opérateur choisit les étapes au démarrage de la tâche. Les possibilités sont 1) Démarrer le suivi, 2) La mise au point automatique, 3) Le lancement de la procédure d'alignement par la résolution, 4) Le démarrage du guidage automatique. Une ou plusieurs de ces étapes peuvent être sélectionnées.
Conditions de démarrage: spécifie les conditions qui doivent être satisfaites avant que la tâche ne soit démarrée. Présentement, l'utilisateur peut choisir de démarrer aussi vite que possible (Dès que possible), ou quand la cible est près ou a passé la culmination ou enfin à une heure spécifique.
Contraintes: ce sont des conditions qui doivent être remplies à tout moment durant le processus d'exécution des tâches. Cela inclut l'altitude minimum de la cible, l'élongation minimale de la Lune, l'observation du crépuscule, les contraintes d'altitude des horizons artificiels et enfin les conditions météorologiques.
Conditions d'achèvement: spécifie les conditions d'achèvement de la tâche d'observation. La sélection par défaut est de noter la tâche comme étant terminée une fois que le processus est achevé. Des conditions additionnelles permettent à l'utilisateur de répéter la séquence un certain nombre de fois ou indéfiniment ou jusqu'à une heure spécifique.
Autres options
Il existe plusieurs autres options pour contrôler le comportement de l'ordonnanceur. Elles se trouvent dans le menu d'options de l'ordonnanceur, présenté ci-dessous, accessible via le bouton
Options…situé en bas à droite de l'ordonnanceur.

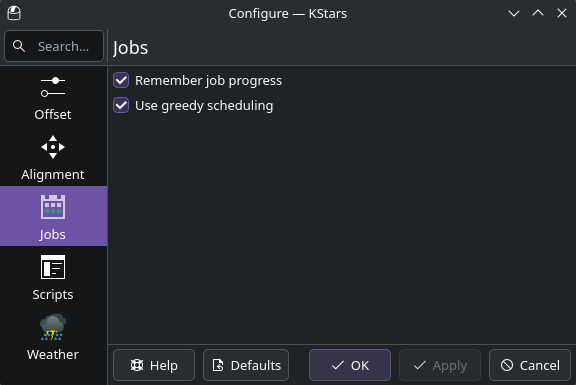
Se souvenir de la progression de la tâche
Parmi les réglages ci-dessus, un est particulièrement important et connu sous le nom
Se souvenir de la progression de la tâche. Quand cette case est cochée, l'ordonnanceur parcourt la liste des images déjà enregistrées sur le disque dur et fait en sorte de ne pas les acquérir à nouveau. L'intérêt est que si une tâche est redémarrée, ou relancée une autre nuit, ou si plusieurs tâches sont exécutées ensemble, l'arrêt et le démarrage des tâches reprendra là où elles s'étaient arrêtées. Cela fonctionne bien avec l'optionRépéter jusqu'à terminé. Si elle n'était pas cochée, les tâches recommenceraient au début de la séquence, ce qui n'est probablement pas ce que vous souhaitez. Cependant, si les images ne sont pas enregistrées sur le même ordinateur qui exécute Ekos, cette fonctionnalité ne fonctionne pas et les tâches redémarreront depuis le début.Un effet secondaire de cette option et qui peut créer de la confusion est que si une tâche est lancée avec la condition Terminer la séquence et que toutes les images ont été acquises, et que vous souhaitez relancer cette tâche, l'ordonnanceur ne programmera pas cette tâche car il croit que toutes les images ont déjà été acquises. Pour éviter cela, il faudra soit déplacer les images ailleurs sur le disque ou modifier la condition d'achèvement de tâches à N fois ou Répéter jusqu'à achèvement.
Répétitions de groupe
Cette fonctionnalité permet d'exécuter deux tâches ou plus de l'ordonnanceur avec approximativement la même priorité, de telle sorte que si elles peuvent toutes être exécutées, elles progresseraient plus ou moins à la même vitesse. Cela peut être utile, par exemple, si vous imager une mosaïque avec plusieurs tuiles, mais est généralement utilisable pour n'importe quel groupe de tâches.
La priorité de l'ordonnanceur glouton est normalement déterminée par la position de la ligne dans la table des tâches. Celles se trouvant vers le haut ont une priorité plus haute que celle vers le bas de la table. Ainsi, si une tâche est sur la ligne 2 (tâche 2) et dont l'option
Répéter jusqu'à achèvementest activée, et que toutes les contraintes sont satisfaites, une tâche plus bas dans la liste (p. ex. tâche 3) ne sera pas prévue pour exécution.Si vous souhaitez alterner les tâches, vous pouvez attribuer chaque tâche au même nom de
groupeet donner aux tâches une des conditions d'achèvement (p. ex. Répéter N fois ou Répéter jusqu'à achèvement). Ainsi configurées, les tâches dans le même groupe laisseront la place aux autres tâches si elles ont terminées plus d'itérations que les autres tâches. Ainsi si la tâche 2 du groupe « Mon-Groupe » termine sa deuxième itération et que la tâche 3 du même groupe n'a terminé que 0 ou 1 itération, quand viendra le moment de programmer la tâche 2, ce sera la tâche 3 qui sera exécutée.Dans la pratique, imaginez que vous ayez une mosaïque à 6 panneaux que vous souhaitez alterner. Vous pouvez mettre chaque tâche dans le même groupe et les faire se répéter par exemple 5 fois. Ensuite, elles s'exécuteront en pas fixe. La cadence de changement sera contrôlée par la longueur du fichier de séquence attribué à chaque tâche. Vous ne voulez pas avoir une cadence trop courte (p. ex. pose de 2 minutes), parce que les changements impliquent plusieurs opérations telles que l'alignement, le guidage et la mise au point.
Répétition de toutes les tâches
Il existe une case à cocher et un champ nombre juste sous la table de tâches qui permet de répéter la programmation entière N fois. Cela peut être utilisé pour alterner quelques tâches. Il suffit de lister les tâches sur l'ordonnanceur, régler pour répéter N fois et les tâches se répéteront. Toutefois, ce changement est incompatible avec l'option « Se souvenir de la progression » et indisponible si cette option est cochée. (Remarque : cette option est recommandée).
Modification des tâches actives
Il est possible de modifier la table de tâches et les attributs des tâches individuelles pendant que l'ordonnanceur est actif. Comme toujours, il faut double-cliquer sur une tâche, modifier les attributs et cliquer sur la case à cocher pour enregistrer les modifications. Si vous modifiez une tâche active, celle-ci sera redémarrée (les étapes initiales (rotation, mise au point, alignement, guidage) seront relancées. Vous pouvez également déplacer les tâches pour modifier les priorités, ajouter de nouvelles tâches ou en supprimer. Vous ne pouvez pas supprimer une tâche active.
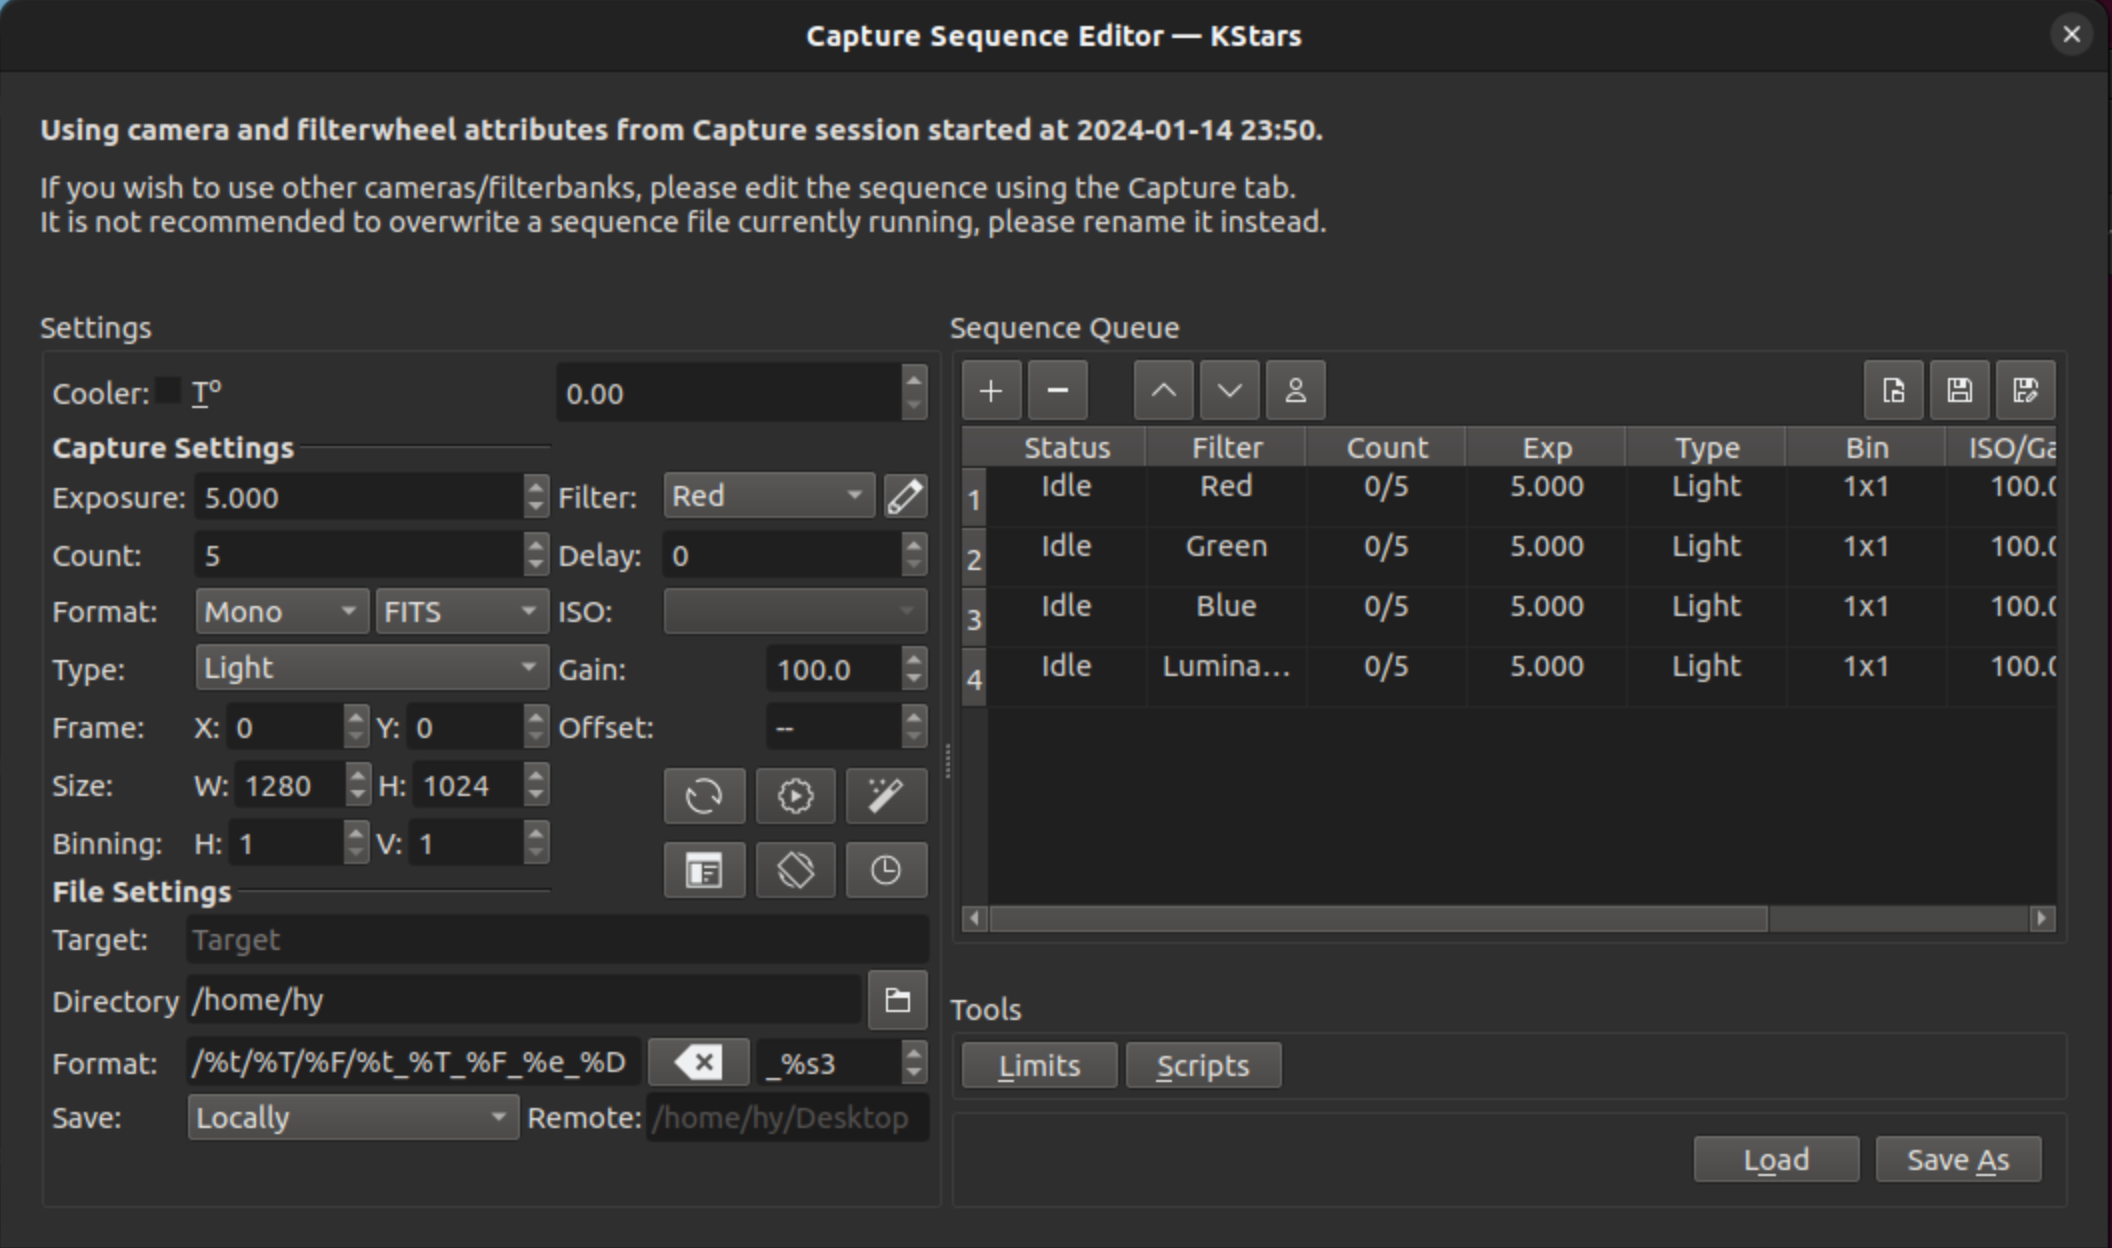
Un attribut important des tâches de l'ordonnanceur est leur fichier de séquence (.esq) qui contrôle le module d'acquisition pendant que la tâche est active. Par exemple, il règle le nombre d'acquisitions, les filtres utilisés, le gain / ISO, etc. Le fichier « .esq » est normalement créé et modifié dans l'onglet d'acquisition, mais il est impossible de le faire pendant que l'ordonnanceur est actif. Si vous souhaitez modifier un fichier .esq pendant que l'ordonnanceur est actif, ou en créer un nouveau, il faut utiliser l'outil de modification de la séquence d'acquisition.
Éditeur de séquences d'acquisition
L'Éditeur de séquences d'acquisition est un outil pour créer et modifier les fichiers (.esq) de séquences d'acquisition qui peut être démarré en cliquant sur l'icône en forme de crayon juste au-dessus de la table de l'ordonnanceur. Une capture d'écran est montrée ci-dessous.
Cet outil est très similaire à l'utilisation et dans sa forme à l'onglet d'acquisition, bien qu'il manque tous les boutons pour l'acquisition proprement dit. Les tâches sont modifiées de la même manière que les acquisitions, ainsi que le chargement et l'enregistrement des files de séquences (mais il y a des boutons de chargement et d'enregistrement additionnels).
Important
Il est important de noter que les séquences d'acquisitions dépendent dans une certaine mesure de la roue à filtre et de l'appareil utilisé (p. ex. les noms de filtre, les valeur d'ISO possible, …). Cet outil, qui n'est pas connecté aux pilotes de périphériques, n'a pas accès à cette information. Au contraire, il utilise les valeurs de la dernière connexion des périphériques à l'onglet d'acquisition. Il ne fait ainsi pas de sens de créer un fichier « .esq » pour un appareil ou une roue à filtres différents que celui utilisé lors de la dernière connexion. Il faudra attendre que la tâche de la séquence soit terminée et modifier le fichier « .esq » directement dans l'onglet d'acquisition.
Il est également recommandé de ne pas écraser les fichiers « .esq » pendant que les tâches de l'ordonnanceur utilisent ces mêmes fichiers. (C'est bien de le faire pendant que l'ordonnanceur est en cours mais pas si cette tâche particulière est en exécution). En effet, cela désynchroniserait l'ordonnanceur et les modules d'acquisition, puisqu'ils lisent ces fichiers à des moments différents. Vous devriez plutôt enregistrer sous un nom différent et ensuite modifier la tâche pour utiliser ce nouveau fichier « .esq ».
Flux de travail
La description ci-dessus n'aborde que l'étape d'acquisition de données du déroulement d'une observation. La procédure complète dans un observatoire peut être résumée par les trois étapes principales :
Démarrage
Acquisition de données (incluant le prétraitement et le stockage)
Arrêt
Procédure de démarrage
La procédure de démarrage est unique à chaque observatoire mais peut inclure :
Mise sous tension du matériel
Contrôle de sécurité et vérifications
Vérification des conditions météorologiques
Extinction des lumières
Contrôle des ventilateurs et de la lumière
Déparquage du dôme
Déparquage de la monture
etc.
L'ordonnanceur d'Ekos n'initialise la procédure de démarrage que lorsque l'heure de début de la première observation est proche (le délai par défaut est de 5 minutes avant l'heure de démarrage). Une fois que la procédure de démarrage s'est terminée avec succès, l'ordonnanceur sélectionne la tâche d'observation et démarre le processus de séquence. Si un script de démarrage est spécifié, il sera exécuté en premier.
Acquisition de données
Selon la sélection de l'utilisateur, un déroulement typique se déroule ainsi :
Pivotage de la monture vers la cible. Si un fichier FITS a été spécifié, il sera résolu et la monture pivotera vers les coordonnées de la position.
Mise au point de la cible. Le processus de mise au point automatique sélectionne automatiquement la meilleure étoile de la pose et exécute l'algorithme de mise au point.
Réalise la résolution, synchronise la monture et pivote vers les coordonnées de la cible.
Réalise une mise au point après l'alignement puisque la pose peut avoir bougé durant le processus de résolution.
Réalisation de la calibration et démarrage de l'autoguidage : le processus de calibration sélectionne automatiquement la meilleure étoile guide, réalise la calibration et démarre le processus d'autoguidage.
Charge le fichier de séquence dans le module d'acquisition et démarre l'acquisition.
Coordonne les problèmes de module tels que l'échec du guidage ou de l'alignement. Cela risque de conduire à la suspension des tâches et à une nouvelle programmation.
Veuillez noter que certaines interactions entre modules sont initiées par les modules eux-même mais sont surveillées par l'ordonnanceur. Cela inclut le retournement au méridien, les mises au point automatiques déclenchées par une variation de température ou l'expiration d'un minuteur ainsi que les conditions de déviation minimale du guidage pour l'acquisition.
Arrêt
Une fois que la tâche s'est terminée avec succès, l'ordonnanceur choisit la prochaine tâche. Si l'heure programmée de la prochaine tâche n'est pas encore proche, la monture est parquée jusqu'à ce que la prochaine tâche soit prête. De plus si la prochaine tâche programmée n'est pas proche dans une limite de temps configurable par l'utilisateur, l'ordonnanceur réalise une extinction anticipée pour préserver les ressources et réalisera la procédure de démarrage quand la tâche sera prête.
Si une erreur irrécupérable se produit, l'observatoire initie une procédure d'arrêt. S'il existe un script d'arrêt, celui-ci sera exécuté en dernier.
La vidéo suivante illustre l'utilisation de l'ordonnanceur, et même si elle date un peu, les principes de base restent d'actualité :
Ekos Scheduler (https://youtu.be/v8vIXD1kois)
Surveillance de la météo
Un autre aspect critique des observatoires robotiques commandés à distance est la surveillance de la météo. Ekos s'appuie sur le pilote météo de INDI sélectionné pour surveiller en continu les conditions météorologiques. Par souci de simplicité, les conditions météorologiques se résument en trois états :
Ok : les conditions sont claires et optimales pour imager.
Avertissement : les conditions ne sont pas claires, la visibilité (seeing) est sous optimale ou partiellement obstruée et inadaptée pour imager. Tout processus d'acquisition est suspendu en attendant une amélioration. Cet état d'avertissement n'implique pas de danger pour le matériel de l'observatoire, ainsi il reste opérationnel. Les mesures exactes à prendre lors d'état d'avertissement peuvent être configurées.
Alerte : les conditions sont préjudiciables à la sécurité de l'observatoire et un arrêt doit être initié le plus rapidement possible.
La surveillance météorologique peut être configurée de deux façons :
Dans le profil d'équipement — un pilote météo démarre avec l'équipement de l'observatoire
Moniteur de sécurité INDI autonome — un pilote INDI Safety Monitor s'exécute indépendamment sur un serveur INDI distinct
Important : si aucun moniteur de sécurité autonome n'est configuré, le planificateur ne peut pas vérifier les conditions de sécurité avant de démarrer l'observatoire. L'observatoire risque donc de démarrer dans des conditions dangereuses. Bien que le pilote météo du profil d'équipement s'active après le démarrage et déclenche immédiatement un arrêt si les conditions sont dangereuses, ce cycle de démarrage-arrêt est inefficace et potentiellement nuisible pour le matériel.
Bonne pratique : configurez un moniteur de sécurité INDI autonome. Lorsqu'il est présent, il a toujours la priorité sur tout pilote météo du profil d'équipement pour déterminer la sécurité de l'observatoire. Le moniteur peut être configuré pour écouter n'importe quel nombre de pilotes météo ou auxiliaires (comme un onduleur) pouvant présenter un risque pour le fonctionnement de l'observatoire. Tout pilote INDI implémentant la propriété standard INDI SAFETY_STATUS peut être ajouté au pilote du moniteur de sécurité. Cela permet au planificateur de vérifier que les conditions sont sûres avant de démarrer l'observatoire.
Réponse aux alertes météo
Lorsque les conditions météorologiques se dégradent jusqu'au statut Alerte en cours d'opération, le planificateur lance une procédure d'« arrêt partiel » de protection. Contrairement à un arrêt complet où tous les systèmes sont stoppés, l'arrêt partiel préserve les connexions Ekos et INDI tout en protégeant l'équipement.
Séquence d'arrêt partiel :
Lorsqu'une alerte météo est détectée :
Un délai configurable (par défaut : 10 secondes) évite de réagir aux problèmes momentanés des capteurs
Si l'alerte persiste, la tâche en cours est interrompue (marquée ABORTED et non ERROR, pour pouvoir redémarrer)
La file de pré-arrêt s'exécute pour protéger l'équipement (fermeture des capuchons anti-poussière, mise en parc de la monture, fermeture du dôme)
Ekos et INDI restent actifs pour une reprise plus rapide
Le planificateur entre dans une période de grâce en attendant une amélioration météo
Période de grâce météo
La période de grâce est un temps d'attente configurable pendant lequel le planificateur surveille les conditions météorologiques après un arrêt partiel. Si la météo s'améliore durant cette période, les opérations reprennent automatiquement sans intervention manuelle.
Valeur spéciale — Période de grâce = 0 (attente indéfinie) :
Régler la période de grâce à 0 demande au planificateur d'attendre indéfiniment que la météo s'améliore. Le planificateur n'abandonne jamais les tâches à cause de la météo — il attend simplement, en stationnement, jusqu'à ce que les conditions redeviennent sûres, peu importe le temps que cela prend (heures, jours, etc.). C'est le réglage recommandé pour les observatoires entièrement automatisés et sans surveillance.
Lorsque la période de grâce est à 0 :
L'équipement est protégé immédiatement (file de pré-arrêt : mise en parc, fermeture du dôme, etc.)
Ekos et INDI restent actifs — aucun arrêt complet n'a lieu
Le planificateur surveille la météo toutes les 5 minutes et reprend immédiatement (en moins de 10 ms) lorsque le capteur météo signale OK
Les tâches restent en état ABORTED (et non ERROR) pour redémarrer automatiquement dès que les conditions s'améliorent
Le journal affichera : « Observatoire planifié pour arrêt partiel. Surveillance météo indéfinie jusqu'à amélioration des conditions de sécurité. »
Comportement avec période de grâce > 0 :
Si une période de grâce non nulle est configurée, le planificateur attend ce nombre de minutes après l'arrêt partiel. Si la période expire alors que l'alerte est toujours active, un arrêt complet est lancé.
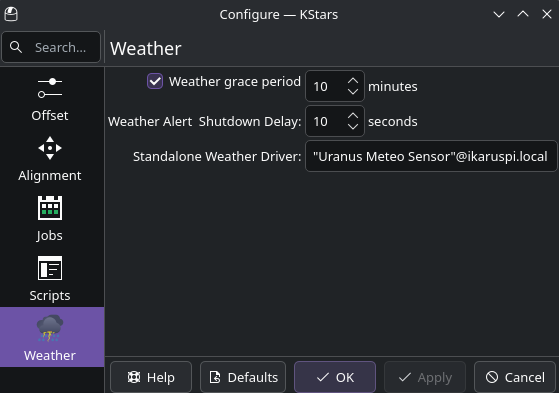
Configuration :
Dans les réglages météo de l'ordonnanceur :
Délai d'arrêt météo : secondes à attendre après la détection d'une alerte avant de lancer l'arrêt partiel (par défaut : 10). Évite les fausses alarmes dues à de brèves anomalies du capteur. Si la météo se dégage pendant ce délai, aucun arrêt n'a lieu.
Période de grâce météo : minutes d'attente (en état parqué/arrêt partiel) pour une amélioration météo avant de lancer un arrêt complet. Réglez à 0 pour une surveillance indéfinie — valeur recommandée pour les observatoires sans surveillance.
Reprise automatique après événement météo
Lorsque la météo s'améliore pendant la période de grâce, le planificateur reprend automatiquement les opérations :
Le statut météo passe d'Alerte à OK
La file de post-démarrage s'exécute pour annuler les actions de protection (ouverture du dôme, désactivation du parc, ouverture des capuchons)
Le planificateur reprend son fonctionnement normal
La tâche interrompue peut redémarrer si ses contraintes sont toujours respectées
Utilisation des files lors d'événements météo :
Les événements météo utilisent des files de démarrage et d'arrêt spécifiques :
Lors d'un arrêt météo : seule la file de pré-arrêt s'exécute (avant l'arrêt d'Ekos). La file de post-arrêt est ignorée car Ekos reste actif.
Lors d'une reprise météo : seule la file de post-démarrage s'exécute (une fois les périphériques prêts). La file de pré-démarrage est ignorée car Ekos n'a jamais été arrêté.
Vos files de pré-arrêt et de post-démarrage doivent fonctionner symétriquement — la file de post-démarrage doit annuler exactement ce que la file de pré-arrêt a effectué.
Exemple de conception des files :
- File de pré-arrêt :
Fermer le capuchon anti-poussière
Mise en parc de la monture
Fermer le volet du dôme
- File de post-démarrage :
Ouvrir le volet du dôme
Déparquage de la monture
Ouvrir le capuchon anti-poussière
Bonnes pratiques de surveillance météo
Pour une protection météo fiable :
Concevoir des files symétriques : assurez-vous que les files de pré-arrêt et de post-démarrage se correspondent exactement.
Régler des délais adaptés : configurez le délai d'arrêt météo suffisamment long pour éviter les fausses alarmes, mais suffisamment court pour protéger l'équipement rapidement (10 à 30 secondes recommandées).
Régler la période de grâce à 0 pour les observatoires entièrement automatisés : c'est la configuration recommandée pour le fonctionnement sans surveillance. Le planificateur attendra indéfiniment que la météo se dégage.
Tester la configuration : testez manuellement l'arrêt météo et la reprise avant toute opération sans surveillance.
Surveiller la stabilité de la connexion : assurez une connectivité fiable avec la station météo. Le planificateur tente de se reconnecter en cas de perte de connexion.
Utiliser une surveillance météo autonome : configurez un périphérique météo autonome dans les paramètres du planificateur pour surveiller les conditions avant même de démarrer l'équipement, évitant ainsi des démarrages dans des conditions dangereuses.
Scripts de démarrage & d'arrêt
Note
NOUVEAU : Système de file de tâches
KStars inclut désormais un système de file de tâches moderne qui offre une alternative puissante et basée sur des modèles aux scripts traditionnels de démarrage et d'arrêt. La file de tâches propose :
Une interface visuelle pour créer des séquences d'automatisation
Des modèles prédéfinis pour les opérations courantes
Une gestion des erreurs et une logique de nouvelle tentative intégrées
Surveillance de la progression en temps réel
Une exécution des tâches tenant compte des périphériques
Pour les nouveaux observatoires ou ceux souhaitant moderniser leur automatisation, nous recommandons d'explorer le système de file de tâches. Consultez la documentation complète de la file de tâches pour plus de détails.
Comme chaque observatoire est unique, Ekos offre la possibilité à l'utilisateur de choisir ses scripts de démarrage et d'arrêt. Les scripts s'occupent de toute procédure qui doivent être activée au démarrage et à l'arrêt. Ekos exécute le script et continue la procédure (déparcage du dôme et de la monture) qu'en cas de succès de l'exécution du script. Inversement, la procédure d'arrêt commence par parquer la monture et le dôme avant d'exécuter le script d'arrêt qui termine la procédure.
Comme chaque observatoire est unique, Ekos offre la possibilité à l'utilisateur de choisir ses scripts de démarrage et d'arrêt. Les scripts s'occupent de toute procédure qui doivent être activée au démarrage et à l'arrêt. Ekos exécute le script et continue la procédure (déparcage du dôme et de la monture) qu'en cas de succès de l'exécution du script. Inversement, la procédure d'arrêt commence par parquer la monture et le dôme avant d'exécuter le script d'arrêt qui termine la procédure.
Les scripts peuvent être écrits dans n'importe quel langage qui peut être exécuté sur la machine locale. Un script doit retourner la valeur 0 pour être considéré comme succès, tout autre valeur indique une erreur. La sortie standard du script est dirigée vers la fenêtre des fichiers journaux d'Ekos. Voici un exemple de script de démarrage écrit en Python :
#!/usr/bin/env python
# -*- coding: utf-8 -*-

import os
import time
import sys

print "Mise sous tension de l'observatoire…"
sys.stdout.flush()

time.sleep(5)

print "Test de confiance…"
sys.stdout.flush()

time.sleep(5)

print "Tout est nominal."
sys.stdout.flush()

exit(0)
Les scripts doivent être exécutables pour que Ekos puisse les invoquer (c'est-à-dire utilisez la commande
chmod +x startup_script.pypour le rendre exécutable). L'ordonnanceur d'Ekos permet d'opérer un observatoire de manière complètement robotisée sans aucune intervention humaine. Il est donc critique que le système puisse se rétablir après des erreurs, et cela à n'importe quelle étape du processus d'observation. L'utilisation des notifications Plasma permet de configurer des alarmes audibles et l'envoi automatique de courriels pour divers évènements de l'ordonnanceur.
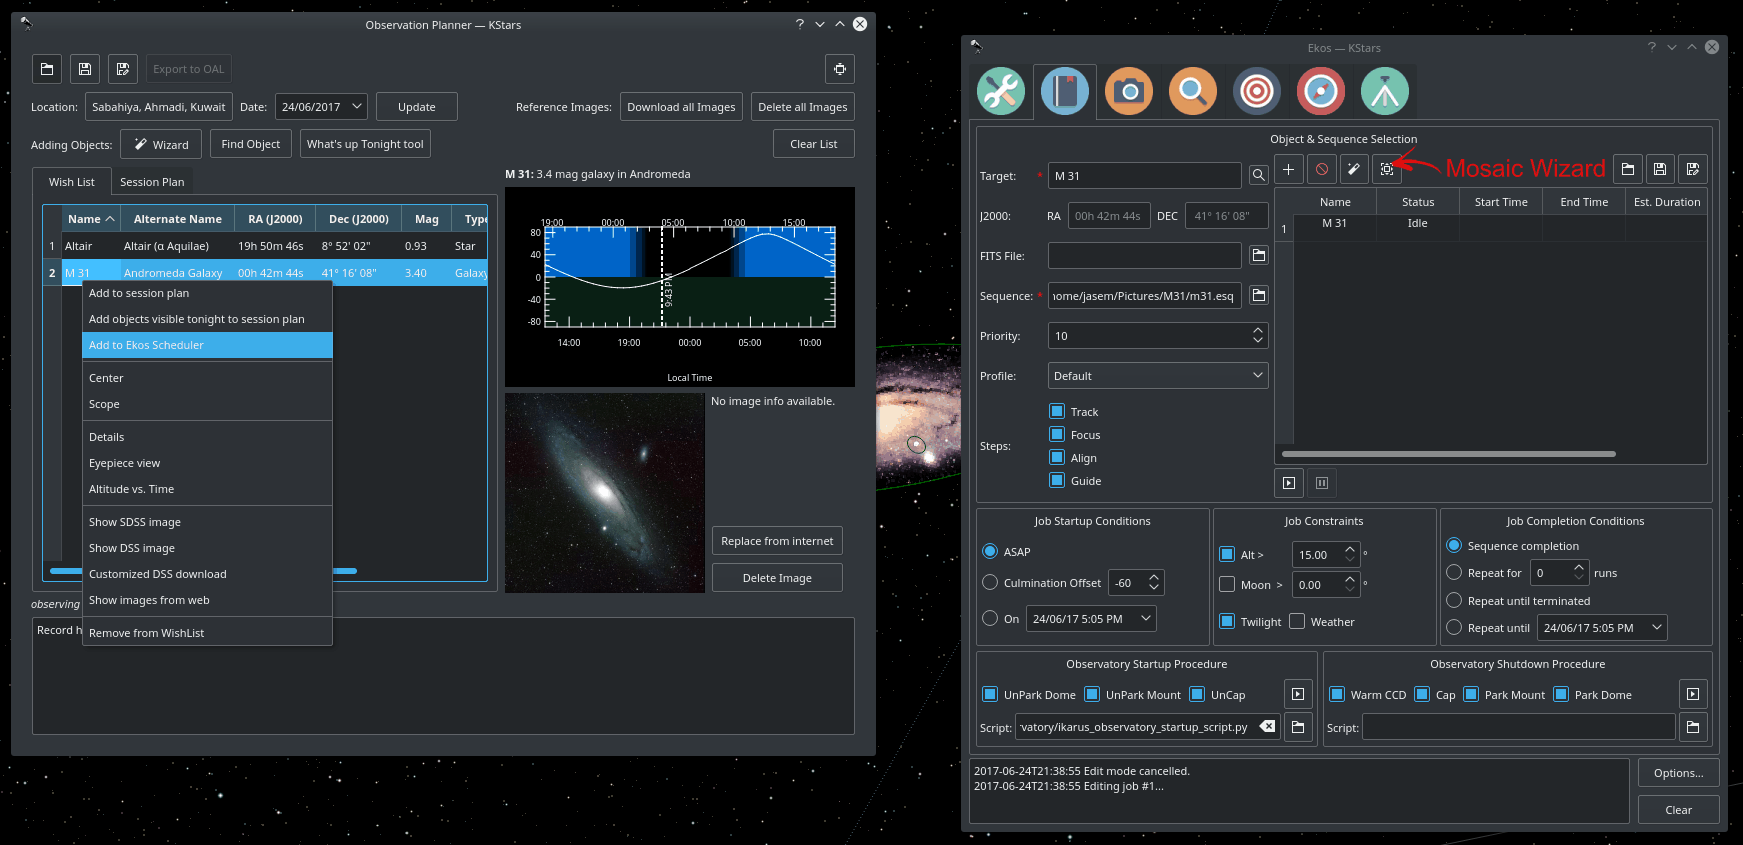
Planificateur de mosaïques
Les images super grand champ du télescope spacial Hubble de galaxies ou de nébuleuses sont source d'émerveillement. Bien que des compétences pointues soient nécessaires pour obtenir de telles images et les traiter, les grands noms en astrophotographie emploient du matériel qui n'est pas très éloigné du vôtre ou du mien. Je souligne très éloigné parce certains ont en effet du matériel très impressionnant et des observatoires dédiés valant une fortune. Néanmoins, beaucoup d'amateurs peuvent obtenir des images grand champ en combinant plusieurs petites images en une seule et grande mosaïque.
Nous sommes souvent limités par le champ de vision de l'ensemble caméra et télescope. En augmentant le champ de vision à l'aide d'un réducteur de focale ou un tube plus court, on obtient une couverture du ciel plus importante au coût d'une diminution de la résolution spatiale. En même temps, beaucoup de cibles grand champ couvrent plusieurs champs de vision dans le ciel. Sans aucune modification de votre matériel, il est possible de créer une super mosaïque en joignant ensemble plusieurs images plus petites. Il y a deux étapes principales pour accomplir une mosaïque :
Acquérir plusieurs images couvrant la cible qui se chevauchent partiellement. Le chevauchement est nécessaire pour permettre au logiciel de traitement d'aligner et de joindre les petites images.
Traiter les images et les joindre ensemble pour créer la mosaïque.
La seconde étape est gérée par des logiciels de traitement d'images comme PixInsight ou autres, mais cela ne sera pas le sujet ici. La première étape peut être accomplie par l'ordonnanceur Ekos qui permet l'acquisition d'images appropriée à votre équipement et qui couvre le champ de vision désiré. Ekos crée non seulement les panneaux pour votre cible mais il construit également les tâches nécessaires pour acquérir toutes les images. Cela facilite grandement la logistique d'acquisition d'images de différents filtres et poses de calibration d'une vaste région du ciel.
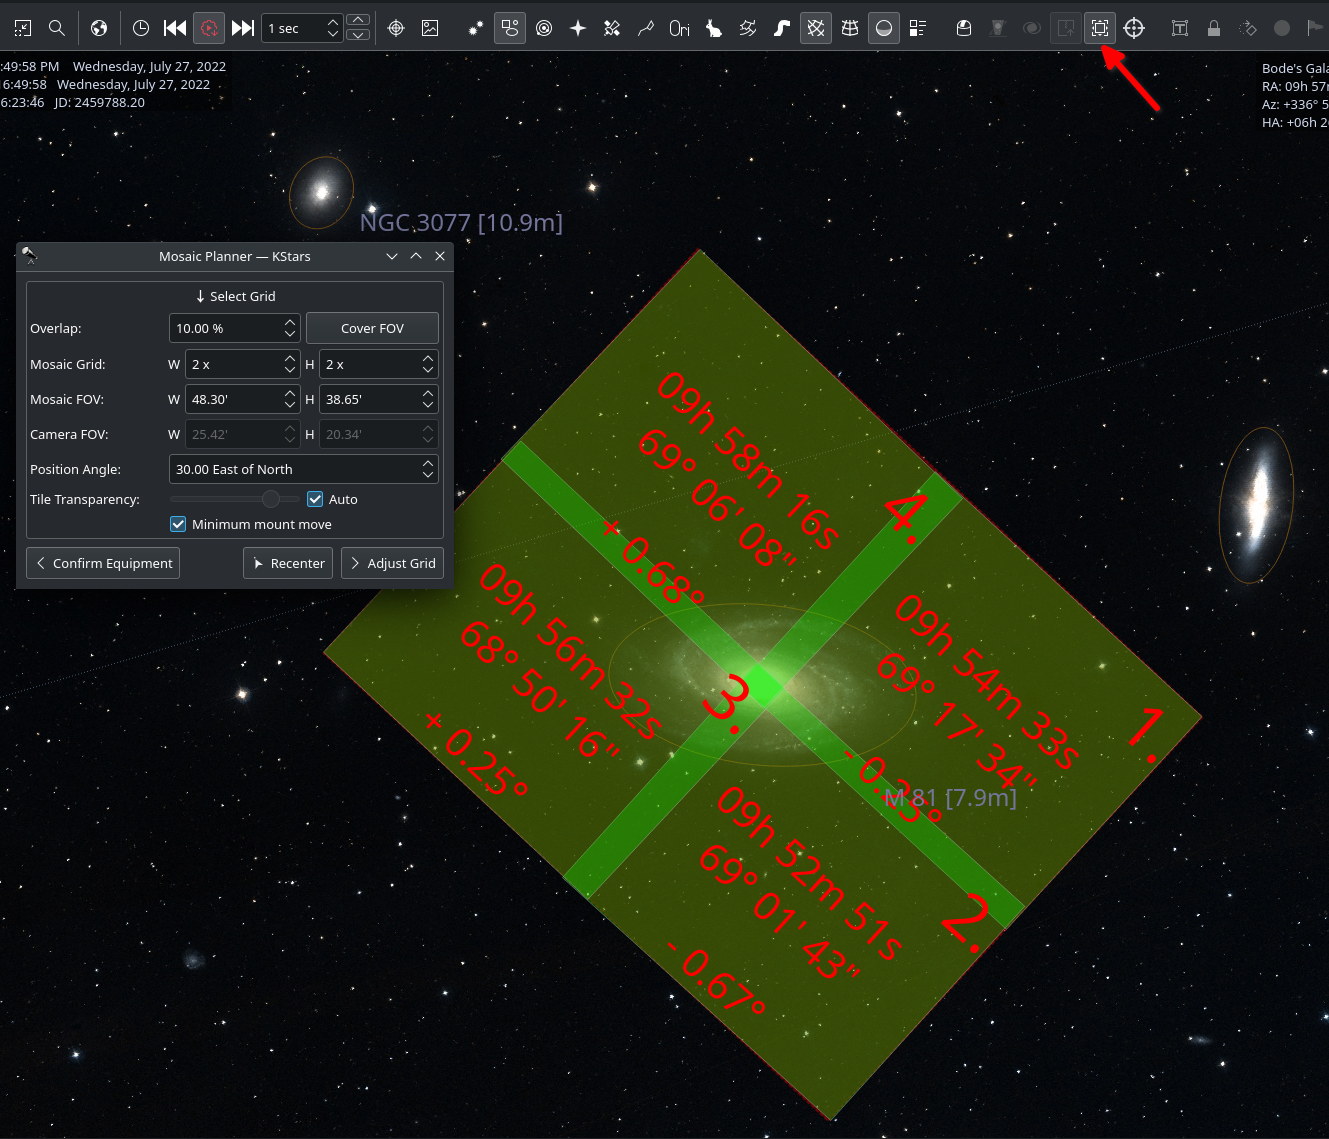
Le
Planificateur de mosaïquede l'ordonnanceur d'Ekos créera plusieurs tâches fondées sur une cible centrale. Pour afficher le planificateur, cliquez sur le boutonPlanificateur de mosaïquedans l'ordonnanceur d'Ekos ou sur la barre d'outils INDI de KStars comme illustré dans la capture d'écran. Le planificateur dessine la mosaïque directement sur la carte du ciel. Il est recommandé d'activer la superposition HiPS pour la meilleure expérience. Le planificateur est composé de quatre étapes :
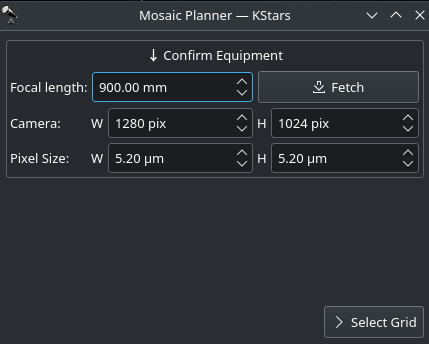
Confirmation du matériel : Ekos tente de charger les réglages du matériel depuis INDI. En cas d'échec, il faut saisir les paramètres du matériel tels que longueur focale du télescope, les dimensions du capteur CCD (largeur, hauteur, taille des pixels). Ces réglages seront enregistrés pour les sessions futures.
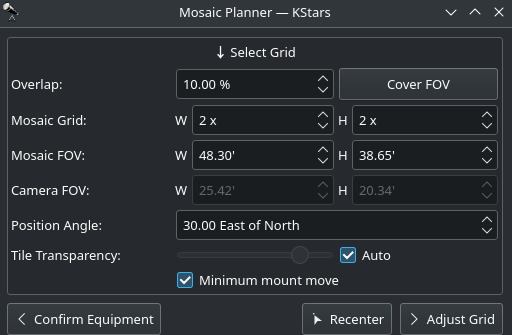
Ajustement de la grille : sélectionner la dimension des panneaux et le pourcentage de recouvrement. Le panneau de mosaïque est mis à jour en conséquence sur la carte du ciel. Ajuster l'angle de position pour correspondre à l'orientation désirée de la mosaïque dans le ciel. Si l'angle de position est différent de l'orientation usuelle de la caméra, il faudra soit tourner la caméra manuellement soit avec un rotateur mécanique lorsque les tâches seront exécutées. La transparence des tuiles est par défaut automatiquement calculée mais peut être désactivée et ajustée manuellement. Pour calculer le champ de la mosaïque à partir du nombre de tuiles, cliquer sur le bouton
Couvrir le CdV. La mosaïque peut être centrée sur la carte du ciel en cliquant sur le boutonRecentrer.
Un grand chevauchement rendra la jointure des poses plus facile durant le traitement mais requiert davantage de panneaux pour couvrir la zone souhaitée. Toutefois, si vous connaissez déjà la quantité minimale de poses qui seront utilisée par l'algorithme de rejet durant la phase de post-traitement, vous pouvez vouloir augmenter le chevauchement pour atteindre cette quantité sur les zones couvertes par de multiples panneaux. Par exemple, une grille de mosaïque 4x4 avec 75 % de chevauchement possède 16 poses couvrant l'intersection centrale, ce qui est suffisant pour l'algorithme de rejet « Winsorized Sigma ». Bien que l'empilement résultant n'ait pas la même hauteur sur toutes les parties de la pose finale, cette méthode vous donne le contrôle sur le rapport signal sur bruit et vous permet de donner du contexte à votre cible tout en devant faire un nombre relativement bas d'acquisitions.
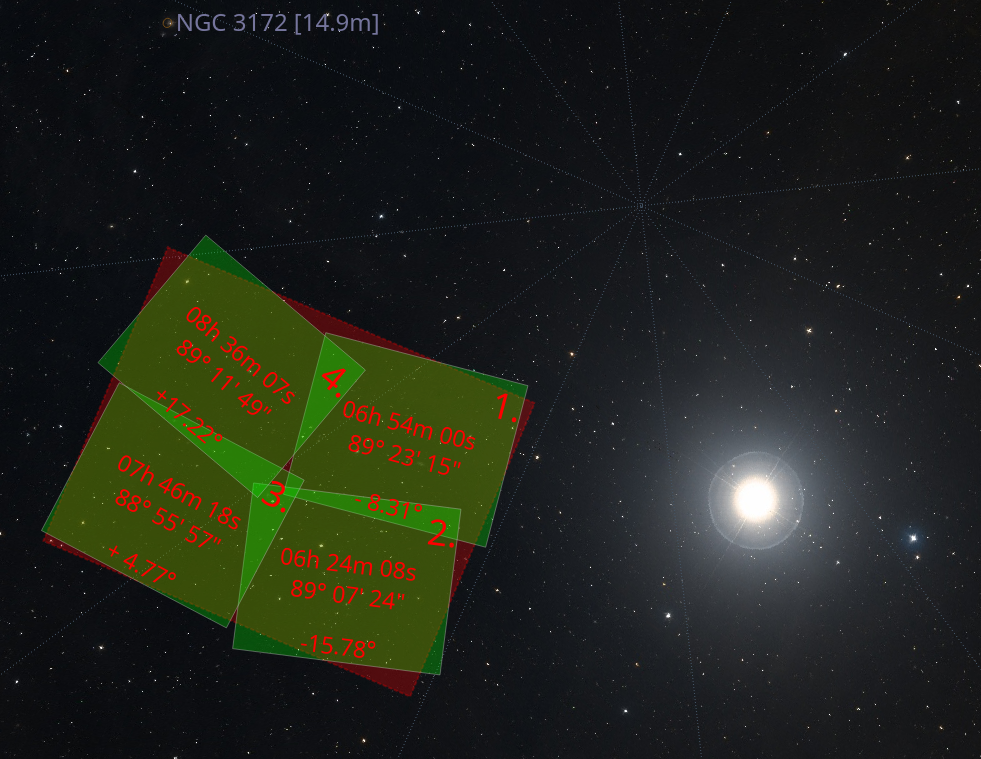
Le grand nombre dessiné dans le coin de chaque panneau de la grille représente l'ordre dans lequel chaque panneau sera traité. Le choix par défaut de la forme d'un S (ouest-est puis en alternance haut-bas/bas-haut) assure un mouvement minimal de la monture durant l'observation. Décochez
Mouvement minimum de la monturepour inverser le comportement en ouest-est/haut-bas. Les coordonnées de chaque panneau (en degrés minutes et secondes) sont affichées en leur centre. Finalement l'angle de rotation de chaque panneau depuis le centre de la mosaïque est affiché en bas. Si votre champ de vision est grand ou si votre mosaïque se trouve près d'un pôle céleste, vous pourrez observer une rotation visible due à la position horizontale ou à une déclinaison importante. Veuillez utiliserChevauchementpour vous assurer que les panneaux couvrent la zone correctement.
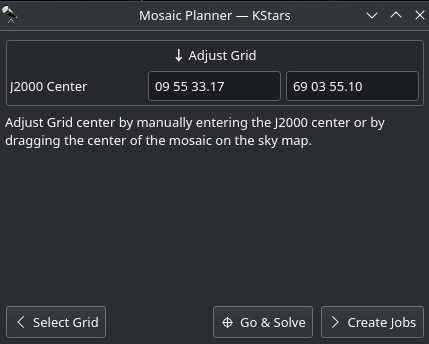
Ajustement de la grille : ajustez le centre de la grille en saisissant manuellement les coordonnées J2000 ou en faisant glisser le centre de la mosaïque sur la carte du ciel.
Création des tâches : l'étape finale consiste en la sélection du fichier séquence et le dossier d'enregistrement des images. Le champ cible est automatiquement renseigné mais peut être modifié à convenance. Sélectionner les différentes étapes de la tâche (Suivre / Mise au point / Alignement / Guidage / Acquisition) et régler la fréquence de rafraîchissement de l'alignement et de la mise au point durant l'exécution de la tâche. Par exemple, si
Aligner toutes lesest réglé à 2 tâches, alors la première tâche exécutera un alignement alors que la suivante ne l'exécutera pas. Et la troisième l'exécutera à nouveau et ainsi de suite.Si vous souhaitez alterner les différentes tâches d'acquisition des tuiles de la mosaïque, saisissez un nom de groupe comme identifiant que chaque tâche partagera et sélectionnez une condition d'achèvement répétée.
Cliquez sur le bouton
Créer des tâchespour générer les tâches d'ordonnancement de mosaïque et les ajouter à la file d'attente. Vous pouvez ensuite les modifier individuellement, comme pour toute tâche.