
Volgen
Inleiding
De Ekos volgmodule doet automatisch volgen en gebruikt daarbij de krachtige ingebouwde volger, of naar uw keuze, extern volgen via PHD2 of lin_guider. Bij intern volgen, worden camera frames voor volgen opgenomen en naar Ekos gestuurd voor analyse. Afhankelijk van hoe ver de sterren verwijderd zijn van hun vastgezette posities, worden er correctiepulsen gestuurd naar uw de RA- en DEC-motoren van uw opstelling. De meeste van de GUI-opties in de volgmodule zijn goed gedocumenteerd, dus kunt u de muis ergens houden, waarna u een tekstballon ziet met nuttige informatie.
Opzet
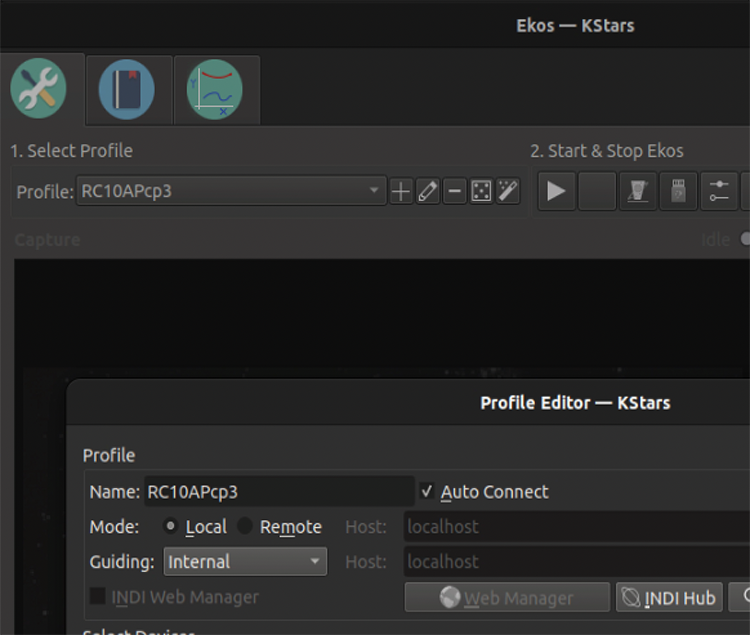
Om volgen uit te voeren moet u (één keer) een volger in de profielbewerker selecteren voor het profiel dat u wilt gaan gebruiken. In profielbewerker kiest u Intern voor de Ekos interne volger of PHD2.
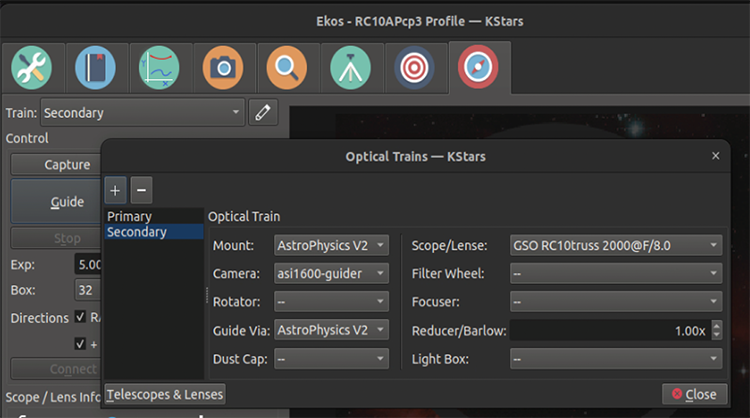
Om te volgen moet u ook uw optische trein voor volgen instellen. Deze tweede optische trein is bijna altijd verschillend van diegene die u gebruikt met opnemen/uitlijnen/focusseren. Zie de afbeelding hierboven voor een voorbeeld van de configuratie van een optische trein voor volgen. Merk op dat de gekozen telescoop de volg telescoop is, die misschien hetzelfde is als uw hoofdtelescoop als u een schema OAG (off-axis-guiding) of ONAG-volgen gebruikt. De geselecteerde camera is natuurlijk uw volgcamera. Het Volgen via zou uw opstelling moeten zijn, aangenomen dat u volgpulsen direct naar uw opstelling stuurt of de naam van het ST4 apparaat (bijv. uw camera) zou u ST4 volgpulsen gebruiken.
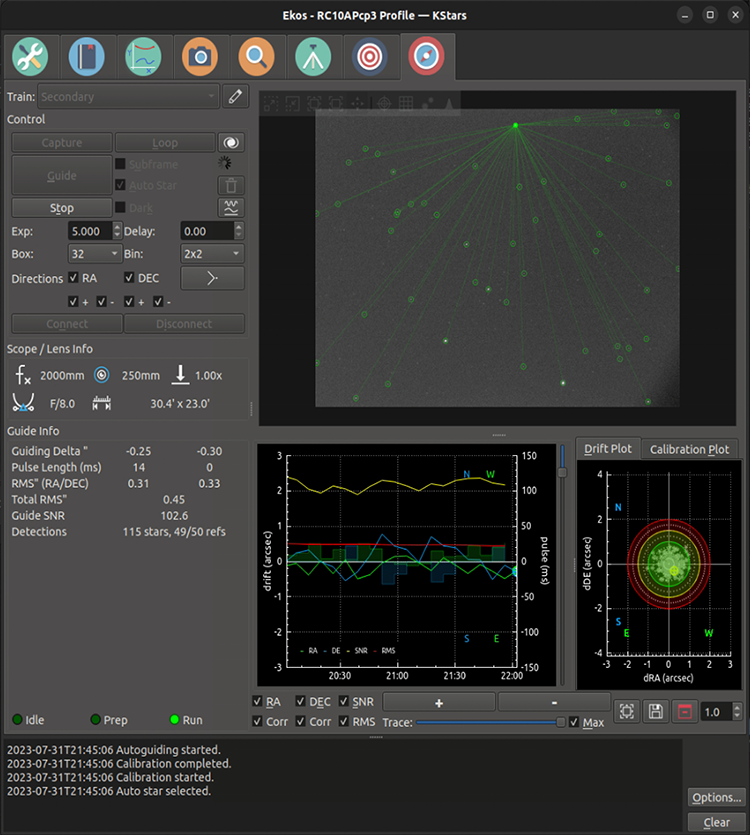
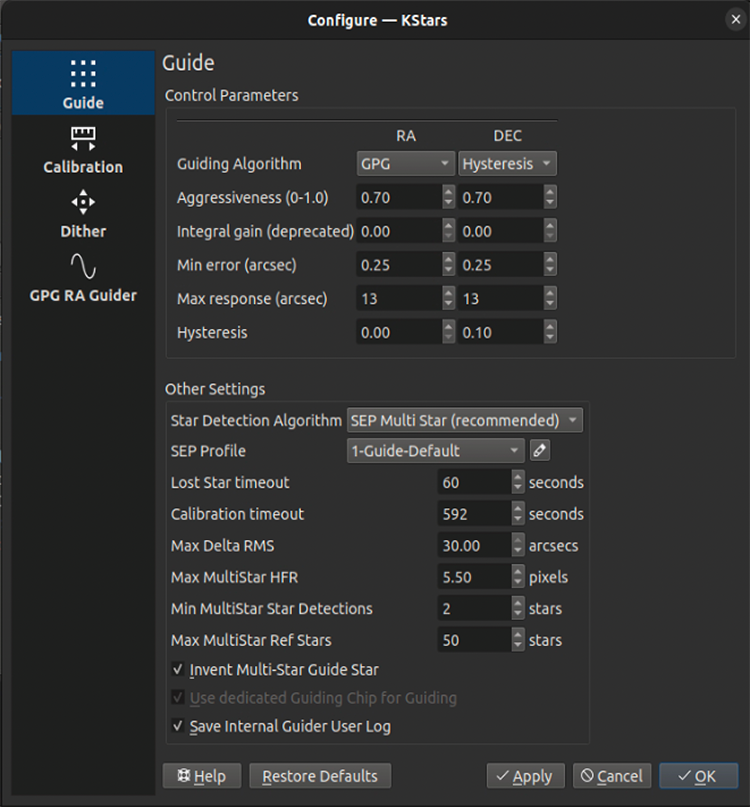
Kijk op de hoofdpagina van de volger die wordt getoond bij de start van deze sectie in de volger. Er zijn vele parameters die ook aangepast kunnen worden, sommige daarvan staan de onderstaande lijst.
Belichting: op de hoofdpagina voor volgen kunt u de belichtingstijd voor volgen aanpassen. Nadat de volgcamera de belichting heeft voltooid, berekent en stuurt het volgalgoritme de volgpulsen naar de opstelling, daarna wacht het een door de gebruiker ingestelde wachttijd en daarna begint zijn volgende belichting.
Binning: Pixelbinning voor de volgafbeelding. Het is gewoonlijk zinvol om de pixels 2x2 samen te nemen (bin). De algoritmen kunnen nog steeds sterposities op sub-pixel vinden en de juiste volgpulsen naar de opstelling sturen.
Vak: dit is alleen van toepassing op volgalgoritmen anders dan MultiStar en MultiStar is het aanbevolen volgschema. Grootte van het vakje rondom de volgster. Selecteer een bruikbare grootte, die noch te groot is, noch te klein voor de gekozen ster.
Richtingen: u wilt typisch alle richtingsvakjes geactiveerd. Ze niet activeren zal volgen in die richtingen uitschakelen. Het is bijvoorbeeld mogelijk om DEC-volgen in de richting Noord uit te schakelen.
Donker: activeer dit om donkere-frame-correcties in te schakelen aan uw volgafbeelding. Zie onderstaand.
Calibratie wissen: activeer dit om uw calibratiegegevens te verwijderen. Zie de sectie calibratie hier onder.
Subframe, AutoStar: deze zijn alleen van toepassing op volgalgoritmen anders dan MultiStar en MultiStar is het aanbevolen volgschema.
Kalibratie
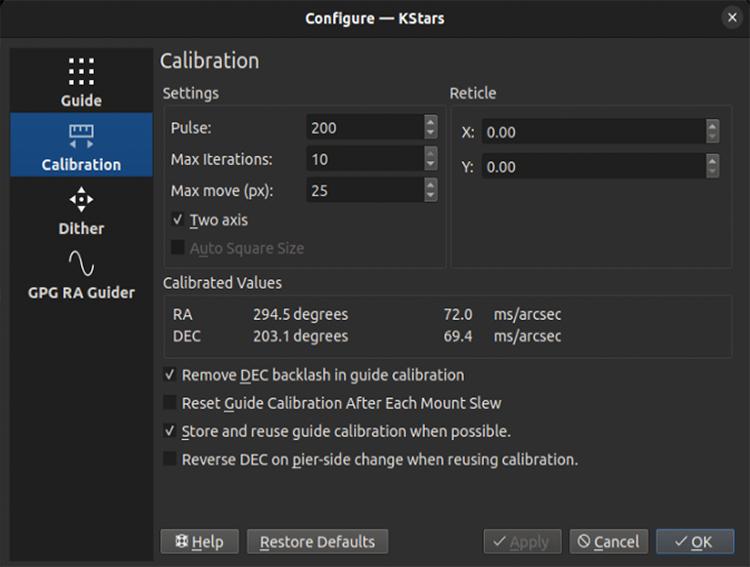
Automatisch volgen is een twee-stapsproces: calibratie & volgen. Calibratie is nodig voor het schema om de oriëntatie van de camera, relatief tot de RF en DEC assen en ook de effecten van volgpulsen (bijv. hoeveel een 100ms RF volgpuls typisch de RF-as verplaatst). Nadat het deze waarden heeft bepaald, kan de volger de positie van de opstelling effectief corrigeren. U kunt de gekalibreerde waarden voor deze parameters in de bovenstaande afbeelding in de sectie “Gekalibreerde waarden” zien.
Gelijk aan andere volgers bevelen we aan dat u eenmaal zorgvuldig kalibreert en daarna alleen opnieuw kalibreert indien nodig. Het is nodig om opnieuw te kalibreren wanneer de camera is verplaatst (bijv. gedraaid) relatief tot de opstelling. Het zou niet nodig moeten zijn om elke keer opnieuw te kalibreren als u de opstelling draait. U zou moeten kalibreren bij een richting dichtbij the meridiaan en langs de Hemelevenaar (mogelijk iets ten westen ervan). Volgen (en kalibratie van volgen) is problematisch dicht bij de pool–het zal waarschijnlijk niet werken. Deze diashow bevat goed advies over hoe de interne volger en/of PHD2 te kalibreren.
De belangrijke opties bij de opties op de calibratiepagina (boven) zijn:
Pulsgrootte: zou groot genoeg moeten zijn om uw afbeelding een paar pixels te verplaatsen.
Kalibratie opnieuw gebruiken: er zijn twee keuzevakjes gerelateerd aan het bewaren van uw kalibratie. We bevelen aan het activeren van “Store and re-use guide calibration when possible” en activering weghalen van “Reset Guide Calibration After Each Mount Slew”.
DEC omdraaien...: het is ook belangrijk om “Reverse DEC on pier-side change when re-using calibration” te activeren of te deactiveren. Om de juiste instelling voor uw opstelling te vinden moet u nagaan, dat volgen met succes werkt op één kant van de pier, daarna omschakelen naar de ander kant. Volg gedurende een paar minuten. Als DEC weg beweegt, dan hebt u waarschijnlijk de verkeerde instelling voor het keuzevak “DEC omdraaien…”.
Maximale verplaatsing, iteraties: we bevelen u aan iteraties groot te houden (bijv. 10) en Maximale verplaatsing groot (bijv. 20+ pixels). Op deze manier zou u een goede schatting van de kalibratieparameters voor volgen moeten krijgen. Kalibratie zou iets moeten zijn dat u zelden doet, dus is het het beste om wat meer tijd te nemen en het juist doen.Om (opnieuw) te kalibreren, wis uw kalibratie op de hoofdvolgpagina en klik daarna eenvoudig op de knop
Volgen. Merk op dat als kalibratie al eerder met succes is voltooid en u hebt de kalibratie niet gewist en u gebruikt de kalibraties opnieuw, dan zal het proces automatisch volgen onmiddellijk beginnen, anders zal het het kalibratieproces starten.Ekos begint de calibratie met het sturen van pulsen naar de opstelling om die te laten bewegen in RK en dec. Het stuurt pulsen uitwaarts van de RK-as, daarna pulsen terug inwaarts. Daarna verplaatst het een beetje in dec om speling die zou kunnen bestaan te wissen en daarna pulsen uitwaarts en terug in voor dec. Om dit grafisch te bekijken, klik op het sub-tabblad “Calibratieplot” op de hoofdpagina voor volgen.
Mislukkingen van calibratie
Calibratie kan door diverse oorzaken mislukken. Om de kans op succes te vergroten, kunt u de volgende tips proberen:
Slechte hemelcondities. Als uw hemelconditie niet geweldig is, kan het het niet de moeite zijn om met volgen/calibratie het gevecht aan te gaan.
Camerafocus volgen.
Behoudt de standaard waarde (
SEP MultiStar) in het tabblad Volgoptie.Probeer de “Guide-standaard” SEP sterdetectieparameters (in het tabblad Guide-optie) en pas ze, indien nodig, aan.
Betere uitlijning op de pool: Dit is kritisch voor het succes van elke astrofotografische sessie. Gebruik Ekos Pool uitlijnprocedure in de module voor Uitlijnen.
Zet binning op 2x2: Binning verbetert de SNR (Signal Noise Ratio: signaal-ruis verhouding) en is vaak erg belangrijk voor het succes van calibratie en volgen.Maak dark frames om de ruis te verminderen.
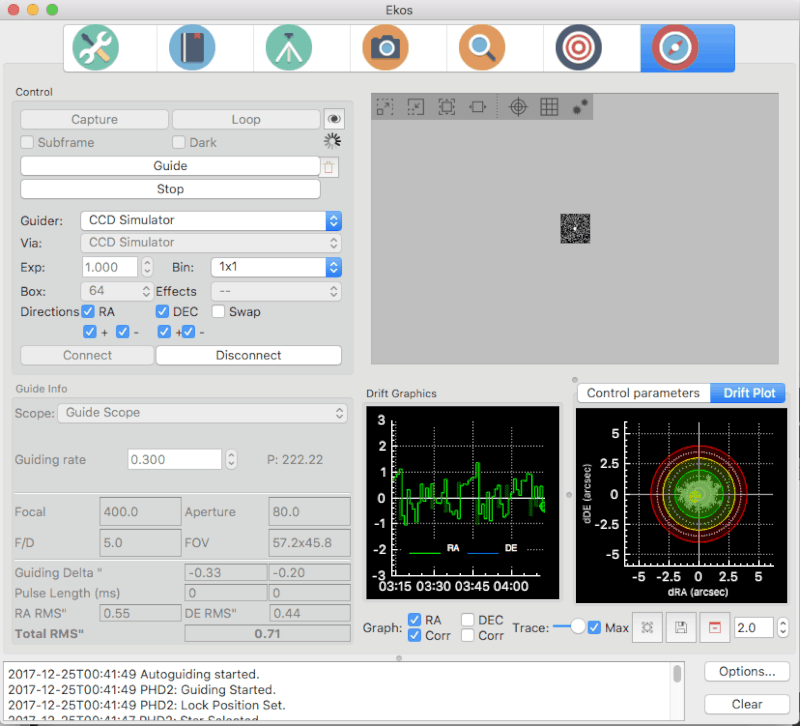
Volgen
Als de calibratie goed is voltooid, begint automatisch het volgen. Het resultaat hiervan is zichtbaar in het gebied voor de
Verloopgrafieken, waarin inGroende afwijkingen in RK worden weergegeven en inBlauwde afwijkingen in de DEC. De kleuren voor RK/DEC kunnen worden gewijzigd in het KStars kleurschema in de instellingendialoog van KStars. Op de verticale as worden de afwijkingen van de vergrendeling uitgezet in boogseconden en langs de horizontale as de tijd. U kunt de muis boven de lijn houden voor informatie over de exacte afwijking, op een bepaald tijdstip. U kunt altijd op de grafiek inzoomen, of erin rondkijken, zodat u een bepaald gebied daarin nauwkeurig kunt bekijken. Een andere gemakkelijke plaats om de prestaties van het volgen te bekijken is in het tabblad Analyse.
Er worden twee typen algoritmen gebruikt in de interne volger en u hebt de keuze welke variaties voor beiden te gebruiken. The eerste is het
Sterdetectiealgoritme. De volger neemt afbeeldingen van de hemel en detecteert automatisch sterren in deze afbeeldingen. Eenmaal dit gedaan, kan het het de drift in RK en DEC van de opstelling bepalen uit zijn originele positie. Het tweede type algoritme is hetVolgalgoritmegebruikt om de RK and DEC volgpulsen te berekenen die verzonden zouden moeten naar uw opstelling om die drift te corrigeren.U kunt keuzes voor sterdetectie-algoritmen vinden in de pagina Volginstellingen (boven afbeelding) bovenaan de sectie
Andere instellingen. Veruit de meest accurate is het (standaard) SEP MultiStar algoritme. Het gebruikt de gedetecteerde positie van vele sterren (in de bovenstaande instellingen, tot 50) om de beste schatting te maken voor de huidige drift. Het is afhankelijk van accurate sterdetectie. Het kan dus belangrijk zijn om de sterdetectieparameters aan te passen. Begin met het standaard Guide-standaard SEP-profiel en bewerkt optioneel zijn parameters als u het gevoel hebt dat sterren niet accuraat gedetecteerd worden. Veruit de enige reden on niet SEP MultiStar te gebruiken zou zijn als u uw SEP ster-detectie niet adequaat krijgt.Keuzees in volgalgoritmen worden gemaakt aan de top van de instellingenpagina. U kunt kiezen uit gescheiden algoritmen voor RK en DEC. Hier zijn de mogelijkheden:
Standaard: het traditionele proportionele volgalgoritme. Het berekent een puls om de berekende volgdrift te corrigeren. De agressiviteitsparameter bepaalt welk deel van de fout wordt gecorrigeerd. Integrale versnelling kan gebruikt worden maar wordt niet aanbevolen. Fouten kleiner dan MinError zullen niet gecorrigeerd worden. Max respons beperkt de grootste correctie. De hysteresisparameter wordt niet gebruikt.
Hysteresis: hysteresis is zoals het standaard algoritme maar weegt in the de vorige correctie volgens de hysteresisparameter.
Lineair: dit is vergelijkbaar met het PHD2 Lowpass2 algoritme. Het berekent de foutpulsen gebaseerd op een korte geschiedenis van recente fouten. Dit kan toegepast worden op erg stabiele opstellingen en is vergelijkbaar met het PHD2 LowPass2 algoritme.
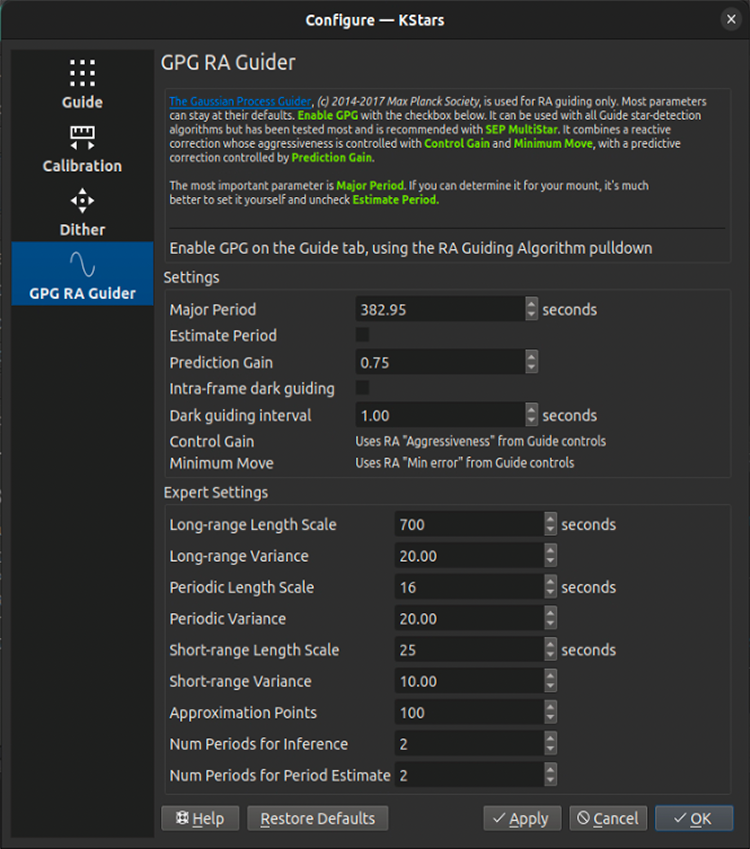
GPG: (alleen RK) Het GPG-algoritme probeert periodieke fout en lineaire drifts te voorspellen. Het gebruikt de agressiviteit, min en max parameters hier en meer parameters op het aparte GPG tabblad. He is erg vergelijkbaar met het PHD2 PPEC algoritme. Voor technische details zie Dit paper. Er is meer detail op onderstaand GPG.
AI Guider: (Experimental) Adds trained, mount-specific feed-forward predictions on top of the Standard algorithm, which keeps running underneath. It requires a one-time training session with the AI Guiding Assistant before it can be selected. See AI Guiding Assistant below.
Een goede startkeuze is
StandaardofHysteresis(met een 0,1 hysteresisparameter). U zouGPGvoor RK kunnen gebruiken, omdat het waarschijnlijk het best presterende algoritme voor vele opstellingen is, het is echter complexer om op te zetten (zie onderstaand).Lineairwordt aanbevolen voor enige opstellingen met hoge prestaties.Goed advies in het kiezen van de parameters is beschikbaar in het internet, bijv. van de bovenstaande diashow.
De keuzes in de hoofdparameters die u hebt zijn onderstaand. Ze zijn van toepassing op alle volgalgoritmen.
Agressiviteit. Dit bestuurt hoe snel u wilt dat de volger de fout corrigeert. Waarden van 0,5 of 0,6 zijn gewoonlijk het best (d.w.z. corrigeren van ruwweg de helft van de waargenomen fout). Niet intuïtief, het lijkt erop dat 100% van de fout corrigeren slechte prestaties kan veroorzaken omdat de volger vaak zal oscilleren met over-correctie.
Min-fout. Dit bestuurt de minimale afwijking (in boogseconden) waarvoor een correctie gemaakt zal worden. Dit aanpassen kan het najagen van het zien vermijden.
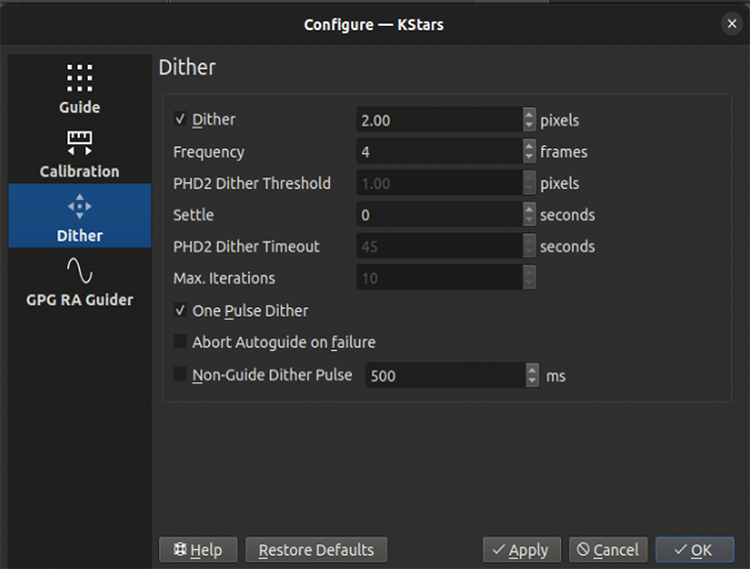
Ditheren
Om automatisch ditheren van frames mogelijk te maken, moet u het keuzevakje``Dither`` selecteren. Standaard moet Ekos het volgvakje tot aan 3 pixels toe ditheren (d.w.z. verplaatsen) na N frame die in de Ekos opnamemodule wordt opgenomen. Bewegingsduur en richting zijn willekeurig. Omdat het volgen direct na ditheren wat kan oscilleren, kunt u de duur van het
Settelen(tot rust komen) na het ditheren instellen, voordat met de opname verder wordt gegaan. Voor het zeldzame geval dat het ditherproces vastloopt, kan een <guilabel>Timeout</guilabel> worden ingesteld, waarna het proces wordt afgebroken. Maar zelfs als ditheren niet lukt, kunt u selecteren of dit het autovolgen moet doen stoppen, ja of nee. Zet met <guilabel>Autoguide afbreken na fout</guilabel> het gewenste gedrag aan of uit.Dithering resulteert niet in een lange wandeling van de originele doelpositie. Ekos onthoudt de originele en huidige doelposities en verplaatst het doel terug naar het oorspronkelijke doel als de positie te ver is weggedreven.
Eén-puls dithering is een interessante snellere optie die een puls naar dither stuurt, maar niet verifieert dat de dither zijn gewenste locatie bereikt. Het is mogelijk dat de dithering voor elke gegeven dither niet is wat is gewenst, maar het gehele effect zou goed zijn.
Opslaan zonder volgen kan ook. Dit is nuttig als er geen volgcamera is of bij het doen van korte belichtingen. In dit geval kan de opstelling opdracht krijgen in een willekeurige richting te ditheren gedurende een pulsduur die wordt opgegeven in de optie
Niet-volgen-ditherpuls.
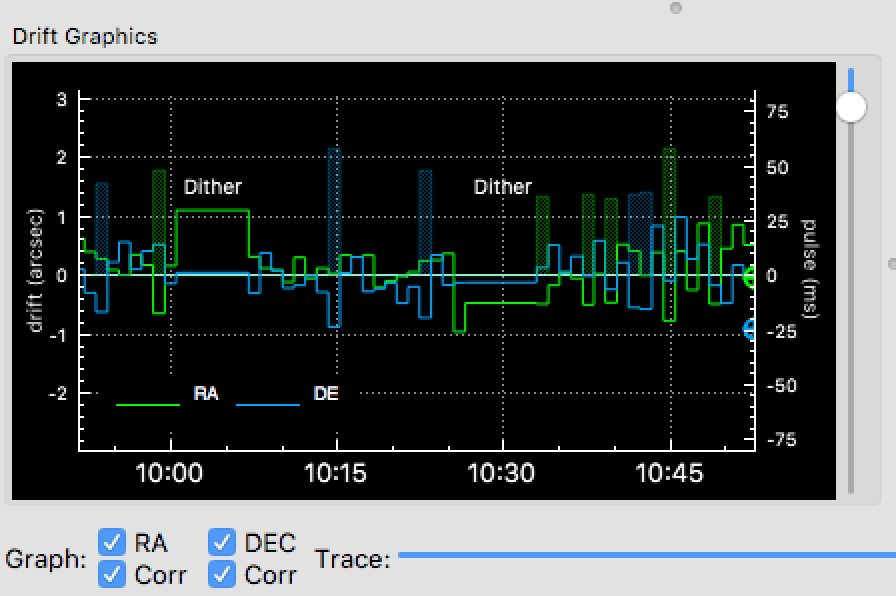
Drift grafieken
Drift is het ontstaan van kleine afwijkingen in de positie van een volgster. De driftgrafieken zijn erg nuttig voor het monitoren van de volgprestaties. Zij zijn in een 2D-plot van afwijkingen en correcties van volgen. Standaard worden alleen afwijkingen getoond in RK en dec. De horizontale as geeft de tijd in seconden sinds het starten van het automatisch volgen en langs de verticale as worden de volgdrift/afwijkingen in boogseconden weergegeven voor elke as. Volgcorrecties (pulsen) kunnen ook in dezelfde grafiek worden geplot, wat u kunt aanzetten in het keuzevakje
Corronder elke as. De correcties worden geplot als schaduw op de achtergrond, in dezelfde kleuren als de assen.U kunt in de plot zoomen en zwenken, en wanneer u de muisaanwijzer boven een grafiek houdt ziet u een tekstballon met informatie over dit specifieke tijdstip.Die bevat de volgdrift, en de gemaakte correcties, naast de lokale tijd waarop deze gebeurtenis werd genoteerd. Met een verticale schuifbalk rechts in de afbeelding kunt u de hoogte van de secundaire Y-as voor pulscorrecties aanpassen.
Met de horizontale schuifknop
Tracerenonderin kunt u de volggeschiedenis nagaan. Ook kunt u op het keuzevakjeMaxklikken, waarmee u de grafiek op het laatste punt vastzet, zodat de driftgrafiek vanzelf doorrolt. De knoppen rechts van de schuifknop dienen voor het autoschalen van de grafiek, het exporteren van de volggegevens naar een CSV-bestand (comma separated values; met komma’s gescheiden waarden), het wissen van alle volggegevens en voor het schalen van het doel in deDriftplot. Verder is in de volggrafiek een tekst waarin staat op welke momenten er is geditherd, zodat de gebruiker weet dat in deze punten het volgen niet zo slecht was.De kleuren van de assen kunnen worden gewijzigd in de Instellingen voor het kleurschema in KStars.
Driftplot
In een scatterplot (plot van een puntenwolk) in de vorm van een doelwit kan de nauwkeurigheid worden geschat van de totale volgprestatie. Deze plot heeft drie concentrische cirkels met verschillende straal, waarin de binnenste groene cirkel standaard een straal heeft van 2 boogseconden. De laatste RMS-waarde wordt geplot als een
met een kleur die hoort bij de bijbehorende concentrische cirkel. U kunt de straal van de binnenste groene cirkel wijzigen door de driftplotnauwkeurigheid aan te passen.
Volgen met meerdere sterren
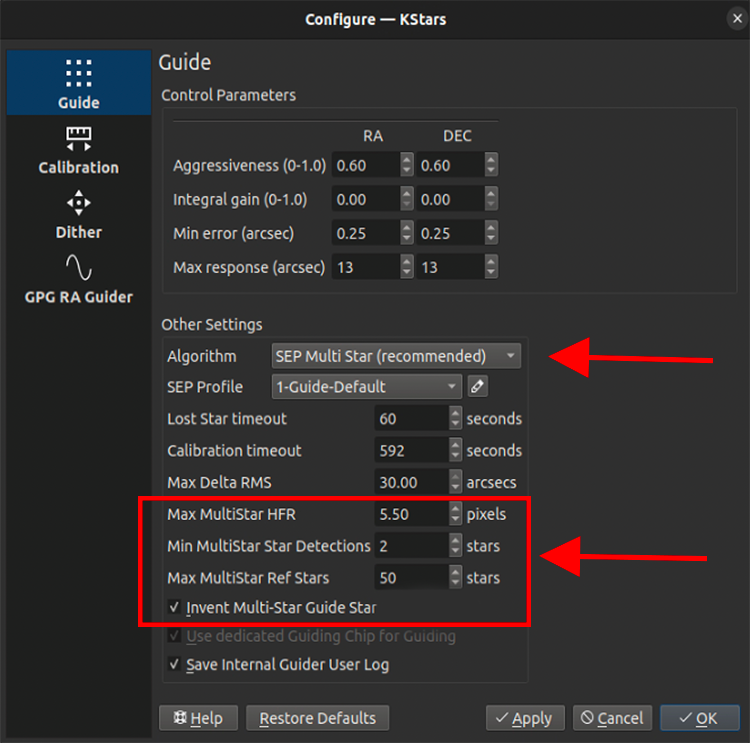
op de standaard manier van volgen selecteert het systeem een te volgen ster. In niet-multi-ster systemen, worden de gemeten verplaatsingen van die star relatief ten opzichte van zijn originele metingen van de positie geconverteerd naar RA en DEC offsets die de driftfouten van het volgen zijn. In multi-ster volgen selecteert het systeem vele referenties sterren en meet alle offsets ervan ten opzichte van hun initiële posities. De volgfout wordt berekent als de mediane verplaatsing van de individuele referentie sterren van hun originele posities. De magie die het systeem nodig heeft om te presteren is het vinden van deze luidruchtige 2-dimensionale patronen van referentie sterren in de volgafbeelding, maar dit patroon vinden is robuuster dan het vinden van een enkele volgster die mogelijk significant is verplaatst of misschien helemaal niet is gedetecteerd. We bevelen u aan deze manier te kiezen om te volgen door het volgalgoritme SEP Multi Star te selecteren.
Er zijn een paar opties die u kunt overwegen.
Max MultiStar Ref Starsis het maximale aantal referentie sterren die het systeem kan gebruiken. De hoofdreden om dit te beperken zijn de kosten van het berekenen, hoewel het geen erg dure berekeningen zijn. 50 is een goede keuze. De instellingMin MultiStar Star Detectionsvertelt het systeem om terug te vallen op een enkele volgster als er minder zijn dan die hoeveelheid detecties van sterren.Invent Multi-Star Guide Starzou geactiveerd gelaten moeten worden enMax MultiStar HFRis een oude parameter die waarschijnlijk nog maar weinig effect meer heeft.
Volgen met GPG
Met GPG-volgen gebruikt de interne volger voorspelbaar en adaptief volgen voor de RF-as. Deze adaptief modelleert de periodieke fout van de opstelling en voegt zijn voorspelde bijdrage toe aan elke volgpuls.
De te overwegen hoofdinstellingen zijn Majeure periode en Geschatte periode. Als u de wormperiode voor uw opstelling weet, misschien door deze tabel te bekijken, maak de activering van Geschatte periode ongedaan en voer uw bekende Majeure periode in. Zo niet, activeer dan Geschatte periode. Intra-frame donker volgen kan gebruikt worden om “de GPG voorspelling uit te spreiden. Bijvoorbeeld, als u volgt op 5s, kunt u het donkere volginterval instellen op 1s en zijn voorspelling wordt elke seconde gepulst, maar de driftcorrectie van volgen zou elke 5s worden verzonden. Op deze manier worden de voorspelde correcties veel sneller uitgestuurd dan de belichtingssnelheid van de volgcamera, waarmee effectief periodieke foutcorrectie wordt uitgevoerd en langere belichting van volgcamera toegestaan. Alle andere parameters worden het beste op hun standaard gelaten.
AI Guiding Assistant (Experimental)
The AI Guiding Assistant adds a trained, mount-specific feed-forward predictor to the internal guider. After a one-time training session, the AI learns the repeatable part of your mount’s tracking error — such as periodic error and slow drift — and adds a predicted correction to each guide pulse before the error becomes visible in the guide image. The standard guiding algorithm keeps running underneath at all times and corrects whatever the prediction misses.
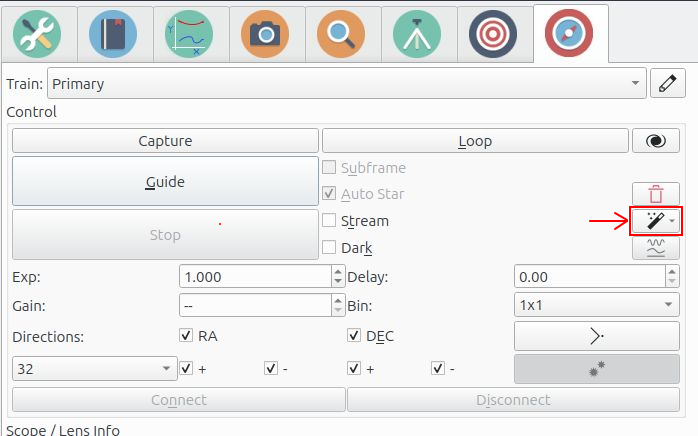
The entry point is the AI Guiding (Experimental) menu button on the main Guide page, just below Clear Calibration. It offers two actions: AI Guiding Assistant…, which opens the data-collection wizard described below, and Load Weights…, which loads a previously trained model file. This feature is unrelated to the AI Assistant (MCP) interface, which connects KStars to external chat assistants.
Waarschuwing
The AI Guiding Assistant is an experimental feature under active development. Trained models are tied to your specific mount, camera, and guide settings. Always verify your guiding performance after enabling it, and be prepared to switch back to the Standard or GPG algorithms if your results are not better with the AI.
Expectations and Prerequisites
Please read this part carefully before investing time in training a model — it will save you from disappointment later.
Waarschuwing
AI guiding augments a well-functioning guiding setup — it does not repair a poorly functioning one. It predicts the repeatable part of your mount’s error and layers that prediction on top of the standard guiding algorithm. It will not fix:
poor polar alignment,
imbalance, cable drag, or differential flexure,
wind gusts, vibrations, or bad seeing,
a mount or guide system that is not already well tuned.
None of these are repeatable errors, so no amount of training can predict them. If standard guiding does not work well on your system, fix that first. The improvement from AI guiding varies considerably from mount to mount, and on some mounts you may see no measurable benefit at all.
Before running the assistant, make sure that:
You are using the internal guider, with a working guide camera and a completed, successful calibration.
Ordinary guiding with the Standard algorithm already works reliably on your setup.
Your mount is well polar-aligned, balanced, and free of cable snags.
You know your mount’s drive type: worm gear (most equatorial mounts), harmonic/strain-wave drive, or direct drive.
Your guide exposure is the one you intend to keep using: the model is trained and locked to the guide exposure, binning, and guide settings used during data collection.
You have 20–45 minutes of clear, reasonably steady sky to spend on data collection, depending on the mount type.
Data Collection with the AI Guiding Assistant
Training a model starts with a system identification session: the assistant points the mount at a few positions in the sky and records how the guide star drifts, both with guiding running and with guiding deliberately paused (“free drift”), so that the mount’s raw error signature can be measured. Click AI Guiding (Experimental) → AI Guiding Assistant… on the Guide page to start the wizard.
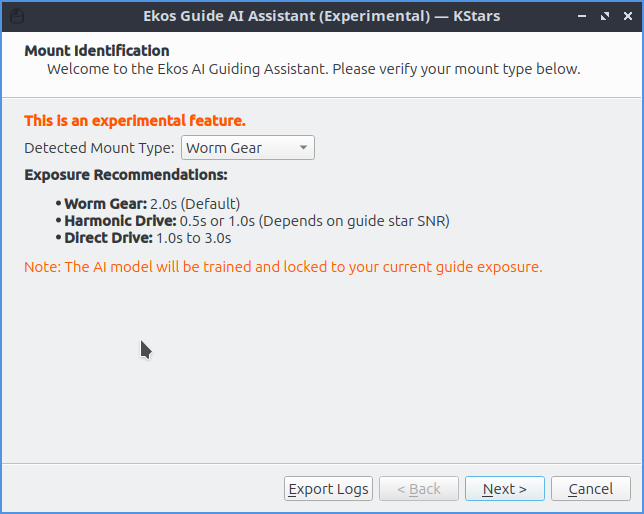
Page 1 — Mount Identification. Verify the detected mount type: Worm Gear, Harmonic Drive, or Direct Drive. The wizard also recommends a guide exposure per drive type — 2.0 s for worm gears, 0.5–1.0 s for harmonic drives (depending on guide star signal), and 1.0–3.0 s for direct drives. Set your exposure before proceeding: the trained model is locked to it.
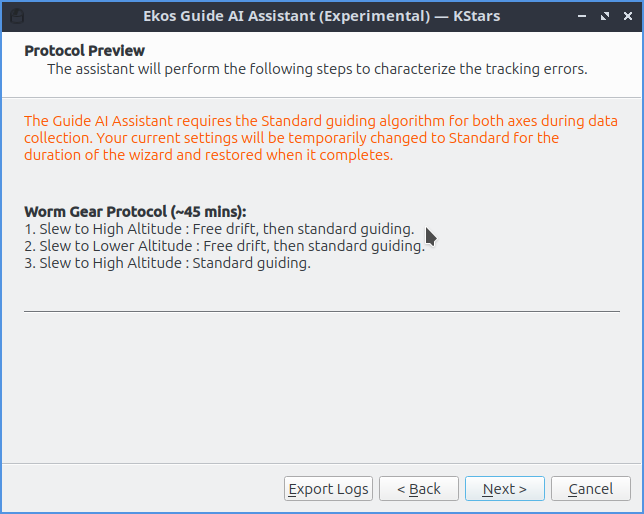
Page 2 — Protocol Preview. The wizard shows the measurement protocol it is about to run. During data collection your guiding settings are temporarily switched to the Standard algorithm on both axes with all guide directions enabled; your original settings are restored when the wizard finishes. The protocol depends on the mount type:
Worm Gear (~45 minutes): three pointings at high, lower, and high altitude, each combining standard guiding with several minutes of free drift. The long free-drift phases capture roughly three full worm cycles, which is what allows the periodic error to be measured.
Harmonic Drive (~35 minutes): free drift and standard guiding at two pointings, plus a series of short pulse-response tests (50, 100, and 200 ms pulses in all four directions) that measure how the drive reacts to corrections.
Direct Drive (~20 minutes): short guiding and free-drift phases at three different altitudes.
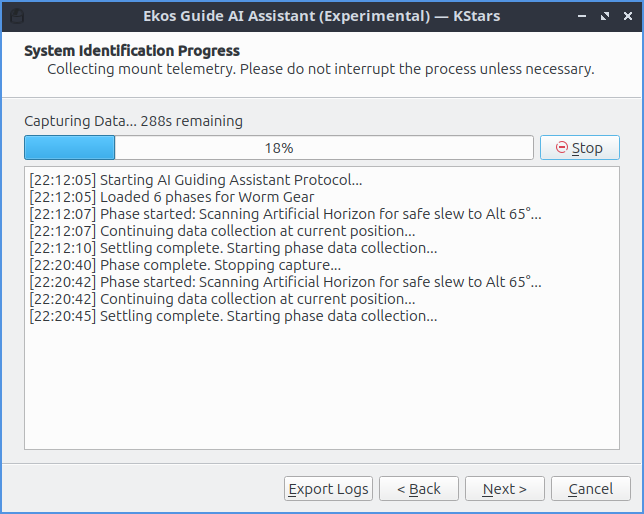
Page 3 — System Identification Progress. The assistant slews, guides, and drifts on its own. Leave the system alone while it runs — interrupting the process invalidates the affected phase. Use Stop only if something goes wrong.
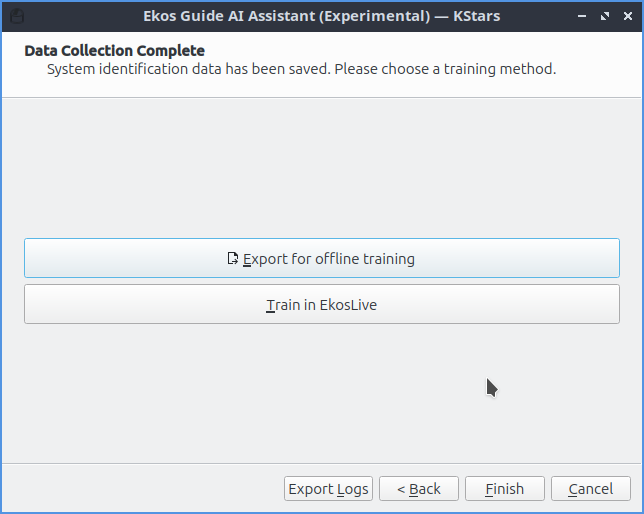
Page 4 — Data Collection Complete. The measured data is saved, and
you choose how to train the model: Train in EkosLive uploads
the data to EkosLive Cloud and returns a ready-to-use model (next
section), while Export for offline training writes a
sysid_data.json file for the Python trainer (see
below).
Training via EkosLive
The easiest way to train the model is with an EkosLive account: click Train in EkosLive
on wizard page 4. The data is uploaded, the model is trained in the
cloud, and the resulting weights are automatically saved (as
ai_guider_weights.json in the KStars data folder,
~/.local/share/kstars/ on Linux) and set as the active weights
file — no further steps are needed.
Notitie
The uploaded system-identification data contains no sky coordinates: only altitude, azimuth, and parallactic angle, together with pixel drift measurements, star signal-to-noise ratios, and the guide pulses that were sent. It does, however, include your mount’s name and camera device names. If you prefer not to upload anything, use offline training instead — it produces identical weights.
Training the Model Offline
You do not need EkosLive to train a model — the trainer is a small set of Python scripts that runs on any ordinary computer. Training uses only the CPU and finishes in under ten minutes; no GPU is required.
On wizard page 4, click Export for offline training and save
sysid_data.json.Copy the file to the computer where you want to train (it can be the observatory computer itself, but a desktop or laptop is usually more convenient).
Get the trainer scripts from the
kstars/ekos/guide/offlinetrainer/directory of the KStars source repository.In that directory, create a Python environment and run the trainer:
python3 -m venv venv
source venv/bin/activate
pip install numpy scipy torch
python train.py --sysid-data ./sysid_data.json --output ./weights.json
The trainer auto-detects your mount type from the data and picks the
matching model. Should the detection ever be wrong, it can be overridden
with --mount-type WORM_GEAR|HARMONIC_DRIVE|DIRECT_DRIVE.
Finally, copy the resulting weights.json back to the observatory
computer and load it in KStars via AI Guiding (Experimental)
→ Load Weights… on the Guide page (or set the
Weights File on the AI Guider options page). The
weights are applied the next time guiding starts.
Activating AI Guiding and Options
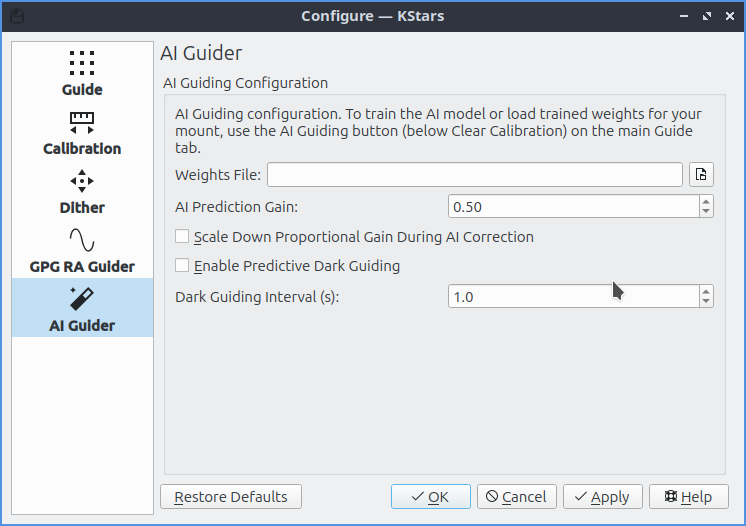
With a weights file loaded, select AI Guider as the guiding algorithm for RA and/or DEC in the guider options, and start guiding as usual. The AI-related settings live on the AI Guider page of the guide settings dialog:
Weights File: path to the trained model weights (JSON).
AI Prediction Gain (default 0.5): how strongly the AI prediction is blended into the guide pulses. 0.0 ignores the AI entirely; 1.0 applies its full prediction. Start at the default and increase gradually if guiding improves.
Scale Down Proportional Gain During AI Correction (default off): reduces the standard proportional response by up to half when the AI is highly confident, to avoid the two controllers over-correcting the same error.
Enable Predictive Dark Guiding (default off): keeps emitting predicted corrections during gaps in guide star measurements — dither settling, autofocus runs, or camera downloads — by extrapolating the periodic error forward in time.
Dark Guiding Interval (default 1.0 s): seconds between predicted pulses when no guide-star measurement is available.
Notitie
A weights file only works with the guide settings it was trained with. When guiding starts, the file’s fingerprint is checked against your current guide exposure, binning, gains, minimum/maximum pulse, and hysteresis settings. On a mismatch, guiding aborts with an explanatory message — either restore the settings you used during data collection, re-run the assistant to train new weights, or switch the algorithm back to Standard.
Monitoring AI Guiding
The guide state display shows what the AI is doing. After guiding starts, the AI is in a warm-up phase (shown as Warm up) while it synchronizes its model with the live mount — about 50 guide frames for worm gears, 30 for harmonic drives, and 10 for direct drives. During warm-up, guiding is handled entirely by the standard algorithm. Once its predictions are verified against real measurements, the AI becomes Active and its corrections are blended in.
The blend is weighted by a live confidence score. Confidence requires a reasonably bright guide star (it reaches its maximum around a signal-to-noise ratio of 30 and drops to zero below 10) and falls whenever the AI’s predictions stop matching what the mount actually does. When confidence is low, the standard guiding algorithm does most of the work — an underperforming model degrades gracefully instead of ruining your subframes.
Several safeguards apply at all times: every pulse respects your configured maximum pulse limits plus a hard 5-second ceiling; AI predictions are suspended during dithering; a meridian flip resets the AI’s internal state for re-warm-up; and a lost guide star triggers the guider’s normal reacquisition logic.
How It Works
A mount’s tracking error has two parts. The repeatable part comes from its mechanics — the worm gear’s periodic error, gear imperfections, atmospheric refraction, and the slow drift from residual polar-alignment error. The random part comes from seeing, wind, and measurement noise. A conventional guider is purely reactive: it can only correct an error after the star has already moved. A feed-forward guider, by contrast, predicts the repeatable part and cancels it as it happens — but it can do that only for errors that repeat, which is why data collection matters and why the random part remains the standard algorithm’s job.
The AI Guider is deliberately conservative in how it uses its predictions. Each guide cycle, the standard controller computes its normal correction from the measured drift. In parallel, the AI model computes a predicted correction, which is scaled by the live confidence score and your prediction gain, and added on top. The summed pulse then passes through the safety clamps before being sent to the mount. If the AI contributes nothing useful, its term simply fades to zero and you are left with plain standard guiding.
The model itself is chosen to match the mount’s physics rather than being one large neural network:
Worm gear mounts use a physics model of the periodic error, refraction, and polar drift, with its phase tracked live while guiding, plus a tiny neural network (about 200 parameters) that learns the leftover, mount-specific residuals.
Harmonic drive mounts use a Kalman-filter model of the drive’s spring wind-up and periodic error, with a small neural network correcting its predictions.
Direct drive mounts have almost no mechanical error, so only refraction and drift are modeled analytically — no neural network is involved.
Troubleshooting and Notes
Guiding aborts immediately with a weights error. The weights file failed to load or its fingerprint does not match your current guide settings. Restore the settings used during data collection, retrain, or switch the algorithm back to Standard.
The AI stays in warm-up or never becomes active. This is usually caused by a faint guide star (low signal-to-noise) or by predictions that do not match your mount’s current behavior. Guiding continues normally on the standard algorithm either way; consider retraining under better conditions.
No visible improvement. This is a realistic outcome on some mounts — especially ones with little periodic error or dominated by non-repeatable errors. Compare a few guiding sessions with the AI enabled and disabled under similar conditions before drawing conclusions.
When to retrain: after changing the guide camera, guide exposure, binning, guide optical train, mount, or any fingerprinted guide setting — and whenever guiding performance degrades noticeably after a remesh or mechanical adjustment.
Reporting problems: the wizard’s Export Logs button bundles the AI debug logs and guide logs into a single archive that you can attach to a bug report or forum post.
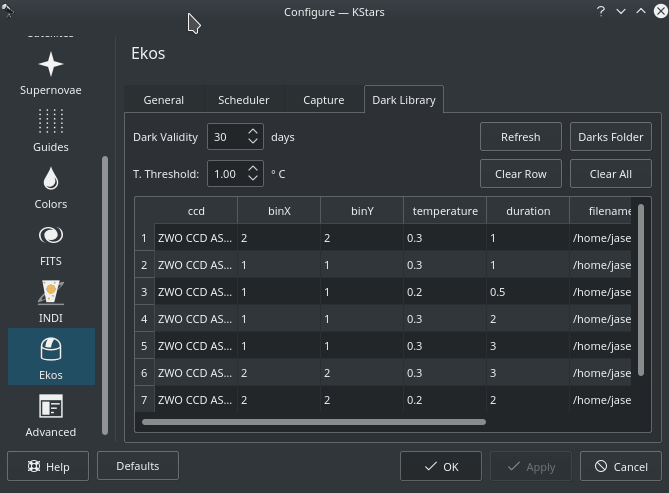
Dark Frames
Dark frames kunnen handig zijn voor het reduceren van ruis in volgframes. Als u deze optie hebt gekozen, wordt het sterk aanbevolen dat u dark frames opneemt voordat u de procedure start voor calibratie en volgen. Kies het keuzevakje
Dark, en klik daarna opOpnemen. De eerste keer vraagt Ekos u naar de sluiter van de camera. Als de camera geen sluiter heeft, vraagt Ekos u bij elke opname van een dark frame de opening van de camera/telescoop af te dekken, voor verder te gaan met opnemen. En anders, als de camera een sluiter heeft, gaat Ekos meteen verder met het opnemen van het dark frame. Alle dark frames worden automatisch opgeslagen in de bibliotheek voor dark frames van Ekos. Standaard worden de frames in deze bibliotheek 30 dagen gebruikt, voordat er nieuwe dark frames worden opgenomen. U kunt dit aantal wijzigen in de instellingendialoog Ekos instellingen van KStars.
Het wordt aanbevolen dark frames op te nemen voor diverse binnings en belichtingstijden, zodat die door Ekos transparant kunnen worden gebruikt wanneer dat nodig is.
PHD2 ondersteuning
Indien gewenst, kunt u de externe PHD2-toepassing selecteren voor het volgen, in plaats van de ingebouwde volger.
Als PHD2 wordt geselecteerd, kunt u met de knoppen
VerbindenenLoskoppelende verbinding regelen met de PHD2-server. U kunt de PHD2-belichtingstijd en dec-volginstellingen regelen. Als u opVolgenklikt, moet PHD2 alle vereiste acties doen voor het starten van het volgproces. PHD2 moet worden gestart en ingesteld vóór Ekos.Na het starten van PHD2, selecteert u uw IND-apparatuur, en stelt u de opties daarvan in. Vanuit Ekos maakt u verbinding met PHD2 door te klikken op de knop
Verbinden. Bij het opstarten probeert Ekos automatisch te verbinden met PHD2. Is die verbinding tot stand gebracht, dan kunt direct beginnen met volgen door te klikken op de knopVolgen. Indien nodig doet PHD2 de calibratie. Als ditheren geselecteerd is, krijgt PHD2 de opdracht te ditheren, met de opgegeven pixels, en zodra het volgen stabiel is en rustig, wordt in Ekos de opname weer hervat.
Log van volgen
De interne volger van Ekos slaat een CSV volglogbestand op in PHD2 format die van pas kunnen komen voor de analyse van de prestaties van de opstelling. In Linux wordt deze opgeslagen onder
~/.local/share/kstars/guidelogs/. Deze log is alleen beschikbaar als de ingebouwde volger van Ekos wordt gebruikt. Het zou compatibel moeten zijn met volglogviewer van PHD2.