Planner
Inleiding
De Ekos-planner is een belangrijke component van uw werkmethode voor afbeeldingen maken. Het verbindt met INDI, start en stopt alle andere Ekos-modulen, plant taken volgens hun voorwaarden en prioriteiten, monitort die taken terwijl ze worden uitgevoerd en brengt het systeem down wanneer taken gereed zijn of voor het ochtendgloren. Of u sessies voor afbeeldingen uitvoert over meerdere dagen voor meerdere doelen of eenvoudig een enkele doel probeert gedurende een paar uur, wordt het aanbevolen dat de planner uw sessies voor afbeeldingen bestuurt.
Plannertabel
Het hart van de planner is een tabel die de lijst van plannertaken toont die de gebruiker wil uitvoeren. Verbonden met elke taak zijn attributen (meestal beschreven in de onderstaande instellingensectie). De attributen beschrijven de naam van de taak, waar de telescoop naar moet wijzen bij maken van de afbeelding van die taak, een beschrijving van welke typen afbeeldingen opgenomen moeten worden, voorwaarden over wanneer de taken uitgevoerd moeten worden (bijv. hoogte, schemering, maan, blokkades in landschap, etc.), dingen die gedaan moeten worden voor en nadat de taak is uitgevoerd en strategieën voor afhandeling van fouten.
U kunt de rijen in de tabel van de planner toevoegen, verwijderen, wijzigen of de volgorde wijzigen.
U kunt een plantaakrij toevoegen in de tabel, als alle vereiste attributen zijn ingevuld (naam, positie en reeksbestand), door op de knop
+boven de tabel te klikken.Als u op een rij klikt, dan kunt u op de besturing
-klikken boven de tabel om die rij te verwijderen.Als u op een rij klikt, dan kunt u op de besturingen
^ofvklikken om die rijen omhoog of omlaag in de lijst met taken verplaatsen.Als u dubbelklikt op een rij, dan worden de attributen van die taak ingevuld in de verschillende instellingen op de pagina van de planner. U kunt dan een of meer van die attributen wijzigen en dan klikken op het vinkje boven de tabel (na uw dubbelklik werd de
+eenvinkjeen de nieuwe attributen zijn toegekend aan die taak.
Grafiek van planner
Verbonden met de plannertabel is een grafiek die de geplande uitvoering van plantaken representeert. Elke grafieklijn correspondeert met een rij in de plannertabel, die de hoogte van de plannertaak plot als een functie van tijd voor vannacht.
Als een taak gepland is on vannacht te draaien, wordt zijn grafieklijn geaccepteerd in groen tijdens zijn verwacht tijden van uitvoeren.
Er zijn pijlen rechts (en mogelijk) links van de grafiek om het beeld naar “morgennacht” en “de nacht na” te wijzigen, of om het terug te verplaatsen naar de huidige nacht.
Als u klikt op een rij in de plannertabel zal de bijbehorende grafieklijn geaccentueerd worden. Men kan grafieklijnen identificeren door met de muis er boven te zweven.
In de grafiek klikken zal de tijd en hoogte voor de geselecteerde plannertaak tonen.
De plannergrafiek kan uitgebreid of verminderd worden door de muis te gebruiken om de gestippelde scheiding tussen de plannergrafiek en de plannertabel te pakken en te slepen.
Planning-algoritme
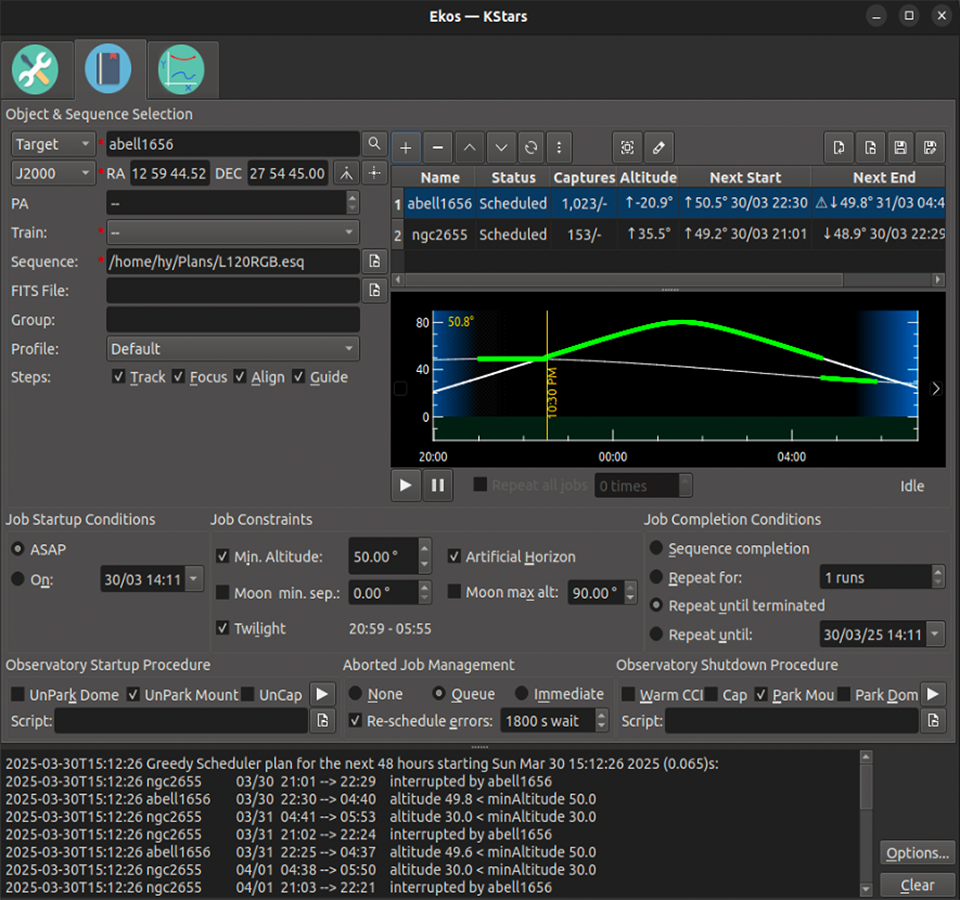
De plannertabel (boven) heeft een lijst met taken in volgorde van prioriteit, met hogere taken (op lager genummerde rijen) die hogere prioriteit hebben dan jobs verder omlaag in de lijst (met hoger genummerde rijen).
De planner plant regelmatig (en plant opnieuw) welke taken zouden uitgevoerd moeten worden en wanneer. Deze kan beginnen met het uitvoeren van een gegeven taak en dan later die taak vervangen door een nieuwe. Deze kan inactief worden als er geen taken uitgevoerd kunnen worden (bijv. in daglicht) en slapen tot een tijd dat deze weer actief wordt. Zijn doel is om de apparatuur zoveel als mogelijk is bezig te houden, met in acht neming van de prioriteiten in de tabel van de planner. Hier is hoe het werkt.
Wanneer de planner start (of wanneer deze opnieuw plant, wat elke seconde wordt gedaan indien actief), dan wordt er gekeken in de gehele lijst met taken, beginnend met de taak met de hoogste prioriteit en werkt omlaag naar die met de laagste prioriteit indien nodig. Wanneer het een taak vindt die uitgevoerd kan worden, dan wordt die taak gestart, mogelijk met stoppen van de nu in uitvoering zijnde taak. Een taak kan uitgevoerd worden als aan zijn voorwaarden is voldaan, bijv. het doel is niet geblokkeerd door het lokale terrein, deze voldoet aan de voorwaarde van minimale hoogte, deze heeft nog niet alle gewenste afbeeldingen voltooid, …
Het algoritme toont zijn geprojecteerde volgende starttijden en stoptijden voor alle taken in de plannertabel. Deze toont ook zijn schatting van het aantal keren dat de taken uitgevoerd zullen worden tijdens de volgende 48 uren in het logpaneel onderaan het venster. Zie de schermafdruk van het plannervenster bovenaan deze sectie.
Het planningsalgoritme beschreven in de bovenstaande paragraaf staat bekend als het Greedy planningsalgoritme. Deze is aanbevolen. In eerdere versies van Ekos was er een ander “Klassiek planningsalgoritme” dat nu niet meer in Ekos is. Dat schema kon geen actieve jobs afbreken en maakte dus geen goed gebruik van de apparatuur zoals het Greedy algoritme.
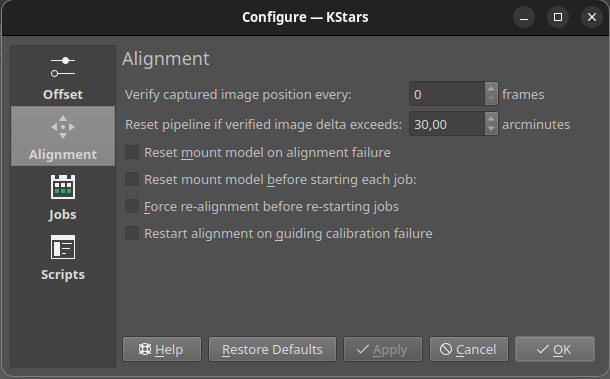
Er is een keuzevak in het optiemenu van de planner genaamd
Gretige planning gebruikendie standaard is geactiveerd. Het systeem werkt zoals bovenstaand beschreven wanneer het is geactiveerd. Wanneer het niet is geactiveerd zal de planner het plannen van lagere prioriteit jobs voorkomen wanneer niet voltooide hogere prioriteit jobs niet kunnen draaien. Dit resulteert in minder efficiënt gebruik van het systeem, maar kan u meer controle over de planning geven.
Plannerbestanden (.esl)
De plannertabel met zijn lijst met taken en attributen kan opgeslagen worden op schijf en terug ingelezen. Het schrijft een .esl-bestand. Besturing voor het schrijven van de huidige plannertabel naar schijf en teruglezen van andere .esl-bestanden staan boven de tabel rechts.
Instellingen
De planner van Ekos heeft een eenvoudige interface, waarin de gebruiker de condities en beperkingen kan instellen, die vereist zijn voor een job in de planner. U moet het
Doel, zijn coördinaten en deReeksselecteren voordat u een job aan de planner kunt toevoegen.Elke job in de planner bestaat uit het volgende:
Naam en coördinaten: selecteer het doel in de Zoekdialoog ofVoeg toeuit de Waarneemplanner. U kunt ook zelf een naam invoeren. Coördinaten kunnen ook gekopieerd worden uit de hemelkaart met de knop net rechts van de coördinaten.Optioneel
PA: de positiehoek (of afbeeldingsdraaiing) kan gespecificeerd worden voor systemen met hardware voor draaien van de camera.Optioneel
FITS-bestand: Als een FITS-bestand wordt opgegeven, lost de astrometrie-oplosser het bestand op en gebruikt de centrale RK/Dec als de doelcoördinaten.
Reeksbestand: het reeksbestand wordt samengesteld in de Opnamemodule van Ekos. Het bevat een lijst met opnamespecificaties, waar elk specificatiedetail het aantal op te nemen afbeeldingen bevat, welk te gebruiken filter, de opnameduur, de versterking, details van de naam van het bestand, temperatuurinstellingen, voorvoegsels, downloadmap, etc.
Profiel: selecteert het te gebruiken apparatuurprofiel wanneer Ekos wordt gestart. Indien Ekos & INDI al gestart zijn, en online, wordt deze selectie genegeerd.
Stappen: de gebruiker selecteert welke stappen genomen moeten worden bij de start van de taak. De mogelijkheden zijn: (1) Start volgen van de opstelling, (2) autofocus, (3) een oplossen van de uitlijning van de plaat uitvoeren, (4) het automatisch volgen starten. Een of meer kan gekozen worden.
Opstartcondities: condities waaraan moet worden voldaan voordat de job in de planner wordt gestart. Op dit moment kan de gebruiker zo snel als mogelijk te starten,ASAP, of wanneer het doel nabij of na de culminatie is, of op een bepaald tijdstip.
Beperkingen: dit zijn condities waaraan altijd moet worden voldaan tijdens het uitvoeren van de job in de planner. Hiertoe behoren minimum hoogte van het doel, minimum afstand tot de maan, waarnemen tijdens de schemering, kunstmatige beperkingen in horizonhoogte en het monitoren van het weer.
Condities voor voltooien: condities die het voltooien van de plannertaak inleiden. De standaard selectie is het eenvoudig aanmerken van de plannertaak als voltooid, als het hele proces klaar is. Extra condities maken het mogelijk de gehele reeks een aantal keren of oneindig te herhalen, of tot een specifiek tijdstip.
Overige opties
Er zijn verschillende andere opties om te besturen hoe de planner zich gedraagt. Deze zijn te vinden in het optiemenu, zoals onderstaand getoond, wat opent met de knop
Optiesgelokaliseerd rechtsonder in de planner.
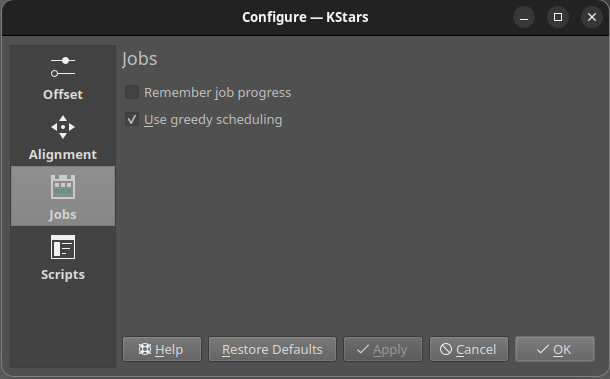
Taakvoortgang onthouden
Onder de boven getoonde instellingen, is er een belangrijke bekend als
Takenvoortgang onthouden. Wanneer dit vakje is geactiveerd en er is een taak actief, dan kijkt de planner naar de al opgenomen afbeeldingen op schijf en zal diegene die al hebt niet opnieuw opnemen . Het voordeel is dat als een taak opnieuw wordt gestart, of in een andere nacht opnieuw uitgevoerd of als meerdere taken tegelijk actief zijn, stoppen en starten wanneer ze zijn uit te voeren, dan starten taken opnieuw daar waar ze zijn gebleven. Dit werkt goed met de optie voor taak-gereedHerhalen tot beëindigen. AlsTaakvoortgang herinnerenniet is geactiveerd, zouden taken elke keer opnieuw gestart worden vanaf het begin van hun reeksspecificatie, wat waarschijnlijk niet is wat u wilt. Helaas, als de afbeeldingen niet opgeslagen worden op dezelfde computer waarop Ekos actief is, dan werkt deze functie niet en de taken beginnen van voor af aan.Een mogelijk verwarrend bijeffect van
Taakvoortgang herinnerenis dat als u een taak hebt uitgevoerd met de (standaard) eindvoorwaarde van de beëindiging van de reeks, en alle zijn afbeeldingen zijn opgenomen en nu wilt u de taak opnieuw uitvoeren, dan zal de planner de taak niet uitvoeren omdat deze geloofd dat alle afbeeldingen al zijn opgenomen. U moet ofwel deze afbeeldingen verplaatsen naar elders op de schijf of de eindvoorwaarde wijzigen naar N keer herhalen of Herhalen tot beëindiging.
Herhalingen van groepen
Deze functie biedt u het uitvoeren van twee of meer plannertaken op ruwweg dezelfde prioriteit, zodat als ze beiden uitvoerbaar zijn, ze voortgang zouden hebben op ruwweg dezelfde snelheid. Dit kan van toepassing zijn, bijvoorbeeld, voor taken die opnamen maken voor meerder tegels in een mozaïek, maar is algemeen van toepassing op elke set taken.
Normaal is de taakprioriteit van de (Greedy) planner ingesteld door de rij waarin de taak in de lijst in de takentabel van de planner staat. Taken in rijen dichter bij de top worden met een hogere prioriteit uitgevoerd dan taken lager in de tabel. Dus, als een taak op rij 2 (Taak2)
Herhalen tot beëindigenen aan de voorwaarden voor uitvoeren van die taak is voldaan, dan zal een lagere taak (bijv. Taak3) niet gepland worden voor uitvoeren.Als u taken wilt laten wisselen, dan kunt u aan elk van de taken dezelfde
groeptoekennen en aan de taken een van de beëindigingsvoorwaarden voor herhaling geven (bijv. N keer herhalen of Herhalen tot beëindiging). Met die opzet, zullen taken in dezelfde groep het uitvoer afstaan aan elkaar als ze meet ‘Herhalingen’ dan de andere taak hebben. Dus, als Taak2 met groep “MijnGroep” zijn tweede iteratie heeft voltooid en Taak3 met dezelfde groepsnaam heeft slechts 0 of 1 iteratie voltooid, dan wanneer de tijd komt om Taak2 uit te voeren, zal Taak3 in plaats daarvan worden uitgevoerd.Praktisch gesproken, stel u hebt een 6-paneel mozaïek dat u wilt afwisselen. U zou al die taken dezelfde groepsnaam geven, maak ze allen bijv. “Herhaal 5 keer”. Daarna zou u ze uitvoeren in vergrendelde stap. De cadens van het omschakelen van taken zou bestuurd worden door de lengte van het reeksbestand toegekend aan elk van die taken. U wilt de cadans niet te kort maken (bijv. een 2-minuten afbeelding), omdat er overhead is in het omschakelen van taken. Bijvoorbeeld, starten van taken kan uitlijnen, volgen starten en zelfs focusseren betekenen.
Alle jobs herhalen
Er is een keuzevak en getalinvoer direct onder de takentabel van de planner die u het herhalen biedt van het gehele plan N keer. Dit kan gebruikt worden om een paar taken te alterneren. U kunt de taken in de planner bekijken, deze instellen op N keer herhalen en de taken zullen zich herhalen. Deze wijziging is niet compatibel met ‘Taakvoortgang onthouden (hier boven) en niet beschikbaar als Taakvoortgang onthouden is geactiveerd. (Opmerking: taakvoortgang onthouden is aanbevolen).
Actieve taken bewerken
Het is mogelijk de tabel met taken in de planner en attributen van individuele taken te bewerken, terwijl de planner actief is. Zoals altijd klikt u dubbel op een taak, wijzigt de gewenste attributen en klikt op het keuzevak om de wijziging af te ronden. Als u edit de actieve taak bewerkt zal deze opnieuw gestart worden (d.w.z. de opstartstappen (draaien, focusseren, uitlijnen, volgen) zullen opnieuw gedaan worden. U kunt ook taken omhoog en omlaag in prioriteit verplaatsen, nieuwe taken toevoegen of bestaande verwijderen. U kunt de actieve taak niet verwijderen.
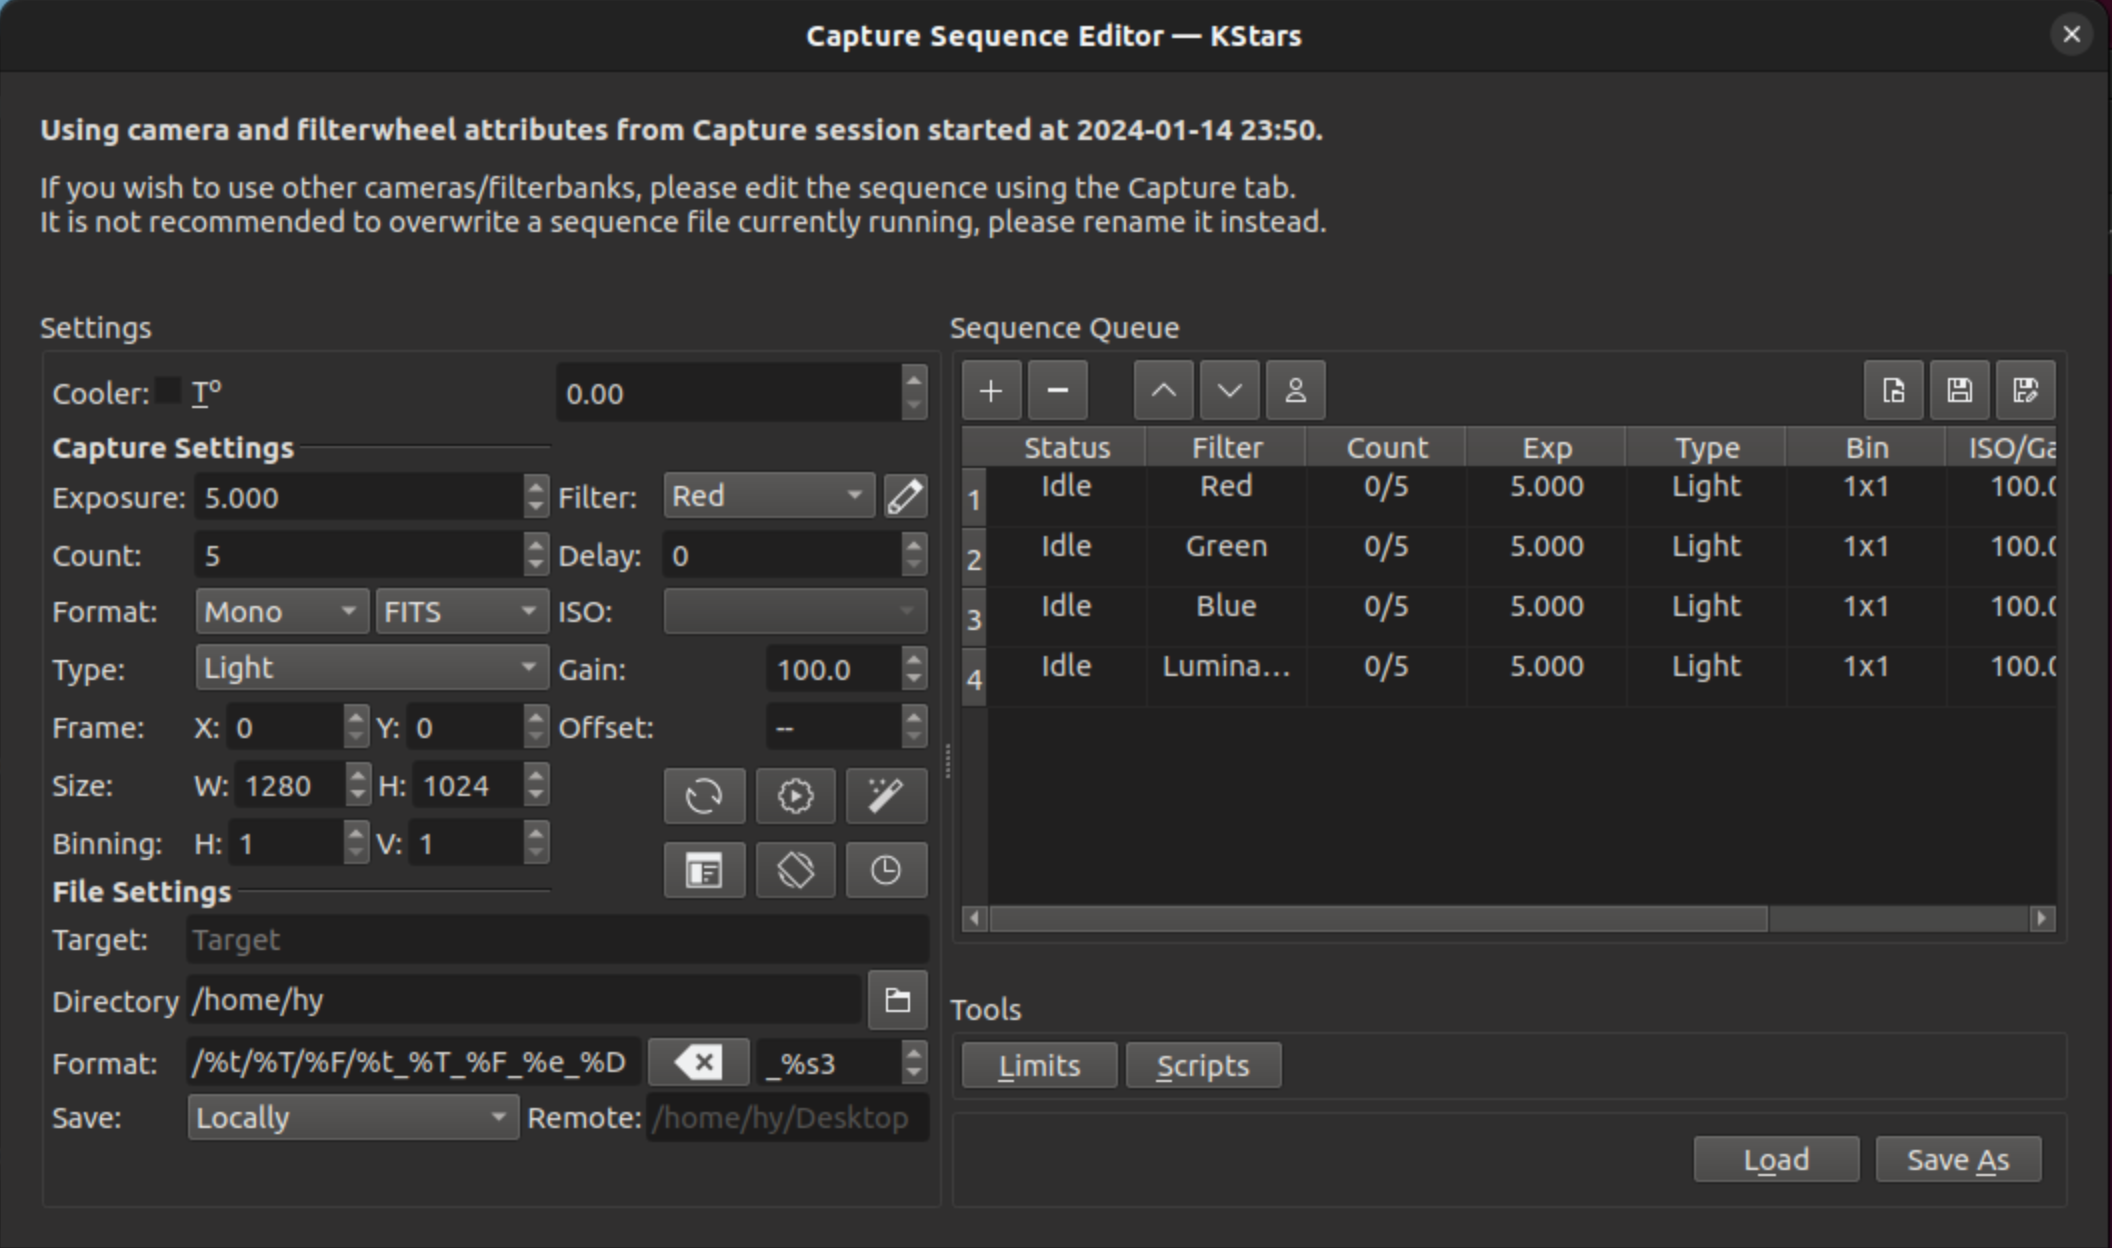
Eén belangrijk attribuut van plannertaken is hun reeksbestand (.esq) die de opnamemodule bestuurt terwijl de taak actief is. Het stelt bijvoorbeeld het aantal opnamen, gebruikte filters, versterking/ISO, etc. in. De .esq wordt normaal aangemaakt en bewerkt in het tabblad Opnamen, maar dat kan niet gedaan worden terwijl de planner actief is. Als u wijzigingen wilt maken in een .esq-bestand terwijl de planner actief is of een nieuwe wilt aanmaken, biedt de planner een hulpmiddel genaamd de bewerker van opnamereeksen.
Bewerker van opnamereeks
De Bewerker van opnamereeksen is een hulpmiddel om opnamereeksbestanden aan te maken en te bewerken (.esq) die gestart kunnen worden door te klikken op het bewerkpictogram (potlood) net boven de plannertabel. Een schermafdruk wordt onderstaand getoond.
De bewerker lijkt in gebruik en indeling erg op het tabblad Opname–hoewel er alle besturing ontbreekt om de afbeelding op te nemen. U bewerkt taken op dezelfde manier zoals u doet in opnamen en laadt of slaat reekswachtrijen op ook op dezelfde manier (hoewel er extra knoppen Laden en Opslaan naar in de bewerker geboden worden).
Belangrijk
Het is belangrijk te begrijpen dat opnamereeksen tot op zekere hoogt afhangen van het te gebruiken filterwiel en camera (bijv. de filternamen, de mogelijke ISO-waarden, …). De Bewerker van opnamereeksen, die niet verbonden is met de apparaatbesturing, heeft geen directe toegang tot die informatie. In plaats daarvan gebruikt de bewerker de waarde uit de laatste keer dat het tabblad Opnamen was verbonden met zijn apparaten. Het kan dus zinloos zijn om een .esq-bestand aan te maken voor een andere camera of filterwiel dan de laatste waarmee was verbonden. U moet misschien wachten totdat u plannertaak gereed is en die .esq direct bewerken in het tabblad Opnemen.
Het is ook aanbevolen dat u geen .esq-bestanden overschrijft wanneer plannertaken nu diezelfde bestanden gebruiken. (Het is OK als de planner actief is, maar niet die taak uitvoert.) Dit kan de planner en opnamemodulen uit synchronisatie halen, omdat ze de bestanden op verschillende momenten lezen. In plaats daarvan kunt u opslaan naar een verschillende bestandsnaam en daarna de te gebruiken plannertaak de nieuwe .esq bestandsnaam geven.
Werkmethode
De bovenstaande beschrijving betreft alleen het Verzamelen van gegevens. De hele procedure die typisch in een waarneemstation wordt gebruikt kan in drie primaire fasen worden samengevat:
Opstarten
Verzamelen van gegevens (inclusief preprocessen en opslag)
Afsluiten
Opstartprocedure
De opstartprocedure is uniek voor elk waarneemstation, maar kan inhouden:
Aanzetten apparatuur voor de energievoorziening
Controleren op veiligheid/juistheid
Weercondities controleren
Licht uitdoen
Besturing ventilatie en licht
Koepel ontgrendelen
Opstelling ontgrendelen
etc.
De planner van Ekos begint pas aan de opstartprocedure wanneer opstarttijd voor de eerste plannertaak nabij is (standaard is de voorloop tijd 5 minuten voor de opstart tijd). Zodra het opstarten met succes is voltooid, kiest de planner de plannertaak en wordt de eerste waarneemreeks gestart. Indien een opstartscript werd opgegeven, wordt die eerst uitgevoerd.
Gegevens verzamelen
Afhankelijk van de keuzes van de gebruiker, gaat dit typisch als volgt:
Draai de opstelling naar het doel. Indien een FITS-bestand werd opgegeven, wordt dit eerst opgelost, en wordt daarna naar de coördinaten gedraaid.
Het doel automatisch focussen. Het autofocusproces kiest automatisch de beste ster in de frame, en gebruikt dit in het autofocus-algoritme.
Los de plaat op, sync de opstelling, en draai naar de coördinaten van het doel.
Focussen herhalen na het uitlijnen, omdat de frame tijdens het oplossen van de plaat kan zijn bewogen.
Calibreren en autovolgen: het calibratieproces selecteert automatisch de beste ster om te volgen, voert de calibratie uit, en start het autovolgproces.
Lees het rijbestand in in de Opnamemodule en start het afbeeldingsproces.
Coördineer moduleproblemen, zoals mislukken bij volgen of uitlijning. Ze kunnen resulteren in onderbreken en opnieuw plannen van taken in de planner.
Opmerking–sommige van de interacties tussen modulen worden geïnitieerd door de modulen zelf, maar worden gemonitord door de planner. Deze omvatten meridiaan omdraaiingen, uitvoeren van autofocus geïnitieerd door temperatuurwijzigingen of aflopen van timers en vereisten voor opnamen voor minimale afwijkingen in het volgen.
Afsluiten
Zodra de plannertaak met succes is voltooid, selecteert de planner de volgende plannertaak. Indien er geen taak gepland kan worden wordt de opstelling vergrendeld, totdat de volgende taak uitgevoerd kan worden. Verder, indien de volgende taak nog niet aan de beurt is gedurende een door de gebruiker instelbare tijd, voert de planner een afsluitprocedure uit als voorzorg, om hulpbronnen te besparen en voert de opstartprocedure weer uit, als doel zover is.
Indien een onherstelbare fout optreedt, zal de waarneemstation een afsluitprocedure beginnen. Als er een script is voor afsluiten, wordt die het laatst uitgevoerd.
In de volgende video ziet u een eerdere versie van de planner in actie, maar de basisprincipes gelden nog steeds:
Ekos-planner (https://youtu.be/v8vIXD1kois)
Weer monitoren
Nog een kritieke eigenschap van elke op afstand bediende automatische waarneemstation is het monitoren van het weer. Voor weer-updates vertrouwt Ekos op de geselecteerde weer-driver van INDI, voor het continu monitoren van de weercondities. Eenvoudigheidshalve kunnen de weercondities opgesomd worden in drie toestanden:
Ok: Helder weer, optimaal voor opnames.
Waarschuwing: Geen helder weer, zicht is onvoldoende, of gedeeltelijk geblokkeerd en ongeschikt voor het maken van afbeeldingen. Verder afbeelden wordt opgeschort tot het weer verbetert. Weercondities zijn niet schadelijk voor de apparatuur in de waarneemstation, dus blijft die operationeel. Wat er precies moet gebeuren tijdens een waarschuwing, kan worden ingesteld.
Alert: Weercondities zijn schadelijk voor de veiligheid van het waarneemstation, en die moet zo snel mogelijk worden afgesloten.
Monitoren van weer kan op twee manieren geconfigureerd worden:
Onderdeel van het apparaatprofiel - een weerstuurprogramma start met de waarneemapparatuur
Alleenstaand INDI-beveiligingsmonitor - een INDI- beveiligingsmonitorstuurprogramma draait onafhankelijk op een aparte INDI-server
Belangrijk: Als er geen aparte veiligheidsmonitor is geconfigureerd, kan de planner de veiligheidsomstandigheden niet controleren voordat het observatorium wordt gestart. Dit betekent dat het observatorium mogelijk onder onveilige omstandigheden start. Hoewel het weerstuurprogramma van het apparatuurprofiel na het opstarten wordt geactiveerd en onmiddellijk een uitschakeling in gang zet als de omstandigheden onveilig zijn, is deze start-stopcyclus inefficiënt en potentieel schadelijk voor de apparatuur.
Beste praktijk: Configureer een alleenstaande INDI-veiligheidsmonitor. Indien aanwezig, heeft deze altijd voorrang op elk weerstuurprogramma in het apparatuurprofiel bij het bepalen van de veiligheid van het observatorium. De monitor kan worden geconfigureerd om te luisteren naar een willekeurig aantal weer- of hulpstuurprogramma’s (zoals UPS) die een veiligheidsrisico kunnen vormen voor de werking van het observatorium. Elk INDI-stuurprogramma die de INDI-standaardeigenschap SAFETY_STATUS implementeert, kan worden toegevoegd aan het veiligheidsmonitor-stuurprogramma. Hierdoor kan de planner controleren of de omstandigheden veilig zijn voordat het observatorium wordt opgestart.
Antwoord op weerwaarschuwingen
Wanneer de weersomstandigheden tijdens de werkzaamheden verslechteren tot een alarmstatus, start de planner een beschermende “zachte afsluit”-procedure. In tegenstelling tot een volledige uitschakeling waarbij alle systemen worden gestopt, behoudt een zachte afsluiting de Ekos- en INDI-verbindingen en beschermt uw apparatuur, waardoor een snelle hervatting mogelijk is zodra de omstandigheden verbeteren.
Sequentie van zachte afsluiting:
Wanneer een weerwaarschuwing wordt gedetecteerd:
Een instelbare vertragingsperiode (standaard: 10 seconden) voorkomt reactie op kortstondige problemen met de sensor.
Als de waarschuwing aanhoudt, wordt de huidige planner-taak afgebroken (gemarkeerd als AFGEBROKEN, niet als FOUT, zodat deze later opnieuw kan worden gestart).
De wachtrij vóór afsluiten wordt uitgevoerd om apparatuur te beschermen (meestal sluit dit de stofkappen, vergrendeld de opstelling en sluit de koepel).
Ekos en INDI blijven in bedrijf voor een sneller herstel
De planner voert een respijtperiode in om te wachten tot het weer verbetert.
Weerrespijtperiode
De respijtperiode is een instelbare wachttijd waarin de planner de weersomstandigheden controleert, na het initiëren van een zachte afsluiting. Als het weer tijdens deze periode verbetert, worden de werkzaamheden automatisch hervat.
Speciale waarde — respijtperiode = 0 (onbepaalde wachttijd):
Door de respijtperiode op 0 in te stellen, geeft u de planner de opdracht om onbepaalde tijd te wachten tot het weer verbetert. De planner zal nooit taken opgeven of afbreken vanwege het weer — hij wacht gewoon, geparkeerd, totdat de veiligheidsomstandigheden weer in orde zijn, ongeacht hoe lang dat duurt (uren, dagen, enz.). Dit is de aanbevolen instelling voor volledig geautomatiseerde, onbemande observatoria.
Wanneer de respijtperiode 0 is:
De apparatuur wordt direct beveiligd (uitschakelprocedures vooraf worden uitgevoerd: opstelling parkeren, koepel sluiten, enz.)
Ekos en INDI blijven in bedrijf - geen volledige afsluiting wordt uitgevoerd
De planner controleert elke 5 minuten het weer als vangnet en herstelt zich onmiddellijk (binnen 10 ms) wanneer de weersensor aangeeft dat het weer in orde is
Taken blijven in de status AFGEBROKEN (niet FOUT) zodat ze automatisch opnieuw worden gestart zodra de omstandigheden verbeteren
Het logboek zal het volgende weergeven: “Observatorium gepland voor gedeeltelijke afsluiting. Weermonitoring wordt voor onbepaalde tijd voortgezet totdat de veiligheid is verbeterd.”
Gedrag bij Respijtperiode > 0:
Als er een respijtperiode van meer dan nul is geconfigureerd, wacht de planner dat aantal minuten na de zachte afsluiting totdat het weer verbetert. Als de respijtperiode verloopt terwijl de waarschuwing nog actief is, wordt een volledige afsluiting (INDI/Ekos stopt) uitgevoerd en worden taken gemarkeerd als afgebroken.
Configuratie:
In de weerinstellingen van planner:
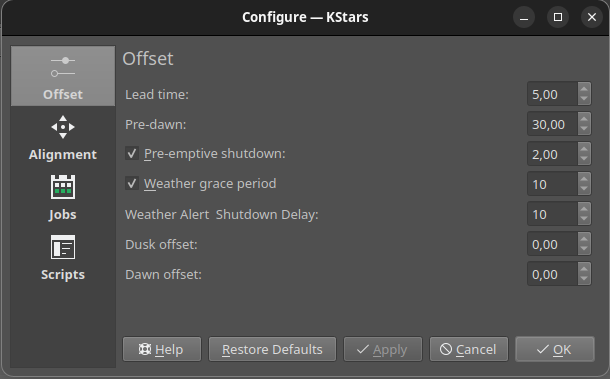
Uitschakelvertraging bij weersomstandigheden: aantal seconden dat gewacht moet worden na detectie van een waarschuwing voordat de zachte afsluiting wordt gestart (standaard: 10). Dit voorkomt valse waarschuwingen door korte storingen in de sensor. Tijdens deze vertraging, als de weersensor herstelt, wordt helemaal geen actie genomen.
Weerwaarschuwingsperiode: Minuten wachten (in de geparkeerde/zachte afsluitingstoestand) tot het weer verbetert voordat volledig wordt afgesloten. Stel in op 0 voor onbeperkte monitoring — de aanbevolen waarde voor geautomatiseerde observatoria die altijd automatisch moeten hervatten.
Automatisch weerherstel
Als het weer tijdens de respijtperiode verbetert, hervat de planner automatisch de werkzaamheden:
De weerstatus verandert van Waarschuwing naar Ok
De wachtrij ná opstarten voert de beveiligingsacties uit (opent de koepel, ontgrendelt de opstelling, opent de stofkappen).
De planner hervat de normale werking
De afgebroken taak kan opnieuw worden gestart als nog steeds aan de randvoorwaarden is voldaan
Wachtrijgebruik tijdens weersomstandigheden:
Weergebeurtenissen maken gebruik van specifieke opstart- en afsluitwachtrijen:
Tijdens een weersafhankelijke uitschakeling: alleen de wachtrij vóór afsluiten wordt uitgevoerd (deze wordt uitgevoerd voordat Ekos wordt gestopt). De wachtrij ná afsluiten wordt overgeslagen, omdat Ekos actief blijft.
Tijdens herstel na weersomstandigheden: alleen de wachtrij ná afsluiten wordt uitgevoerd (wordt uitgevoerd nadat de apparaten gereed zijn). De wachtrij vóór opstarten wordt overgeslagen omdat Ekos nooit is gestopt.
Uw wachtrijen voor vóór afsluiten en ná opstarten moeten symmetrisch samenwerken-de wachtrij ná opstarten moet precies het omgekeerde doen van wat de wachtrij vóór afsluiten deed.
Voorbeeld ontwerp wachtrij:
- Wachtrij vóór afsluiten:
Stofkap sluiten
Opstelling vergrendelen
Koepel sluiten
- Wachtrij ná opstarten:
Koepel openen
Opstelling ontgrendelen
Stofkap openen
Beste praktijken van weer monitoren
Voor betrouwbare bescherming tegen weer:
Ontwerp symmetrische wachtrijen: zorg ervoor dat de wachtrijen vóór afsluiten en ná opstarten exact hetzelfde zijn.
Stel de juiste vertragingen in: configureer de uitschakelvertraging bij slecht weer lang genoeg om valse alarmen te voorkomen, maar kort genoeg om de apparatuur snel te beschermen (10-30 seconden aanbevolen).
Stel de respijtperiode in op 0 voor volledig geautomatiseerde observatoria: Het instellen van de respijtperiode op 0 is de aanbevolen configuratie voor onbeheerde werking. De planner wacht dan onbeperkt tot het weer verbetert – zelfs gedurende meerdere dagen – en hervat automatisch zonder menselijke tussenkomst. Als u de voorkeur geeft aan een eindige respijtperiode (bijvoorbeeld om een volledige INDI-afsluiting te activeren na N minuten), kies dan een waarde op basis van de lokale weersomstandigheden (30-120 minuten is gebruikelijk voor passerende bewolking of buien).
Test uw opzet: test handmatig de automatische uitschakeling en herstart na weersinvloeden voordat u de installatie onbeheerd uitvoert.
Bewaking van de verbindingsstabiliteit: zorg voor een betrouwbare verbinding met het weerstation. De planner probeert opnieuw verbinding te maken als de verbinding verloren gaat.
Gebruik alleenstaande weermonitoring: configureer een alleenstaand weerapparaat in de planningsinstellingen om de omstandigheden te bewaken, zelfs voordat de apparatuur wordt gestart, waardoor onveilige opstartmomenten worden voorkomen.
Scripts voor Opstarten & Afsluiten
Notitie
NIEUW: Wachtrijsysteem voor taken
KStars bevat nu een modern Wachtrijsysteem dat een krachtig, op sjablonen gebaseerd alternatief biedt voor traditionele opstart- en afsluitscripts. De Wachtrij biedt:
Visueel interface voor het bouwen van automatiseringssequenties
Voorgeprogrammeerde sjablonen voor veelvoorkomende bewerkingen
Ingebouwde foutafhandeling en logica voor opnieuw proberen
Realtime monitoring van voortgang
Taakuitvoering met oog op apparaat
Voor nieuwe observatoria of observatoria die hun automatisering willen moderniseren, raden we aan om het Wachtrijsysteem te verkennen. Zie de volledige documentatie van Wachtrij voor meer informatie voor details.
Omdat elk waarneemstation uniek is, maakt Ekos het mogelijk scripts te maken voor het opstarten en het afsluiten. In de scripts staan alle nodige procedures hiervoor. Bij het opstarten voert Ekos de opstartscripts uit en gaat alleen verder met de rest van de opstartprocedure (ontgrendelen van koepel en opstelling), als dit met succes wordt voltooid. Omgekeerd, begint de afsluitprocedure met het vergrendelen van opstelling en koepel, voordat tenslotte het uitvoerscript wordt uitgevoerd.
Omdat elk waarneemstation uniek is, maakt Ekos het mogelijk scripts te maken voor het opstarten en het afsluiten. In de scripts staan alle nodige procedures hiervoor. Bij het opstarten voert Ekos de opstartscripts uit en gaat alleen verder met de rest van de opstartprocedure (ontgrendelen van koepel en opstelling), als dit met succes wordt voltooid. Omgekeerd, begint de afsluitprocedure met het vergrendelen van opstelling en koepel, voordat tenslotte het uitvoerscript wordt uitgevoerd.
OPstart en afsluitscripts kunnen in elke taal worden geschreven die op de lokale machine beschikbaar is. 0 moet worden gerapporteerd bij succes, elke andere waard betekent dat er iets niet goed is gegaan. De standaarduitvoer van een script gaat ook naar het logvenster van Ekos. Hier volgt een voorbeeld-demo van een opstartscript in Python:
#!/usr/bin/env python
# -*- coding: utf-8 -*-

import os
import time
import sys

print "Apparatuur aanzetten..."
sys.stdout.flush()

time.sleep(5)

print "Veiligheidsschakelaars controleren..."
sys.stdout.flush()

time.sleep(5)

print "Alle systemen zijn GO"
sys.stdout.flush()

exit(0)
Opstart- en afsluitsripts moeten uitvoerbaar worden gemaakt, voordat die door Ekos kunnen worden gebruikt (bijv. gebruik hiervoor ``chmod +x script_naam.py``). De planner van Ekos maakt een werkelijk eenvoudige automatische werking mogelijk van elk stap in het proces. Zonder iemand in de buurt, wordt het steeds belangrijker dat als er iets misgaat in enige fase van de waarnemingen, dat de waarnemingen op een goede manier worden beëindigd. Met Plasma-berichten kan de gebruiker hoorbare alarmen en e-mailberichten instellen voor de diverse gebeurtenissen in de planner.
Mozaïekplanner
Super wide-field afbeeldingen als van de Hubbletelescoop van melkwegstelsels <http://darkskyart.com/?page_id=96> en nevels zijn werkelijk heel indrukwekkend, en hoewel er veel vakmanschap nodig is om deze opnames te maken en te bewerken; zijn er veel opmerkelijke namen op het gebied van de astrofotografie, die apparatuur gebruiken die niet heel veel verschilt van die van u en mij. Ik benadruk heel veel, omdat sommigen inderdaad indrukwekkende apparatuur hebben en speciale waarneemstations die tienduizenden Euro’s kosten. Niettemin, vele amateurs kunnen wide-field opnames maken van sterren, door kleinere afbeeldingen te combineren in een enkele grootse mozaïek.
We worden vaak beperkt door het gezichtsveld (GV) van onze camera+telescoop combinatie. Door het GV te vergroten door middel van het verkorten van de brandpuntsafstand, of een kortere buis, zien we een groter gedeelte van de hemel, ten koste van de ruimtelijke resolutie. Tegelijkertijd zijn er vele aantrekkelijke wide-field doelen die meerdere GV’s beslaan aan de hemel. Zonder veranderingen in uw astrografische apparatuur, is het mogelijk een aantal kleinere afbeeldingen tot een super mozaïekbeeld aan elkaar te plakken. Dit kan op twee manieren:
Maak meerdere opnamen die samen met enige overlap het hele object beslaan. De overlap is nodig voor de software die de sub-afbeeldingen met elkaar uitlijnt en aan elkaar verbindt.
Bewerk de afbeeldingen en plak ze aan elkaar tot een super mozaïek afbeelding.
De tweede manier wordt afgehandeld door toepassingen voor het bewerken van afbeeldingen, zoals PixInsight <https://pixinsight.com>, onder andere, welke hier niet zullen worden besproken. De eerste stap wordt gedaan in de planner van Ekos, waarin een mozaïek wordt aangemaakt die geschikt is voor uw apparatuur, in overeenstemming met de gewenste GV. Ekos maakt niet alleen de mozaïekpanelen aan voor uw doel, maar ook de ermee corresponderende waarneemtaken die nodig zijn voor het maken van alle opnames. Hiermee wordt de logistiek van het maken van veel opnames met verschillende filters en calibratie-frames over een groot gebied van de hemel, veel eenvoudiger.
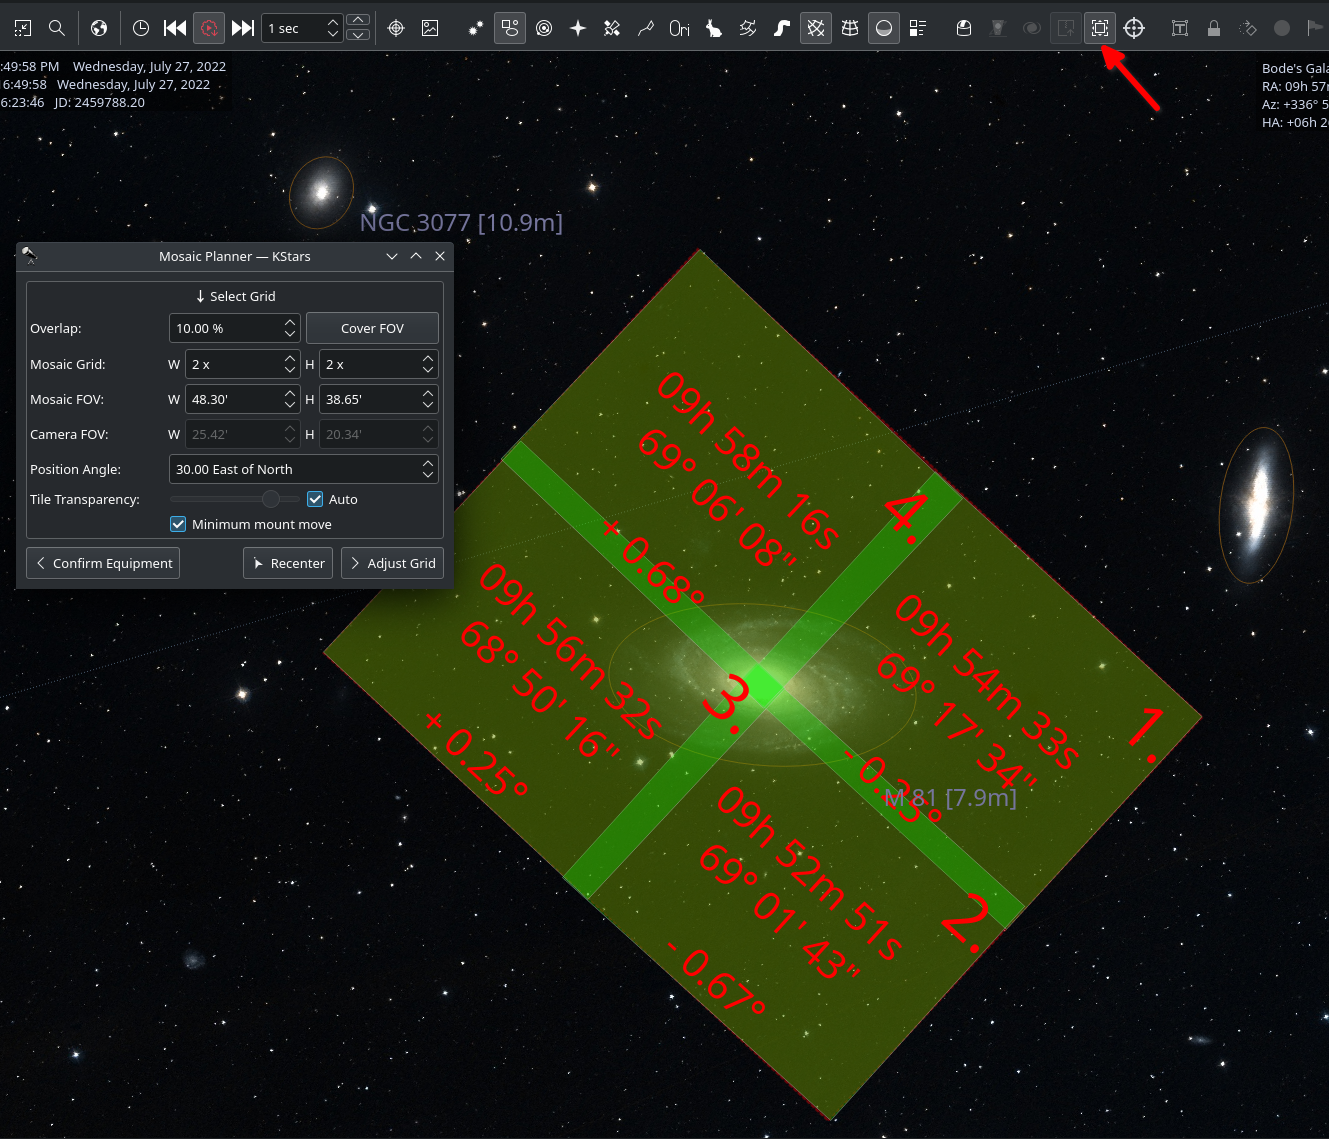
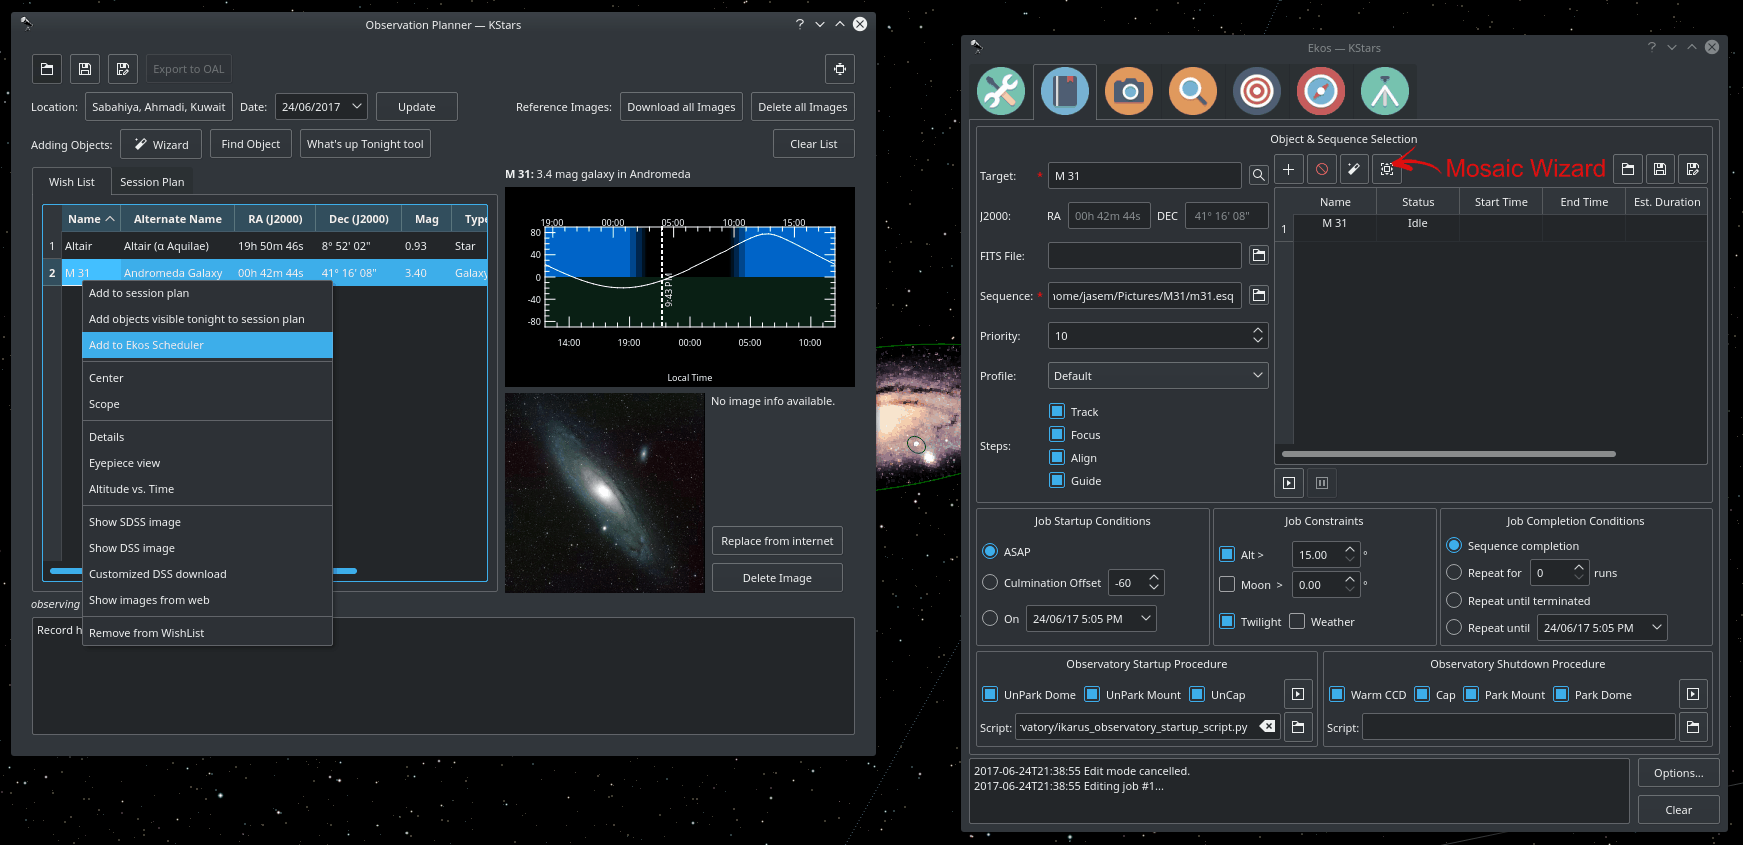
De
Mozaïekplannerin de Ekos planner zal meerdere plannerjobs aanmaken gebaseerd op een centraal doel. Om de planner om te schakelen, klik op de knopMozaïekplannerin de Ekos planner of KStars INDI werkbalk zoals getoond in de schermafdruk. De planner tekent het Mozaïekpaneel direct op de hemelkaart. Aanbevolen is het inschakelen van HiPS overlay voor de beste ervaring. De planner is opgebouwd uit vier stadia:
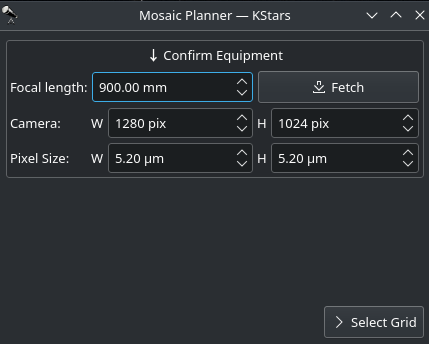
Apparatuur bevestigen: Ekos probeert apparaatinstellingen uit INDI te laden. Indien, zonder succes, moet u uw apparatuurinstellingen inclusief uw brandpuntsafstand van de telescoop naast breedte, hoogte en pixelafmetingen. De instellingen worden opgeslagen voor toekomstige sessies.
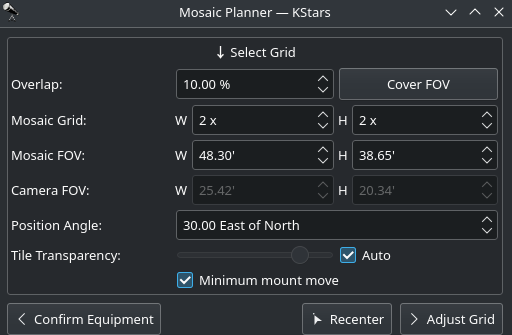
Raster aanpassen: selecteer de afmetingen van het mozaïekpaneel en het percentage overlap. Het mozaïekpaneel wordt bijgewerkt dan ook op de hemelkaart. Pas de positiehoek aan om overeen te komen met de gewenste mozaïek-oriëntatie in de hemel. Als de positiehoek verschilt van de gebruikelijke oriëntatie van uw camera, dan moet u misschien de camera draaien ofwel handmatig of via een gemechaniseerde rotator wanneer de planjobs zijn uitgevoerd. Transparantie van vakjes wordt standaard automatisch berekend maar kan uitgeschakeld worden en handmatig aangepast. Om het mozaïekveld uit het aantal vakjes te berekenen, klik op de knop
FOV dekken. Het mozaïekpaneel kan gecentreerd worden in de hemelkaart door te klikken op de knopOpnieuw centreren.
Een grote overlap zorgt er voor dat het aan elkaar naaien van frames gemakkelijker zal zijn tijdens nabewerking, maar het vereist meer panelen om de gewenste uitbreiding te dekken. Als u echter al het minimale aantal sub-frames weet dat uw afwijs-algoritme zal gebruiken tijdens nabewerken, dan kunt u de overlap verhogen om die hoeveelheid te halen op de gebieden gedekt door meerdere panelen. Bijvoorbeeld, een 4x4 mozaïekraster met 75% overlap heeft 16 sub-frames die de centrale doorsnede dekken, wat genoeg is voor Winsorized Sigma afwijzing. Hoewel de resulterende stapel niet dezelfde hoogte heeft op alle delen van het uiteindelijke frame, geeft deze methode u controle over de signaal-ruisverhouding en biedt u om de context naar uw doel te leveren tijdens het leveren van een relatief laag aantal opnamen.
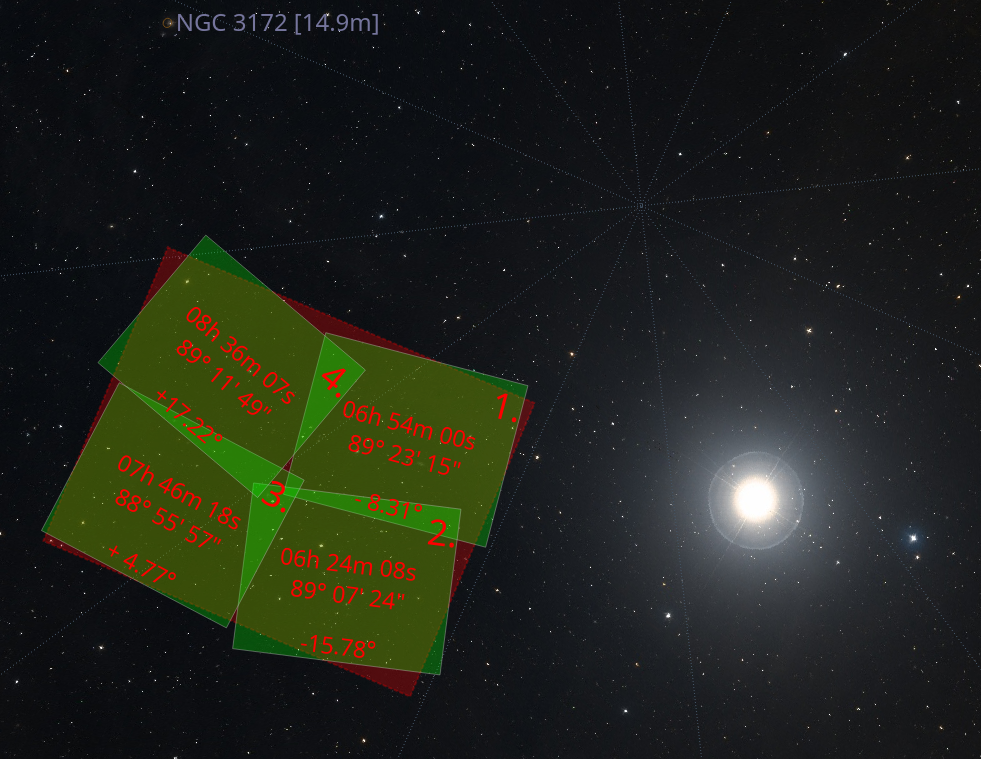
Het grote getal getoond in de hoek van elk rasterpaneel representeert de volgorde waarin panelen zullen worden opgenomen. De standaard S-vormige keuze (west-oost daarna afwisselend verplaatsingen omhoog-omlaag/omlaag-omhoog), verzekert minimale beweging van de opstelling tijdens de observatie. Deactiveer
Minimale beweging van de opstellingom terug te gaan naar alleen beweging west-oost/omhoog-omlaag. De coördinaten van elk paneel behoren bij hun centrum als graden, minuten en seconden. Tenslotte wordt de hoek, die elk paneel draait vanuit het centrum van het mozaïek, onderaan getoond. Als uw zichtveld groot is of als uw mozaïek zich dicht bij een hemelpool bevindt, zou u kunnen zien dat gerenderde panelen zichtbaar beginnen te draaien vanwege hun horizontale positie of hoge declinatie. Gebruikde overlapom te verzekeren dat panelen de gewenste uitbreidingen van het frame juist dekken.
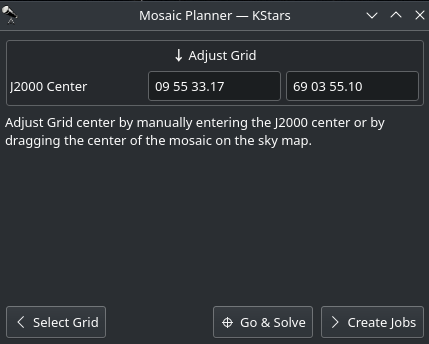
Raster aanpassen: Centrum van raster aanpassen door handmatig het J2000-centrum in te voeren of door het centrum van het mozaïek op de hemelkaart te slepen.
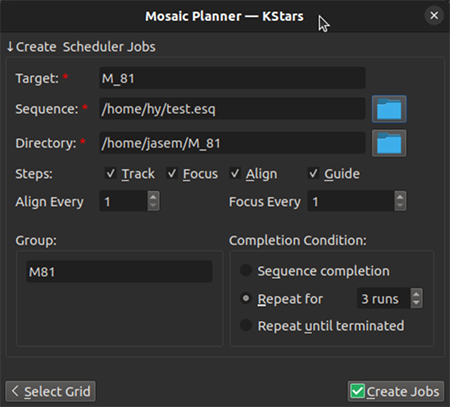
Taken aanmaken: de laatste stap is het selecteren van het volgordebestand en map voor opslag van de afbeeldingen. Het doelveld kan automatisch gevuld worden maar kan naar wens gewijzigd worden. Selecteer de stappen die elke planjob in volgorde zou moeten uitvoeren (Track -> Focus -> Uitlijnen -> volgen -> Opnemen) en pas de frequentie van automatische uitlijning en focusroutines die uitgevoerd moeten worden tijdens de mozaïek bewerking. Bijvoorbeeld, als
Alles uitlijnenis ingesteld op 2 planjobs, dan zal de eerste job de uitlijning van de astrometrie doen, terwijl de tweede job dat zal overslaan. Wanneer de derde job wordt uitgevoerd, dan wordt opnieuw uitlijnen gedaan enzovoort.Als u de verschillende taken in de mozaïekvelden wilt alterneren, vul dan in de groepsnaam een identifier die alle taken in de mozaïekvelden zullen delen en selecteer een herhalende voorwaarde voor gereed.
Klik op
Jobs aanmakenom mozaïek planjobs te genereren en ze toe te voegen aan de wachtrij. U kunt de taken verder individueel bewerken, zoals u met normale plantaken zou doen.