
L'outil de planification d'acquisition
Cet outil aide les utilisateurs à choisir les objets à photographier. Ils peuvent télécharger des catalogues d'objets recommandés et aussi créer leur propre catalogue. L'outil calcule quand les objets peuvent être acquis pour une nuit définie en tenant compte de contraintes telles que l'altitude minimale, le terrain et la séparation de la Lune. Il peut trier les objets selon plusieurs dimensions telles que le nombre d'heure d'acquisition pour la nuit (en tenant compte de la géographie de l'utilisateur, de contraintes et également de l'horizon artificiel), son altitude au méridien, la distance à la Lune, sa constellation, son nom et son type. On peut aussi filtrer les objets selon plusieurs critères comme le type d'objet, s'il a déjà été photographié, les mots clé ajoutés par l'utilisateur, s'il a été sélectionné, l'intérêt de l'utilisateur, etc.). Cet outil aide les utilisateurs dans leur recherche en affichant des images de haute qualité de l'objet, sa position dans le ciel et fournit des liens vers des sites contenant davantage d'informations et d'images. Il permet également d'ajouter des notes aux objets et d'en sélectionner certains pour plus tard. Il peut être utilisé avec Ekos ou d'autres outils d'acquisition. Cependant, il n'interagit pas directement avec ce dernier ; il ne fait qu'aider l'utilisateur à choisir les objets à photographier.
Configuration du planificateur d'acquisition
Le planificateur d'acquisition peut être utilisé avec KStars/Ekos ou d'autres logiciels d'astrophotographie. Cette section fournit des instructions de configuration pour les nouveaux utilisateurs de KStars. Les utilisateurs existants pourront ignorer les premières étapes.
- Télécharger KStars
Suivez les instructions sur https://kstars.kde.org/download/.
- Premier lancement de KStars
L'
Assistant de démarrageapparaît lors du premier lancement de KStars. Il est également accessible depuisConfiguration→Assistant de démarrage.Configurez votre emplacement géographique dans l'assistant de démarrage.
Cliquez sur
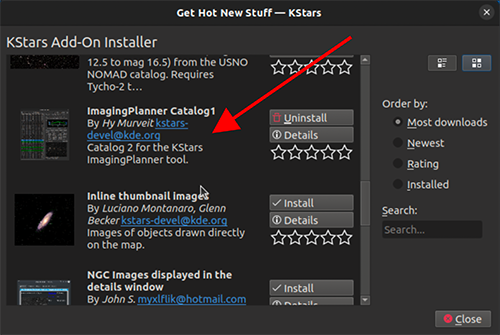
Télécharger des données supplémentaires.Si vous utilisez KStars 3.7.6 ou une version ultérieure, le seul téléchargement requis pour le planificateur d'acquisition est le catalogue du planificateur (voir image). Il doit indiquer
Catalog 2…ou une version plus récente.Si vous utilisez une version antérieure, il est recommandé de télécharger également les catalogues
NGC/IC,Open NGC,Abell,Sharpless,HicksonetLyndspour accélérer considérablement le premier démarrage du planificateur.Dans tous les cas, vous pouvez également télécharger tout autre catalogue souhaité.
- Configurer votre fichier d'horizon artificiel (facultatif, mais utile)
Votre fichier d'horizon doit être formaté comme suit. Les lignes commençant par
#sont des commentaires facultatifs,SideNearFencepeut être remplacé par le nom de votre choix, et les autres lignes contiennent deux nombres à virgule flottante pour l'azimut et l'altitude. Ce format est probablement compatible avec les fichiers d'horizon d'autres logiciels.# KStars Artificial Horizon export # Horizon SideNearFence 67.6236 22.7211 71.4942 21.7769 73.8178 20.6722 …Allez dans
Configuration→Horizon artificiel. Cliquez sur l'icône en 5e position depuis la gauche (en passant la souris dessus, elle devrait indiquer « Importer un fichier d'horizon exporté »).Naviguez jusqu'à votre fichier d'horizon et sélectionnez-le.
Cliquez sur Appliquer puis sur Fermer.
- Changer de thème (facultatif)
Si vous préférez un thème sombre, allez dans
Configuration→Thèmeset sélectionnezBlack Body.
- Premier lancement du planificateur
Allez dans
Outils→Planificateur d'acquisitionLe planificateur démarre, mais peut vous demander de charger un catalogue
Si vous avez besoin d'un catalogue ou n'utilisez pas le plus récent (ex. Catalog2 avec 770 objets), cliquez sur
Charger un catalogue…sur le côté droit du planificateur.
Un menu
Ouvrir un fichiers'affiche, pointant vers un dossier où vous devriez trouver les catalogues du planificateur d'acquisition. Le catalogue le plus récent se trouve dans un dossier nommé ImagingPlanner-catalog2.Double-cliquez sur ce dossier, vous accéderez à un dossier contenant
all.csv.Sélectionnez (simple clic)
all.csvet cliquez surOuvrir. Le planificateur sera grisé pendant le chargement, qui peut prendre plusieurs minutes lors du premier ajout d'un catalogue sur les versions antérieures à KStars 3.7.6. Le délai est bien plus court à partir de la version 3.7.6.Ces longs délais ne surviennent que lors du premier lancement du planificateur. Une note en haut de l'écran indique la progression, par exemple
13/66 ajout de Arp 240.Si vous avez un catalogue ou venez d'en charger un, le planificateur d'acquisition est prêt à l'emploi.
Les démarrages suivants seront bien plus rapides, avec vos choix mémorisés.
- Utilisation du planificateur d'acquisition
Cette vidéo (créée en novembre 2024) présente l'utilisation du planificateur d'acquisition : https://youtu.be/hrjqglLCW2s
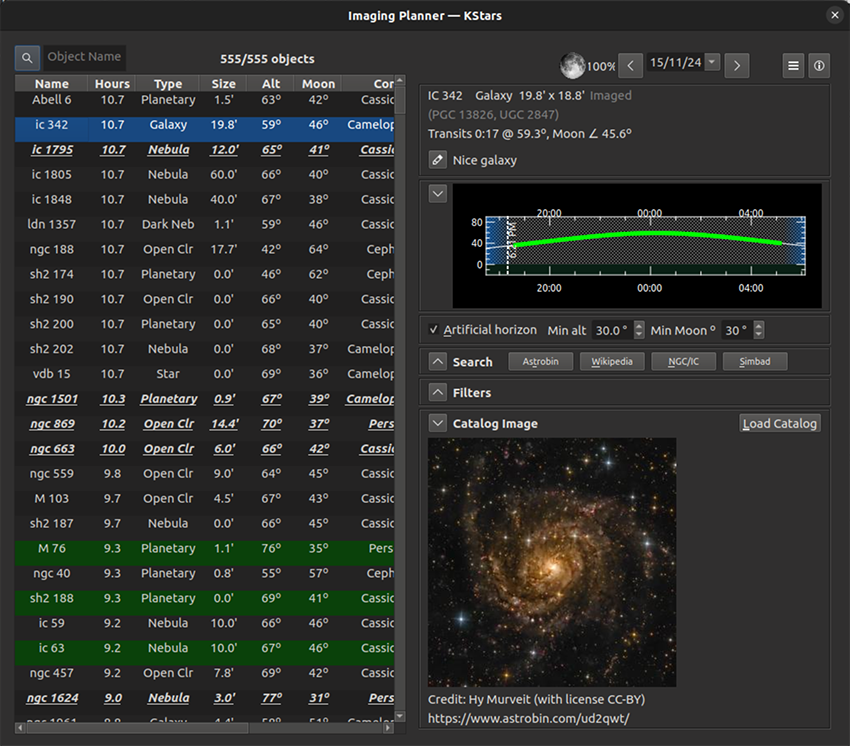
La table des objets
La partie gauche de l'outil est principalement occupée par la table des objets. Elle dresse la liste de tous les objets du catalogue chargé, à l'exception de ceux qui ont été filtrés (voir la section sur les filtres plus bas). Les attributs des objets sont listés dans les colonnes. Les lignes peuvent être sélectionnées et les informations liées comme le graphique d'altitude et une image sont affichées sur la droite de l'outil.
Le tableau est trié par défaut selon les heures d'acquisition. Cliquez sur un en-tête de colonne pour trier selon cette colonne. Cliquez à nouveau pour inverser l'ordre de tri.
Un clic droit (ou Contrôle-clic) sur une ligne ouvre un menu d'opérations licite pour cet objet. Plusieurs lignes peuvent être sélectionnées en même temps (clic puis Maj-clic) puis une action est possible sur les lignes sélectionnées. Les opérations permettent d'ajouter des attributs à l'objet. Les possibilités sont :
Choisir l'objet sélectionné (ou annuler la sélection d'un objet déjà choisi). Vous pouvez sélectionner plusieurs objets à la fois avec un clic puis Maj-clic. Marquer un objet comme choisi permet de n'afficher plus tard que quelques objets choisis plutôt que toute la table. Par exemple, on peut passer du temps à rechercher de nombreux objets et, quand un candidat intéressant est trouvé, le marquer comme choisi pour l'étudier plus tard. Après un moment, une fois qu'une collection d'objets choisis a été constituée, on peut n'afficher que les objets choisis en utilisant le critère de filtrage « Choisi » (voir Filtres plus bas).
Marquer un objet comme déjà photographié (ou annuler cela). On peut à nouveau définir cet attribut et ensuite filtrer pour ne pas les afficher (ou n'afficher que ceux-ci).
Marquer un objet à ignorer (ou annuler cela). Similaire à marquer les objets déjà photographiés.
Centrer l'objet sur la carte du ciel de KStars. Cela ne fait sens que si le centrage automatique a été désactivé dans le menu des options.
Capture d'écran. Opération plus complexe décrite dans la sous-section Captures d'écran ci-dessous.
Les objets marqués comme déjà photographiés sont affichés avec un arrière-plan de couleur différente pour bien les distinguer. Cet outil ne sait pas automatiquement quel objet a déjà été photographié, parce que, par exemple, cela a déjà été fait avec KStars/Ekos. Il faut plutôt explicitement les marquer en utilisant le menu, ou utiliser le bouton
Charger déjà photographiésdans la section des filtres.Les objets choisis sont également affichés différemment. Ils sont affichés en gras et italique et soulignés pour bien les distinguer.
La ligne au-dessus de la table affiche le nombre de lignes dans la table et le nombre total d'objets dans le catalogue chargé. Ce nombre peut être différent si certains objets sont filtrés. Il y a aussi une boîte de recherche permettant de rechercher un objet qui se trouve dans la table.
Captures d'écran
Vous pouvez placer un bel exemple d'une cible envisagée sur la carte du ciel. Il peut s'agir, par exemple, d'une image admirée sur Astrobin. Cela peut aider à cadrer votre prise de vue. Pour ce faire, utilisez la fonctionnalité superpositions d'images. Cependant, vous pouvez raccourcir cette procédure si vous voulez seulement créer une superposition temporaire (le temps de cette session). Une vidéo de démonstration de ce processus est disponible ici et résumée ci-dessous :
Trouvez un grand exemple de l'image à superposer et ouvrez cette page web de façon à la voir sur votre écran.
Revenez au planificateur d'acquisition et faites un clic droit sur l'objet dans le tableau. Sélectionnez l'option du bas
Capture d'écran.Le curseur de la souris se transforme en curseur de capture d'écran. (Appuyez sur
Échappour annuler l'opération.)À l'aide des commandes clavier (pas de la souris), naviguez vers l'image souhaitée, placez la souris dans le coin supérieur gauche, maintenez le bouton enfoncé et faites glisser jusqu'au coin inférieur droit, puis relâchez. Si vous ne savez pas naviguer sans la souris, consultez la section suivante sur la navigation au clavier.
Si tout s'est bien passé, une fenêtre apparaît avec un bouton
Résoudre. Cliquez sur Résoudre. Cette étape peut être automatisée en cochantDémarrer la résolution astrométrique immédiatementdans le menu hamburger en haut à droite de la fenêtre principale du planificateur.Si l'image a été résolue, la carte du ciel devrait maintenant afficher votre image d'exemple correctement positionnée. Vous devrez peut-être zoomer si la vue est trop dézoomée.
Date, heure et géographie
La date d'analyse peut être modifiée à l'aide des zones de saisie de date en haut à droite de l'outil. On peut reculer d'un jour en cliquant sur le bouton à gauche de la date, et avancer d'un jour avec le bouton à droite. On peut également choisir une date arbitraire via le bouton de menu situé près de la date, ou simplement en modifiant le texte de la date. L'illumination de la Lune ce jour-là est affichée à gauche de la date.
L'heure utilisée (par exemple, pour la position de l'objet dans la carte du ciel) et la géographie/localisation utilisées pour déterminer la position céleste de l'objet sont prises à partir des valeurs utilisées dans KStars. Pour changer votre emplacement, allez dans le menu
Configuration→Position géographique. Pour changer l'heure actuelle, allez dans le menuHeure→Régler l'heure….
Options et aide
Il y a deux boutons à droite du contrôle de la date.
Le bouton d'options ouvre un petit menu d'options. Actuellement, le menu contient deux cases à cocher. La première contrôle si le système déplace la carte du ciel de KStars vers les coordonnées d'un objet lorsqu'il est sélectionné dans le tableau. La deuxième détermine si l'outil est une fenêtre indépendante (c'est-à-dire qu'elle peut passer derrière ou devant d'autres fenêtres de KStars) ou si elle reste toujours devant la fenêtre principale de KStars.
Le deuxième bouton, lorsqu'il est cliqué, ouvre ce manuel KStars dans un navigateur web.
Information sur l'objet
La section des informations sur l'objet, située en haut à gauche de l'outil, affiche des informations sur l'objet sélectionné. Cliquez sur un objet pour voir cette section se remplir.
La première ligne doit afficher le nom principal, le type d'objet et la taille de l'objet.
La deuxième ligne doit afficher tous les noms alternatifs de l'objet.
La troisième ligne donne des informations sur le transit et la séparation de la Lune.
La dernière ligne vous permet d'ajouter des notes sur l'objet. Ces informations sont enregistrées de session en session par KStars dans sa base de données MySQL et sont associées au nom de l'objet. Vous pouvez modifier ces notes en cliquant sur l'icône de crayon à gauche de la ligne Note. Si vous ajoutez jusqu'à trois URL dans la note (rappelez-vous d'utiliser http ou https au début de l'URL), elles devraient être automatiquement détectées, et une icône pour les parcourir sera ajoutée à la ligne des Notes. Si la note est trop longue pour la section Informations sur l'objet, vous pouvez toujours voir la note complète en cliquant sur le bouton de crayon.
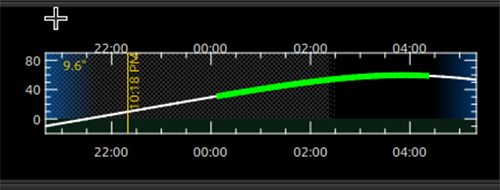
Le graphique d'altitude
L'altitude de l'objet actuellement sélectionné est tracée dans le graphique Altitude en fonction du Temps. Le graphique s'étend de peu avant le coucher du soleil à peu après le lever du soleil. Vous remarquerez un fond sombre pendant la nuit. Vous pouvez également observer un motif hachuré indiquant l'illumination de la Lune en arrière-plan. L'altitude est tracée en blanc, mais une ligne verte plus épaisse est superposée pour indiquer les moments où l'objet peut être imagé selon vos contraintes (voir la section Contraintes d'acquisition ci-dessous). Ainsi, si vous ne voyez qu'une ligne d'altitude blanche, l'objet ne peut pas être imagé. Si vous voyez une ligne verte, ce sont les moments et altitudes où l'objet peut être imagé. Si vous cliquez sur le graphique, vous verrez l'altitude de l'objet sélectionné affichée dans le coin supérieur gauche du graphique.
Dans la capture d'écran du graphique ci-dessus, l'axe X correspond à la nuit entre environ 20h30 et 05h30. La ligne blanche représente l'altitude de l'objet sélectionné (NGC 6384, non affiché). La ligne verte vive superposée indique qu'il est imageable d'un peu après minuit jusqu'à environ 4h20. Le fond bleu de part et d'autre du graphique correspond aux moments juste avant et après le crépuscule astronomique. Les hachures indiquent la présence de clair de lune entre le coucher du soleil et presque 2h30. L'utilisateur a cliqué sur le graphique là où (sur l'axe X) il était 22h18, et à ce moment l'altitude de l'objet était de 9,6°.
Contraintes d'acquisition
L'outil de planification d'acquisition calcule quand, pendant la nuit, les objets peuvent être photographiés. Plusieurs contraintes affectent ce calcul. Certaines sont définies dans cet outil, et quelques-unes sont des paramètres de KStars/Ekos qui peuvent nécessiter des modifications.
L'altitude minimale en degrés à laquelle un objet peut être photographié est indiquée dans la case Min alt. Si vous changez cette valeur, vous devriez voir la colonne des Heures recalculée dans le tableau des objets, ainsi que le graphique mis à jour dans la section Informations sur l'objet.
De manière similaire à l'altitude, vous pouvez modifier l'angle minimal de séparation de la Lune en degrés.
Si la case horizon artificiel est cochée, alors les contraintes de l'horizon artificiel sont utilisées pour calculer les temps d'acquisition possibles. L'horizon artificiel représente les parties du ciel obstruées par des bâtiments, des arbres ou similaires à l'emplacement de votre télescope. L'horizon artificiel est configuré ailleurs dans KStars (voir Menu de Paramètres et descendre jusqu'à
Configuration→Horizon artificiel) et dans sa forme la plus simple, il s'agit d'une liste de valeurs d'azimut et d'altitude. Si vous utilisez cet outil et que vous photographiez depuis une zone où une partie importante du ciel est obstruée, il est recommandé de configurer et d'utiliser la fonctionnalité de l'horizon artificiel. Associée à l'horizon artificiel, il y a la fonctionnalité de terrain de la carte du ciel. Si vous configurez votre image de terrain, alors lorsque l'outil de planification d'acquisition affiche l'objet sur la carte du ciel, vous verrez où il se trouve par rapport à votre environnement local. Bien sûr, vous devrez définir un temps d'acquisition réaliste, c'est-à-dire, si vous planifiez pendant la journée et que l'outil localise les objets à l'heure actuellement réglée, l'objet peut être obstrué par des bâtiments ou des arbres.KStars/Ekos utilise les heures de crépuscule astronomique pour contraindre les temps d'acquisition. En utilisant les valeurs par défaut, aucune acquisition ne pourra être effectuée en dehors des heures de crépuscule astronomique. Si vous souhaitez ajuster cela, consultez la contrainte dans le menu Décalage du planificateur Ekos - changez le Décalage du crépuscule (Dusk Offset) en positif pour commencer l'acquisition plus tard, et en négatif pour commencer plus tôt. De même, modifiez le Décalage de l'aube (Dawn Offset) en positif pour continuer l'acquisition plus longtemps, et en négatif pour l'arrêter plus tôt. Ces contrôles se trouvent en sélectionnant
Outils→Ekos, puis en cliquant sur l'ongletPlanificateur(le deuxième à partir de la gauche), en cliquant sur le boutonOptionsen bas à droite, et l'ongletdécalageen haut à gauche.
Recherche d'image/objet
La section
Recherchefournit des raccourcis pour rechercher l'objet actuellement sélectionné. Le boutonWikipédiaouvre une fenêtre du navigateur vers Wikipédia en utilisant l'identifiant de l'objet. Similaire pourSimbad. Le boutonNGC/ICouvre une fenêtre du navigateur pour le site Internet du Professeur Seligman NGC/IC.Le bouton
Astrobinutilise la fonctionnalité de recherche d'Astrobin.com pour effectuer une recherche d'images légèrement plus détaillée. Vous pouvez lui faire rechercher des images dans Astrobin avec un certain rayon d'image, et exiger que les images obtenues aient remporté des « récompenses Astrobin », comme la nomination « top-pick » ou l'image du jour. Une fois que vous naviguez sur le site Internet d'Astrobin, vous pouvez bien sûr modifier les contraintes de recherche d'Astrobin comme vous le souhaitez, en fonction des contraintes et capacités du site Internet d'Astrobin. Les contraintes de recherche d'Astrobin peuvent être masquées ou affichées à l'aide du bouton à gauche de la ligne « Recherche ».
Filtres
Il existe plusieurs façons de filtrer les objets affichés dans le tableau des objets du planificateur d'acquisition. Le filtrage des objets les retire du tableau, mais ils peuvent être retrouvés à nouveau en modifiant le filtre. Notez que la section des filtres peut être masquée ou affichée en cliquant sur le petit bouton à gauche de la section des filtres.
Les objets peuvent être filtrés en fonction du nombre d'heures pendant lesquelles ils peuvent être photographiés cette nuit-là. Modifiez la valeur dans la case
Min Heures, et les objets avec moins d'heures que cette valeur ne seront pas affichés.Cocher ou décocher l'un des types d'objet fera en sorte que les objets de ces types soient affichés ou non.
La sélection de « Choisi » affichera uniquement les objets « choisis ». De même, la sélection de « Non choisi » affichera uniquement les objets marqué comme non « Non choisi »». Cocher « Peu importe » dans la ligne « Choisi » rendra l'état « Choisi » sans importance dans le filtrage des objets du tableau.
Similaire à « Choisi », « Photographié » permet d'afficher ou non les objets étiquetés comme ayant été précédemment photographiés.
Ignoré permet d'afficher ou non les objets étiquetés comme « Ignoré ».
La recherche par mot clé à l'intérieur des notes que l'utilisateur a ajoutées à l'objet, et renvoie « VRAI » si un mot de la note correspond au mot clé (voir la section Information sur l'objet ci-dessus).
Le bouton
Charger déjà photographiésdans la ligne « Photographié » de la section Filtres permet de charger un fichier déjà photographié. Ce fichier est une simple liste de noms d'objets, un par ligne, que vous pouvez construire et charger. En chargeant ce fichier, l'outil se souviendra de ces noms d'objets et les marquera comme déjà photographiés lorsqu'il les rencontrera. Si vous souhaitez annuler cette action, il vous suffit de définir les filtres pour n'afficher que les objets photographiés, puis d'utiliser le menu contextuel (clic droit/contrôle-clic) pour définir les objets souhaités comme non photographiés. Vous pouvez accélérer cela en sélectionnant plusieurs objets à la fois en utilisant la technique du clic puis du clic avec Maj.
Image de l'objet
Si disponible, une petite image de l'objet actuellement sélectionné est affichée. Cliquer sur l'image, la ligne de crédit de l'astrophotographe ou la ligne URL ouvrira un navigateur avec le lien fourni vers l'image complète, si un lien a été fourni.
Notez que le bouton
Charger un catalogue…se trouve également dans cette section.
Configuration de KStars pour le planificateur d'acquisition
Il existe plusieurs façons de configurer KStars pour améliorer votre expérience avec cet outil.
La première chose à faire est d'aller dans
Données→Télécharger de nouvelles données…et télécharger un catalogue associé à cet outil. La première fois que vous utilisez cet outil, vous devrez cliquer sur le boutonCharger un catalogue…et charger le catalogue téléchargé. L'outil devrait automatiquement télécharger le catalogue lors des exécutions suivantes.Une autre chose importante à faire si vous utilisez une version antérieure de KStars (avant la 3.7.6), également dans le menu
Données→Télécharger de nouvelles données…ci-dessus, est de télécharger certains catalogues d'objets du ciel profond. En particulier, les catalogues NGC IC, OpenNGC, Sharpless, Abell, Lynds et Hickson seraient utiles. Vous pouvez utiliser le planificateur d'acquisition sans ces téléchargements (petits fichiers), mais le temps de démarrage la première fois que vous utilisez cet outil sera beaucoup plus long si vous ne les téléchargez pas.Lisez la section des Contraintes d'acquisition ci-dessus et suivez les suggestions qui y sont présentées, afin que cet outil puisse mieux prédire combien de temps un objet peut être acquis durant la date sélectionnée.
Les objets sélectionnés peuvent être automatiquement centrés dans l'affichage de la carte du ciel. Si cet affichage est utile, vous pouvez ajuster le zoom afin qu'il soit proche du champ de vision de votre appareil d'acquisition. Les éléments ci-dessous s'appliquent également à cet affichage de la carte du ciel.
Vous pouvez également définir l'heure dans KStars pour refléter quand vous effectuerez l'acquisition. Voir le menu Heure.
Si vous ne définissez pas l'heure, vous voudrez peut-être masquer l'affichage du terrain (si vous l'avez configuré) et ne pas afficher le sol, car ceux-ci peuvent masquer l'objet. Vous pouvez afficher et masquer le terrain dans le menu d'affichage, et le sol peut être désactivé dans
Configuration→Guidesavec la case à cocherSol opaque.Si vous utilisez une carte du ciel reposant sur HiPS, vous voudrez probablement des copies locales des données DSS pour accélérer le rendu de la carte du ciel. Veuillez consulter
Affichage→Totalité de l'étude du ciel avec HiPSet sous ce menu,Paramètres HiPS…→Cache, activez le cache et saisissez l'emplacement de votre copie locale des données. Les données sont disponibles sur https://irsa.ipac.caltech.edu/data/hips/CDS/DSS2/color/Norder1 … /Norder7 et une autre ressource est https://coochey.net/?p=699.Il serait utile de créer un symbole personnalisé « FOV » pour la carte du ciel, identique au champ de vision de votre appareil d'acquisition. Allez dans
Configuration→Symboles de champ de vision, puis sélectionnezNouvelle→Appareilet saisissez la longueur focale de vos optiques ainsi que les spécifications de la caméra.Vous pouvez ajuster le thème de couleur, par exemple dans
Configuration→Thèmes, en choisissant « Black Body » si vous aimez les thèmes sombres.
Catalogues
KStars fournit actuellement un seul catalogue de planification d'acquisition via l'élément de menu
Données→Télécharger de nouvelles données…. L'espoir est qu'il y aura de futurs catalogues spécialisés, et éventuellement des catalogues générés par les utilisateurs. Par conséquent, le catalogue est formaté de manière lisible pour l'homme.
Format du catalogue
Le format est actuellement un fichier séparé par des virgules avec un objet par ligne.
La première colonne est un identifiant d'objet, un type d'identifiant qui fonctionne avec l'outil Trouver un objet de KStars.
La deuxième colonne est un nom de fichier (par rapport à l'emplacement du catalogue) où une image approximative de l'objet en jpeg 300x300 peut être trouvée.
La troisième colonne est le nom du photographe de l'image.
La quatrième colonne est un lien vers une version plus grande de l'image.
La cinquième colonne est la permission de licence Creative Commons pour utiliser l'image (par exemple, « ACC » signifie « Attribution Creative Commons », « ANCSACC » signifie « Attribution Non-Commercial ShareAlike Creative Commons », en utilisant les mêmes conventions que le site Astrobin.com).
Pour ajouter un objet sans image, il suffit d'ajouter l'identifiant de l'objet sans virgule suivante, ou un identifiant d'objet avec 4 virgules suivantes, comme l'une de ces lignes (sans guillemet) : « M 42 », ou « M 42,,,, ». Un exemple de ligne complète pourrait être : « M 42,M_42.jpg, Hy Murveit, https://www.astrobin.com/x4dpey/, ACC ».
Il existe quelques autres lignes spécialisées possibles :
Les lignes commençant par # sont des commentaires.
Les lignes contenant « LoadCatalog RELATIVE_CATALOG_FILENAME » signifient que le contenu de « RELATIVE_CATALOG_FILENAME » doit être lu comme s'il faisait partie de ce fichier de catalogue.
Si vous voulez ajouter vos propres objets au catalogue existant, vous pouvez le faire en créant votre propre catalogue, par exemple sur votre bureau dans un fichier au format
.csvet en incluant la première ligne avec le catalogue existant et une ligneLoadCatalog, puis en listant vos nouveaux objets dans les lignes suivantes. Utilisez ensuite le boutonCharger un catalogue…sur votre nouveau fichier.csv.
Chargement des catalogues
Les catalogues téléchargés via
Données→Télécharger de nouvelles données…sont enregistrés dans le dossier des données standards de KStars. Cependant, les catalogues peuvent être lus depuis n'importe quel emplacement.Utilisez le bouton
Charger un catalogue…du planificateur d'acquisition pour charger un nouveau catalogue.Lorsqu'un catalogue est chargé, le catalogue précédent est supprimé.
Lorsque l'outil démarre, il charge le dernier catalogue chargé lors de la session précédente.